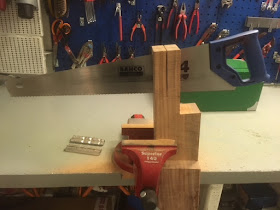
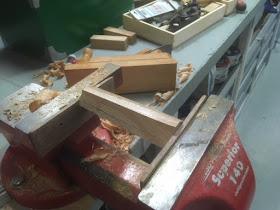
The weather is incredibly bad at the moment, with forecasts of a hurricane (named Ylva) coming sometime tomorrow on the Norwegian west coast. Wind speeds are predicted to be around 50 m/s (112 mph).
At the moment we are a bit south of the places that are expected to be hit the worst, but guess who is scheduled for sailing north this morning?..
We have already strong winds and high waves, but making a handle isn't the project that requires the biggest amount of accuracy.
I wanted to use a bit of my bubinga, and There was a part left on one of the large pieces that was just the right size for my purpose.
My initial idea was to saw of this end and then rip it to make the handles, but I decided that it was probably going to be a lot easier to rip the part first, and then saw it off. I had decided on a length of 11 cm which is something like 4 and 3/8".
Once I had four small pieces all approximately the same size, I squared one of them up a bit using a plane. two of the sides plane nicely and two sides don't. It is really some strange grain, and I had a bit of tear out. It isn't a plane tote, so I can live with a less than perfect surface, because it is not a tool that will be handled over a long period of time, so the chances of getting blisters by it are close to non existing.
I eyeballed a pleasing taper and planed it without too much trouble. The fat end of the handle is something like 1 1/8" and the thin end is approximately 13/16"
With a square tapered shape, I drew some lines with a pencil on each corner to define the octagonal shape. It is not an equal sided octagonal, but It doesn't have to be.
I planed down the corners and once I was happy with the result, I flattened the end with a file, so the piece stood up straight.
I marked out the center in the thin end and drilled a hole the size of the tang of the drawbore pin.
The edges of the fat end were then chamfered using a chisel, and finally the handle was sanded. When I used my fingers as backing for the sand paper, I was able to smooth down the small pieces of tear out that were left on the sides.
I only made one handle today, but since I didn't find any major obstacles in my course of action, I think that I can make the remaining 3 tomorrow if the weather permits it.
The drawbore pin has not been hardened yet, so I didn't mount the handle.
Octagonal handle next to drawbore pin.
Ripping.
Removing the corners.
Octagonal handle.
Chamfered end.


In my Navy career I rode out 3 hurricanes. Two in a sub and one on a ship. Nothing beats rolling around in big seas to make you feel really insignificant in the universe. Be safe if you have to go on deck.
ReplyDeleteHi Ralph
DeleteThank you.
I agree that there are few things like a hurricane to let you know your place in the greater scale of the universe (and it ain't the top dog place..)
We might just be lucky to miss out on the worst part, because we have to sail to shore for refueling before heading north according to the latest plans. So with a bit of luck we'll just see and feel the tail of the hurricane.
Brgds
Jonas
Jonas,
ReplyDeleteI know you know about using the cap iron to control tear out but just a reminder to check the setting of the cap iron to where the cutter just shows a thin reflection of light. I worked some Sapele a couple of weeks ago and the cap iron saved my bacon.
I've been through a couple on land and have no desire to do it at sea. Hope it stays North of you.
ken
Hi Ken
DeleteThanks for the reminder on the cap iron. I actually think it is set too far back, so that might be the problem.
But The wood is behaving strangely. On this narrow piece there the left 3/8" and the right 3/8" will plane nicely, but the 1/4" between those two tore out like 100 % reversed grain.
But I'll use your suggestion and try to see if it will help when I make the remaining 3 handles.
Hurricanes are one of those things that look best in the old movie "Yellow brick road" Though I must say that the witch used to scare me a bit when I was a child.
Brgds
Jonas
I really like that shape. I like the feel of an octagonal handle like that better than a round one, especially on a tool that needs to be turned with your hand.
ReplyDeleteDoes the pin really need to be hardened? Will you do that on board, or wait until you get home?
Hi Brian
DeleteI think it came out pretty well too, and I agree completely on that if the tool has to be turned, it is hard to beat this shape of handle.
I don't think it is really necessary to harden the pin, but we have a Map torch that should be able to do the job. I just have to find the time to do so. My plan is to do it outside on the deck, to avoid having to disengage the fire alarm system.
Brgds
Jonas
Doing it on deck during the hurricane should mitigate the risk of setting the ship on fire.
DeleteYou might not believe me, but I actually planned to do it someday with calm weather..
DeleteJust once in a while I try to do the sensible thing, admittedly not very often :-)
Cheers
Jonas
Man those look great. Safe travels and stay dry.
ReplyDeleteChris
Hi Chris
DeleteThanks a lot. So far we are staying clear of the storm, but the northern part of Norway are hit pretty bad.
Brgds
Jonas
Heavy duty drawbore pins:
ReplyDeleteThis carpenter call the drawbore pin "podgers":
https://www.castleringoakframe.co.uk/blog/
(see pictures in the blog " the Bromyard balcony")
https://www.urbandictionary.com/define.php?term=Podger
Sylvain
Hi Sylvain.
DeleteThanks a lot for the links.
Now I have even managed to find a company in England that make podgers for sale. They look exactly like the ones in the blog post.
I think I'll have to wish for some of them for Christmas.
Brgds
Jonas
All I can say is, Beautiful work sir!
ReplyDeleteThanks Bill,
DeleteThose are grand words for this little project.
I can clearly feel that we are back to "working" again, much more sailing and only a little time after a watch to go on with the project. So I am glad that I managed to make the infill plane while we were in port in Africa.
Brgds
Jonas