Showing posts with label Barn. Show all posts

Wednesday, September 15, 2021

New gable on the barn completed

After a long period with fantastic weather, I decided that I'd better pull my act together and complete the gable before I would have to do it in rain and wind. 
I am not sure why I didn't really feel so excited about this job since normally I like to do carpentry jobs such as this one. 

Nevertheless I got the last boards installed, and managed to make a decent closure of the upper part of the gable too. That one had to be a bit different due to some of the original framing of the barn extending farther out than the rest. 

I applied some zinc drip edges on top of the doors and on top of the lower part of the opening for the sawmill, to prevent water from entering the end grain of the wood.

Since the boards were planed and not just rough sawn as they would have been if I had milled them myself, I found some oil based paint in the standard Swedish red colour. Painting didn't take much time, and it all suddenly looked a whole lot better. I have to admit that it could use a second coat, but I can do that some other time.

I still need to install some plywood on the inside, as Gustav and I had decided when we started the project. The idea is that we can each paint our logo on the plywood, and that should hopefully look good.


Completed gable at the North end of the barn


Friday, August 20, 2021

New gable on the barn

 When I returned home from sea this Monday, Gustav suggested that we did some work on the northern gable of the barn.

The barn was originally designed so that you could drive straight through it, and unload all the grain in the middle where there was a pit and a grain elevator. Being of this design meant that both ends had large barn doors.

The southern one I replaced probably 10 years ago, but since the northern part ends in the paddock for the horses, making a new gable hasn't been high up on my list.

Gustav suggested a rather elaborate design where the inside would be covered in some thin plywood, so we would have a place to put our logos, and I couldn't really argue about that. Instead of the old one piece door, we are making it like a wall with a regular door and a double hatch to allow logs to be loaded onto the sawmill. It will be a major improvement over the old system, where I had to squeeze myself through the same hole as the logs, and I couldn't close up that hole, meaning that there was a lot of draft through the barn.


Sunday, June 2, 2019

A small barn for the summer house 17, laying tiles on the roof.

Though it might not seem that way, I do occasionally still work on the small barn at our summer house.
I have completed the interior cladding of the walls, and also completed painting the outside.

Last year I wanted to install the tiles on the roof, but I never took the time to do so, instead I built some nice hydroplanes with the boys, and I think that was a great idea.
The month of April this year was fantastic regarding the weather. So I jumped at it and started cleaning mortar of the old tiles from the house. I have been saving all those tiles since 2013, when we installed a new roof at home.

The tiles are as old as our house which means that they were made in 1924. They are of a much better quality than most of the tiles available today since they are burned harder than today's tiles.
A drawback is that they do not comply with any of the available fixation systems. Back then they were secured from the inside of the attic using some heavy gauge iron wire similar to what was used for fencing the fields.
That would still work if I had an accessible attic. But since I have decided to make a sub roof with tarred paper, the tiles are not accessible from the back.

Instead I resorted to drilling a small hole in the top of each tile, and then I fixed them with a screw directly to the lath. That will ensure that they don't blow off in the event of heavy winds.

Laying the tiles was more arduous than really difficult, and I finally found out what the correct spacing should be, so I know that when I start on the second side of the roof.

When I go to the summer house, I usually do so in the morning after tending the horses. Mette and Asger (the only child at home at the moment) have both left for work and school at that time, so after letting the horses out, I put the leash on Bertha and lifts her into the passenger front seat of the green Volvo Valp.
We then drive down to the small shop in the village and I get out and buy a package of sausages or some pork, a loaf of bread and maybe some milk.
As soon as we get to the summer house, I put the groceries in the refrigerator, and then lifts out Bertha and we go for our regular morning walk. It is maybe one and a half mile, so it isn't that long, but there's plenty of deer tracks for Bertha to examine and there's also a canal which she will swim in regardless of the temperature.

Back at the summer house I'll start working and around noon I'll light a fire in an old type grill. I then roast sausages or pork and Bertha and I helps each other eating it while I sip a cold beer.

Around 3 I'll pack up and head home so there's someone to greet Mette and Asger when the workday/school day is over.

It might not sound like a big deal, but to me those days are reinvigorating. The only problems Bertha and I face in the summer house are that the local squirrel population are decidedly unsportsmanlike. They will occasionally appear and then clear off into the treetops - Now that is hard for a Newfoundland dog to understand and accept.

Putting tiles on the roof.

This is the sort of thing that will lower my blood pressure.


Bertha is patiently waiting for the food to get ready.


Thursday, November 9, 2017

A small barn for the summer house 16, staircase installed.

After preparing all the individual steps of the staircase, I hand planed them front and back plus the upside before mounting them in the stringers.
I had to keep reminding myself that it is for a barn, so I shouldn't go all wild in trying to achieve some show surface on the underside.
Mounting the steps was straight forward. But as I discovered, doing this on top of the workbench wasn't a smart idea.
I had to apply a couple of clamps to keep everything together so I could lift it down to the ground where I would be able to hammer in some nails.
A little bit of forward thinking would have been nice here.. (but that is not my strongest card).

I hammered in one nail per step, and then turned the assembly over so I could square it up before pounding in the nails from the other side.
When I had bashed in all the nails on that side I again flipped it over and hammered in the last set of nails on the first side. My idea was that if I had put in both nails in the first side straight away, it might have been more difficult to square it up.

The individual steps were sawed flush to the side that will be facing the wall, and sawed at an angle to the side facing the room. This is something I have seen on most old stairs, and I like the subtle elegance of this ornamentation.

The completed staircase was loaded into my trailer and I drove it to the summerhouse.
While maneuvering the assembly out of the shop I became aware that it wasn't very easy to move around single handed. But I managed in the end.

At the small barn, I mounted the assembly by means of a bit of ingenuity, a cargo securing strap and a couple of clamps.

As per Mettes suggestion, I have wrapped up the barn project for this time, since I'll be heading back to work in a weeks time.


The installed staircase.

Mounting the steps in a stringer.

This would have been smarter to do at the floor.

Flipping over the assembly.

The only decorative elements of the staircase.


Progress on the attic.

Tuesday, November 7, 2017

A small barn for the summer house 15, work on the staircase and a small setback.

There isn't much to be said about the work progress at the small barn, installing all those boards takes a longer time than I anticipated while sitting on the ship. I had the unrealistic idea that I could install them all in a matter of a couple of days. That has not been the case. I'll admit that I haven't worked exceptionally long hours out there.
Instead I have taken my time in the morning, driven out there slowly. Taken Bertha for a long walk along the shore before making a pot of tea. And then I have started on the actual work. I have generally tried to stop around 2-3 P.M. to be home in the afternoon with the children.
Today I hope to be able to install some of the last boards, and then I'll see if I can complete the staircase.

The small setback occurred Sunday afternoon. I was supposed to drive to Viborg to pick up Asger from a goalkeeper camp, and I decided to take the green Volvo Valp. I had to bring some large boxes for my older brother, and Mette wanted to use the regular Volvo to pull the horse trailer so she could ride in the forest with a friend.
I have changed the ignition coil, the points and the capacitor on the green Valp, and it ran like a sewing machine. All the way till I reached the middle of Sallingsundbroen (the main bridge leading to our island). At that point the engine suddenly died completely.
After testing the starter button, I found that the engine could turn, but it turned much faster than normally. I then tried to look into the rocker arm cover by removing the oil filler cap - and nothing moved at all in there.
These old Volvo engines haven't got a timing chain or a timing belt. Instead they operate with timing gears. The middle gear is made out of some sort of fiber and does not last forever...
After checking with an old mechanic who's a friend of mine, he said that nothing is damaged inside the engine when this occurs. So I just have to order a new set of timing gears and replace them. I think that might be a job for the next time I am home.

Following the advice of Nathan Simon, I used a framing square for the lay out.

View from the bridge (to the North).

View to the East.

Wednesday, November 1, 2017

A small barn for the summer house 14, starting on the staircase.

In the evenings I have tried to start out on the staircase for the  small barn. The work is not very efficient, since both Gustav and Asger have started some projects in the shop too. I try to help them out, and once they are tucked into bed, I'll have something like an hour where I can use the shop by myself.
I have milled the steps, and they are pretty close to the thickness of the floor boards (1.75"). The two longitudinal parts of the staircase (I have no idea what the correct English word is?) Are a bit thinner. I would have liked them to be the same size, but the two boards that I had of the correct width were fairly twisted, so it took some thickness to get them flat and level. I suppose that I could have milled some new boards, but they would not have been as dry as those, and they finally ended up something like 1 3/8" which I think will be strong enough.

I have been looking as Das Zimmermannsbuch  for some inspiration, and they suggest that for the more modern approach you should attache the steps by means of sliding dovetails.
An older and simpler method is to just use a groove and either make a tenon on half of the steps or secure the steps by means of nails. I think that I'll go with the groove and nails model. Because the barn is supposed to be kept a bit simple.

Right now I have had to devise some special workholding, in order to be able to joint the edges of the longitudinal parts.
10' is a bit too long for my workbench, but perhaps that could justify building another and larger one?

There will be very 8" in height difference between each step, and the angle of the stairs will be 58 degrees. So it will be a fairly steep staircase, but this is to avoid that it will take up too much space in the relatively small room of the barn.

Asger sanding a cutting board. Gustav's apple crates are in the background-

My co-driver Bertha sniffing the fresh autumn air.


Workholding of the long parts of the staircase.


Monday, October 30, 2017

A small barn for the summer house 13, internal boards.

I have been making some progress on the internal boards for the small barn.
Those were the boards that I had to shift inside as I was called to work a week earlier than anticipated.
So the first task was to shift all of them out again. I decided that I could work around the table that was inside, but I still needed to move the chairs and a bit of other stuff outside before starting the actual work.

The boards are the same type as those that were put on the sub roof. It is not a typical type of boards to use for internal paneling/boards, but it is of a much better quality than the regular type used. In Denmark the usual boards to be used would be something called "rustic boards". They are made out of the surplus Christmas trees that grew to fast so they were too large to sell. The distance between the growth rings is typical 3/8" or thereabouts, so the wood is of an exceptionally poor quality. The shape is like a tongue and groove board with the tongue something like 1/2" too long. So once the boards are mounted, there is a trench between each board. They are available in various widths and either nature, or artificially whitened, smooth or rough sawn.
But that aside - I chose the other type because I think they look better in a classic barn, and they were actually cheaper per square meter (or square foot if you like).

I mount the boards using regular nails. I know that a pneumatic nail gun is faster, but I actually like to hammer in nails, so I go for the slow and old fashioned way.

Once all the boards are mounted, I plan on putting some strips of wood in the corners and around the window sills, to cover the gaps.


Internal boards mounted.

The "famous" stack..


Sunday, October 15, 2017

A small barn for the summer house 12, progress and plans.

I am getting ready to go home now, and one of the things that I always think about during the last days on board is what projects I would like to be able to work on when I get home.

By checking my blog I discovered that I hadn't made entries about the small barn that I am building at our summerhouse since late March.
That doesn't mean that I haven't been working on it., but rather that I have been too lazy to blog about it while at home.

In the early part of summer I started painting the barn, but the weather wasn't very cooperative, so basically I only got as far as to do the south gable and the underside of the roof on that gable plus a bit on the west side as well.

I also made a door and installed it. I never got around to install boards around the door though, but I can do that later since they are mainly decorative.

Last time while at home I sawed some more floor boards and sent them through the planer a couple of times, so they were the same thickness as the floor boards on the ground floor. (1.75"). Those boards were all installed on top of the beams to form an attic.
I used the same method as last time, with a handheld router making a groove in both boards, and then assembling them with a loose spline.

After completing the floor, the last two windows were installed in the gables.  Then I insulated the entire structure with 6" of rockwool. I know that a lot of people dislike insulating, but I actually enjoy it. It is very quiet, and there are quick results to be seen.
I think that the mineral wool of today is less dusty compared to what it used to be, so it doesn't bother me to do that job.
A funny thing to notice is how the sound changes when the walls are only bare insulation. It becomes very "dead".

I had purchased 882 board feet of 1" thick T&G boards that was going to be installed inside the barn, they were delivered to the site and I was just getting ready to start installing them - when the crewing coordinator of the company called me on the phone and asked if I had seen my email.
I hadn't at that time, and told her that I had checked in the morning, and there was nothing from her.

She paused and said: No, I mean the one that I sent you an hour ago. I again told her that I hadn't checked, but since she was calling she might as well tell me what it was about.
Oh, you are signing on tomorrow, and it was just the flight details, letter of guarantee etc.
???
NO WAY, am I going on board tomorrow! You sent me an email like three weeks ago, and in that email you stated that I should expect to sign on around the 19th of September (this was on Monday the 11th).
Let me see she said, and I could hear her tapping her keyboard and finding the old email. Dead silence for a couple of seconds. Oh yes, I can see that. But that was a mistake. So you are still going out tomorrow!
I tried to explain that I was not impressed with the level of planning, She started explaining that the agent in Guinea had been advised about my coming, and a helicopter trip had been arranged too etc. I then managed to ask in a polite way if I at least had an afternoon flight from Denmark. But nope - My plane was scheduled to leave from Aalborg at 06:00, t
So I had 15 hours left.
I told her that if that was the case, I didn't have any time left for chit chatting, and hung up.

I took a quick look around and started shifting all the boards into the barn so they would be protected from the weather. Cleared up the place and drove home with the surplus of insulation. Emptied the trailer for insulation and stacked it in the large barn at home. Emptied the car for tools, cleared up the mess at home (which I usually do quietly and calmly the last couple of days before leaving).
Ate some supper and packed my bags with the small toolchest and arranged for a taxi to pick me up in the middle of the night. I was still not impressed, but things such as these are the downside of being a seaman.

BUT now I am soon on my way home, and I hope to be able to install all those boards so the interior of the barn will be completed.
I have considered painting the interior white, I guess it will never be easier than when the structure is empty, plus I think that it will look good.

Another project that I have been looking forward to in a long time is to make a staircase for getting up to the attic of the barn.
I guess that a lot of people have a hard time understanding that you can look forward to such a project, but I hope that those reading this post will understand that feeling.
My plan is to make a fairly simple staircase. It will also be rather steep because I don't want it to take up too much room inside. A staircase to me represents one of those projects that are just in the borderland between carpentry and joinery. Large dimensions of stock and still the joints have to be laid out and executed with a lot of care. Yup, that is definitely going to be a rewarding project.

Depending on if the weather will be nice, which it probably won't, I could also continue with some painting outside, and perhaps mount the framing boards around the door and the window in the gables. I could also do the electrical wiring so the inside will be completed, but let's see how it all goes.


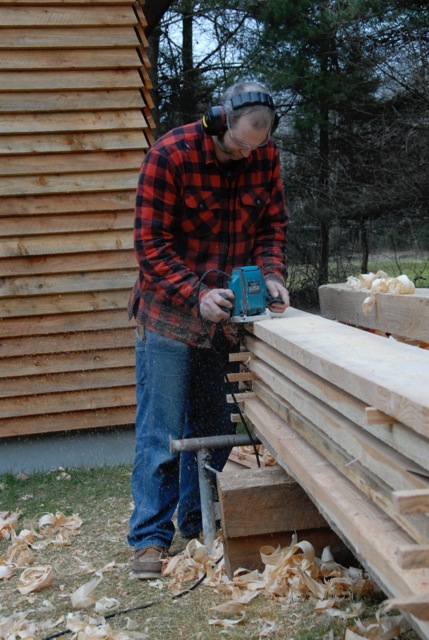
Painted end of the barn, working on a floor board.


Wednesday, March 29, 2017

A small barn for the summer house 11, windows installed.

In the previous week, I went to the summerhouse for completing the floor. I had gotten the hang of it, and I really wanted to proceed with installing the windows as soon as the last board was nailed down.

When I brought the windows with me, I had only one floor board left to install. I had made some wooden shims to be used for the window installation, and I looked forward to doing it.
After completing the floor and celebrating this with a cup of tea, I discovered that I had left all the shims at home..
So no window installations that day after all.

I test fitted a window, and could see that I needed some slightly thinner shims, so I made those when I got home, and put them in the car straight away. I also made three boards with and angled cut on one side to mount over the window frames once these were installed.

The installation itself went really smooth. The outside of the window frame is installed flush with the outside of the exterior cladding of the barn. 
Some boards were then installed as trim, and on the very top is the board with the angled cut, now functioning like a very small overhang roof.

Since I haven't installed the floor for the attic yet, I didn't install the windows for the gable. My plan is to push the floor boards through the hole before installing a window, and thus avoiding to scratch the painted frame. A floor will also give me something to stand on while I install the window, making it a safer operation than balancing on a ladder or tip toeing on the rafters.

Gustav and I worked a few hours out there Saturday and Sunday too. Gustav downed a couple of trees with a chainsaw, and I cleared up a lot of the debris left behind from the floor installation, and swept the floor inside.

I also started on installing the corners and the trim for covering where the cladding meets the underside of the roof. 

There is still a lot that needs to be done before the barn is complete, but I am enjoying every minute of the project. In no particular order are: A new door including a frame. A floor for the attic, a staircase for the attic, insulate the walls. Install boards for the walls and ceiling. Install the remaining windows. Finish the outside trim. Paint the barn. Install the roof tiles. Etc.


Window installed and left corner covered.

The completed corner.

View through the door.

Thursday, March 16, 2017

A small barn for the summer house 10, laying the floor.

After I had painted the windows, I have been busy trying to get some work done on the floor of the small barn. My goal is to get the windows installed and thereby freeing some space in the workshop that will then be used for making some obstacle holders for horse jumping. But that is a bit into the future.
I sawed some 1/2" thick boards on the saw mill that I installed between the joists. These boards are only there to hold the insulation, so they won't carry a lot of weight.
The insulation was added (6"), and a plastic membrane was mounted on top. I am not quite sure that it is needed since there will not be much human activity in the barn to breathe out humidity, and besides it also shields the insulation a bit while I am working on the floor itself.

The floor boards are 1 3/4" thick and are joined by means of a loose tongue.
I have finally gotten around to using my Veritas BU jointer that I bought some years ago at a great price. I use it to joint the edges of the boards before I make the groove for the tongue.

The upper corner is planed off with two swipes of the block plane, so it is just a tiny bevel that will keep splintering to a minimum.

The groove is made with an electric router. A year ago I finally had it with my old router and forked out some real cash and got myself a more professional Makita router. That thing is so much better than the old one, it is easier to hold, it can actually retain the cutter in the desired position and it does a quick job of making a groove.

Due to the width of the boards I am installing them with nails through the top instead of using hidden nails or screws.
I would have liked to use headless nails like I used for the porch, but those are not available in 5.5" so that is why I am using regular nails. They look a bit crude, but it is a barn after all.
They are mounted 5/4" form the sides of each board, and if the board is very wide I also put a nail in the middle as well. To keep the heads aligned, I am using a piece of string to mark out the position.

Olav stopped by today and gave me a hand, and also took some pictures. So all the pictures of today are by the courtesy of Olav.

Hammering.

Hammering. 

Floor boards on the right, Merlin half way hidden.

Veritas BU jointer with fence, now in use!

The board is clamped to a 5x5 to be able to stand on an edge.
 
Beveling the edges of the groove. 

Larch floor board prior to grooving.

Cross cutting. 

Grooving with the Makita.

A router is noisy and dusty but fast.

Merlin is supervising the project.

A finished board with grooves.

Monday, March 6, 2017

A small barn for the summer house 9, painting the windows.

After preparing all the individual pieces for the windows, they were assembled. I used a plane for adjusting the size to a pleasing reveal all around each one of them.
The flat parts of each window were also smoothed with a plane, to ease any small differences from the manufacturing.

I consulted Olav for some advice, and he suggested that the traditional way to go would be to coat the rabbet for the glass twice with shellac prior to painting and adding glaziers putty. The reason behind this approach should be that the shellac keeps the putty "soft" longer, because it prevents the linseed oil from migrating from the chalk and into the wood. 

While I am not be someone who dives into testing new stuff, I am normally ready to try out something old and tested straight away. So I took Olavs advice and used up the remaining shellac mixture I had left over from the travelling bookcases.
While I was at it, I also coated all the knots with shellac.

The hardware for the windows look good in my opinion, but it is the most traditional way to cover it in paint as well, that actually made painting a bit easier, since I shouldn't try to avoid getting paint anywhere.
For the painting itself I have strapped a frame to the workbench and mounted the windows on it. That way I didn't have to invent any work holding for the painted windows. The outside of each frame will not be painted since it will be hidden inside the wall. So it seems to be a fairly efficient way of doing it.

The biggest obstacle was Bertha who found it incredible interesting that I was mowing a small paint brush up and down, so she came close to have a look. I managed to get her ushered away with only a few white parts on her coat of fur.

Complete window.

one large and two small windows painted.

Inside corner with shellac applied.

Tuesday, February 28, 2017

A small barn for the summer house 8, windows

Last time I was home I managed to make the window frames for the total five windows that I planned for.
The three larger windows will be at the ground floor, and the two smaller windows will be for the attic. One in each gable.

For once this was a project that could benefit from my shaper. That thing is a beast when it comes to making large rabbets and long pieces of mouldings.
Traditionally frames are made with mouldings on the stiles and none on the rails. But I wanted to have mouldings all the way around.
I dovetailed the frames together, and in order for the moulding to flow around the corner I used a mitered dovetail for the outermost part of the frame.
The technique isn't terribly hard to learn or do, so it went together fairly well. My biggest challenges were that the stock was thick, but a bit of concentration during sawing helps a lot.

During the last couple of days I have been trying to make the window casements. There will be a total of 8 casements, so in order to make some progress, I am making it mainly as a power tool build.

The stock for the window casements are larch that I milled two years ago. It was originally intended to become a fence around the porch, but in the end we decided that a fence wasn't needed, so I could use them for this project instead.
I again used the shaper for making the rabbets and the mouldings. And this time I have tried to use it for making the bridle joints as well.
There is a special iron that is suitable for making tenons and the open mortises for the bridle joints. I have never used it before, because quite frankly it scares me a bit. The combination of the shaper and that blade is something that will eat a hand or an arm in an instant.
It is a interesting to note that when I have to make multiples, the machines are really fast despite the setting up can be a bit time consuming. A thing that is also interesting to note is the sometimes terrible amount of tear out left behind.
To be fair I think most of it can be traced to the wood. Larch is rather stiff, but it tears out easily.

The first window casement was assembled by means of drawbored dowels. The next one was just pegged after the glue had set. That route allowed me to put a clamp on the bridle joint which I think results in a better joint overall.
A project like this that requires a lot of pegs/dowels, is just what I have been longing for, because it gives me an opportunity to use my BLUM dowel plates. They are nothing short of impressive.

Mitered dovetail joint on window frame.
 
The spindle shaper with the scary Z blade.

Frames for the large windows.
 
Blum dowel plate.


Sunday, August 28, 2016

A small barn for the summer house 7, external boards

We have had a period of 2 weeks with very nice weather, so I have been having a great time at the summer house hammering on the small barn.

After the sub roof was installed, I spent some time installing some cement boards as a rodent barrier. I placed them a little distance apart and installed something called a mouse-band in between. this allows for ventilation of the lower part of the frame and hopefully it will keep mice out.

The next thing was to wrap the barn in wind proof tarred paper. Suddenly the house looked a lot more like a complete barn and not like a timber frame structure.
The tarred paper was followed by some 1" thick boards running vertical, to ensure a bit of distance between the external boards and the paper allowing for a bit of ventilation. These distance boards will also help to keep the paper in place once I start insulating from the inside, so it will not bulge out and touch the external boards.

Given that the timber frame has a lot of vertical posts, I decided to do something radical (for me at least): To install the boards horizontal.
I normally like to follow Swedish traditions regarding building practices, and they call for vertical boards, but since this design is inspired by an American barn, I thought that I would give it a try to install the boards the other way. It also means that I can nail them to the existing posts.

I managed to complete the front of the barn. The two sides are some 80% complete and the back is maybe 30% complete.

To protect a bit from rain I have covered the window openings with plastic, and I have mounted an old door as a temporary installation.

I would like to thank The Louisiana State University Agricultural Center for kindly making an incredibly interesting array of different plans available on the Internet.
I have no idea how that university is doing in playing football, but based on their building plans alone, they ought to win the national championship in football.
GO LSU footbal team!!

This is pretty much how it will end up looking.


Too few buildings are made with gambrel roofs in Denmark.

The sides still need a couple of boards more.

A bit of work still remains to be done inside.


Sunday, August 14, 2016

A small barn for the summer house 6, sub roof

Today it wasn't raining, so I managed to burn on the tarred paper (bitumen + some weaving) on top of the roof boards.

Some time possibly next year my idea is to use some of the old roof tiles from our house on top of the sub roof.
But for the time being I'll just stay with the tarred paper roof and continue with the rest of the barn.

According to the weather prophets we can expect (hope) for some sunshine the next couple of days. So I'll try to keep up the pace.

Barn with sub roof.

Sunday, August 7, 2016

A small barn for the summer house 5, rafters

Back from sea and back from a canoeing trip with my brothers and all our children, I have returned to the small barn project.

The weather is as you would expect it from a Danish high summer: lots of rain and howling winds.. Not something that encourages you to work outside, but I like building this sort of thing, so I'll keep on anyway.

The children still finds it an interesting project, and they especially look forward to nailing on the roof boards, as that will yield instant recognizable results.


First set of lower rafters installed.

Witches hat rafters detail.


Asger posing.

The work crew. Gustav, Jonas and Asger.