Showing posts with label Statsraad Lehmkuhl. Show all posts

Wednesday, July 23, 2025

Drydock pallet frame cabinet part 2

Browsing through my phone, I suddenly realized that I had forgotten to make a blog post about the pallet frame cabinet completion last year.

We ended up having a bit of a tight deadline for the completion, since it was a wedding gift for Klaras friend. Furthermore I had to remain calm and pedagogical while trying to explain that: If you want the cabinet to be completed in time - well then you need to work on it. 

For some reason it was very hard to understand that you couldn't both go to the movies or go to a sauna all evening and at the same time work on the cabinet.  And that realization was really hard to fathom.

But after I had explained very clearly that the clock was ticking, and that I had spent hours helping, which was why I sort of expected some effort being put into completing the project, Klara saw what I meant and worked at it. 
Klara originally intended to paint the cabinet, but lack of time made this impossible. I told her that the recipient would no matter what be thrilled to receive a homemade cabinet, and that painting was one of the things that she could easily do at home without my tuition.
She also needed to decide on a closing mechanism (magnetic or latch type)

Lessons learnt:
For young people it is very hard to miss out on anything social in favour of a project that they have started themselves. So I should probably have advocated for a much less complicated project from the start. But I had been completely honest with the amount of time that it would take to build something like that, and also described how it could be achieved by a steady effort each day for maybe a couple of hours. But somehow the coupling between doing other stuff for 6 days and suddenly be short of time was not clear.

The actual build was helped a lot by the fact that we had a table saw at our disposal and also a thickness planer. 

Mouldings really help giving a finished look, as does a raised panel door.

It itched in my fingers to do part of the project myself, to speed up the process, but I managed to not do it, I wanted it to be her build, and I would only make sample joints so she could see how they should be carried out.


Klara planing a moulding.

The cabinet with the face frame on.

The completed cabinet with mouldings and a raised panel door.


Wednesday, September 11, 2024

Drydock pallet frame cabinet part 1

 We have a volunteer engineer apprentice on board. She is doing her initial training and is doing a great job. We talked a bit about making stuff one day where she was knitting a sweater. I told her a bit about what I had made earlier of woodworking, and she told me that one of her oldest friends were going to get married - and that she would like to make something for her as a wedding gift.

After discussing the various possibilities and showing her examples from my blog she set her mind on something like the small hanging cabinet with drawers which I made 9 years ago.

As per usual, we started off finding a decent pallet frame so we had some wood to make the cabinet out of. Since we are in drydock at the moment, and due to the nature of our ship, we have a lot of the carpenters machines ready set up in a warehouse on the yard. So stock preparation was much easier than it used to be. We have a small Makita planer that could trim the boards to the desired thickness in very little time. The table saw is out of service at the moment due to someone sawing into a hidden screw and activating the Sawstop. So for the ripping of boards we had to use the band saw.

Klara is new to woodworking, so I decided that a rabbeted construction would be the best bet, also given that we need to complete the cabinet before the wedding.
For some reason we don't have a router plane, so for the dado for the shelf, I had to make a small router plane out of a block of wood and a sharpened screw. That worked OK.
There is a Lie Nielsen rabbet block plane on board that we used for the rabbets. I like my Veritas skewed rabbet plane better, or the old combination plane that I have in my ocean going tool set. I didn't bring this set with me, so we had to rely on what we could find on board.

The case was assembled using some headless brads and glue. We had glued up a back panel which was reduced in thickness to 1 cm (3/8"). The back panel was attached in a rabbet with a dab of glue in the center and some more headless brads. The idea is that the back can then move a bit with the seasons without splitting.

I demanded that the face frame was built traditionally with mortise and tenons and rails and stiles. No mitered corners and quick solutions. Klara really liked the look of the face frame on one of my other old cabinets, where there is a small moulding on the inner part of the frame. In order to make something like that, we found an old moulding plane that someone has once donated to the ship, and it was still sharp enough to work. 

So far we have made one corner of the face frame, but today we are going to see of we can complete it and glue it onto the case.

Klara planing wood for the face frame.

The case with the back panel mounted

Klara using the moulding plane.


Thursday, March 17, 2022

Marine life

 Today just when lunch was over for my shift, someone came down to the messroom and said that there were a couple of whales really close by. So I took my cup of coffee, fetched a jacket and went up to see if it was possible to get a glimpse of them.

There were two humpback whales and a playful sealion maybe 25 yards away from the ship. 

I managed to get a picture and a decent video of one of the whales and the sealion sort of photobombed all the videos I tried to take. :-)

It is awe-inspiring to see such a huge animal so close by. And almost equally impressive to watch a sealion scoot around like a happy kid in a water park.

Humpback whale in the South Atlantic Ocean


Sunday, March 6, 2022

Drain grates

 During the hurricane we had last time I was on board, we lost a couple of drain grates. 

The drain grates help to keep large objects out of the drain pipes from the gutter on the main deck. Large objects could be stuff like an apple or an orange or a water bottle. If they would fall into a drain pipe it would take quite some job to get them free again, so it is much better for us to prevent the blocking from happening. 

The first time I was on board this ship, I made 4 drain grates, so I took upon myself to make a couple of replacements this time also. But instead of following the same procedure as last time, I decided to see if I could make them without soldering them together.

My idea was to make a brass pipe using rivets, and hammer one end so it would flare out. Then finally I would ad some pieces of copper pipe on top as the regular grate part.

I marked and cut a strip of brass sheet (1 mm / approx 3/64" thick). On one end I formed something like a rabbet, and then I bent the piece over a piece of pipe, so it ended up being round and of the correct outer diameter. 

Using a piece of bronze welding rod, I made some small rivets. I would have used ready made rivets if I had some, but making them yourself is also fast.

Holes were drilled in the ends of the brass strip, and the cylinder shape was riveted together.

Using a piece of sturdy pipe as an anvil, I started hammering along one of the ends of the cylinder. The idea is to thin and thereby stretch the material so it will eventually curve out. Machines exist that can help you with that, but it is not equipment that we have on board, so the trusty hammer was the choice.

After a couple of rounds of hammering, the brass hardens. to keep it from cracking and also to make it easier to continue the forming, I annealed it using an oxygen/acetylene torch. 

At a certain point the flared end almost naturally starts to bend over in a 90 degree angle to the cylinder, and that means that the forming is almost done. The only thing left is to use a flat anvil and level out the flared part.

My last design used two pieces of copper pipe bent to a 90 degree bend, and this design would also work very well with a riveted construction. So I found an old piece of copper pipe and made a couple of bends that were separated from the pipe using a pipe cutter. The ends of each bend were hammered flat and they were then riveted to the flared part of the cylinder.

The strange thing is that this way of making drain grates actually seemed faster than my previous design, and I hadn't expected that. My main reason for not soldering was actually that I wanted to see if I could use a bit less oxygen and acetylene. That was also accomplished, but the speed surprised me.

Brass plate with strip cut of (enough for two drain grates)

A riveted cylinder marked before starting the hammering.

Flared out end of the drain grate.

The two copper bends are riveted in place


Side view of the drain grate showing the rivets.

Drain grate in place in the drain pipe.


Thursday, January 20, 2022

Marlinspike with a leather sheath

 I have helped a lot of my colleagues turning marlinspikes out here, and I have made some myself as well, but those have either been for the ship's bosun shop, or as gifts to other colleagues. I have however never made one for myself. 

Probably since I don't need a marlinspike, but this time I decided to make one for myself anyway.

I found an old steel bolt for the cylinder heads of the main engine, and I deemed that it would be perfect for the purpose.
The shape is the one I usually help the trainees to achieve, a long sleek body with a mushroom shaped head. The conical body gradually turns from round to oval the nearer to the tip of the tool it gets. the tip itself is ground or filed flat and gets and edge of approximately 60 degrees.

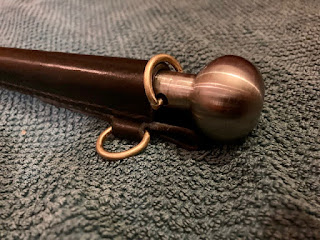
The dimensions for my marlinspike is a length just shy of  12", the head is 1.25" in diameter, the upper part of the body is 19/32" which tapers to a width of 1/4" at the very tip. Just above the ground part, the width is 3/8" and the thickness is 9/32" (due to the oval shape).

A hole was drilled in the upper part and I made a small D-ring of bronze that I silver soldered in place, this is so that the marlinspike can be secured with a lanyard when working aloft. I made an extra D-ring that I could mount on the sheath, so that the securing line has a place to be secured to.

For the sheath I decided to test myself a bit, and make it as small as possible.
A wedge shaped piece of leather was sewn to the backpiece. this would form a rabbet that the rounded part of the sheath could register to. 
During the sewing of the wedge, I mounted the D-ring on the sheath. The wedge also moves the marlinspike a bit forward of the back piece, so that it will in theory stay a bit more clear of the hip when worn in the belt.

The rounded part was first made wedge shaped, so that the sheath would also taper in its length, both in width and height. I sewed it on using angled stitches that would enter the side of the rounded piece and pierce through to the back of the leather. 

Finally the edges were trimmed and polished a bit.


Monday, January 17, 2022

A bit of pounded brass

 A couple of days ago we had a regular storm out here. We had gusts of hurricane strength and waves that corresponded to the rest of the weather.

We ended up blowing out 3 of our stay sails, and we still did 12 knots on just two square sails. So apart from it being a bit difficult to sleep, it was great fun, and awe inspiring as always to see the full force of the sea.

When one of the stay sails had to be taken down, it hit the brass top of one of the old magnetic compasses. The sergeant quickly saved it and brought it inside. But the small top lid was missing.

We all take great pride in that the ship is looking its best when we go into port, and polished brass looks best if all the part are present. So I found our last piece of brass sheet metal, and set to work.

The first step was to determine more or less the size I wanted to lid to be, and then it was just a matter of cutting a disc out of the sheet and finding a hammer.

In a perfect world I would have had a nice little rounded anvil and a polished face hammer for working sheet metal, but a small ball peen hammer and a bit of pipe had to do the trick. 
The perimeter of the disc was going to be furled back, so I'd gently knock on it with the hammer and the after two rounds, I would heat it all up to anneal it so the brass once again became reasonably pliable. 

Before giving the outer edge the final hammering, I domed the disc a bit, and when it looked fair, I folded over the edge the rest of the way.

I tested the lid on the compass top, but I had made it a bit too small. I decided that I could fix it by machining the inner edge on the lathe. Which was not my original plan, but never the less it worked.

The lower rim was made up of a couple of strips of the brass sheet. I would have preferred a long continuous piece, but I didn't have enough brass to do that, so I had to improvise a bit.

Finally the lower rim was soft soldered to the domed disc. The completed lid was then cleaned up in the lathe and mounted on the compass top. 
Truth be told, my lid is just a smidge too tight for my liking, but it will stay put even in rough weather and it looks OK.


The completed top with its new lid


Tuesday, March 16, 2021

Marlinspike manufacturing

It is not a secret that I like to turn stuff on a metal lathe. On my first voyage with the Lehmkuhl, I made a large marlinspike just to test out one special way of making cones. 
The marlinspike was well received by the deck department, and I ended up making a couple of smaller ones later on that year.

I have great difficulties saying NO to a Newfoundland dog and to young people wanting to learn from me. So when I signed on this time and almost all of our volunteers asked me if I would teach them how to make a marlinspike I replied that I'd be happy to.

Making a marlinspike is a fine little project. There are different processes that involves different tools, and you can leave the project for some time and pick it up again later without any issues.
The turning teaches people a basic understanding of the lathe and how to use it. The surface is improved by a file and by sandpaper before it is hardened.
Some sort of head or handle is dealt with next, and finally everything is polished using some fine emery paper. 
One of the volunteers asked if I could also help him make a sheath for the marlinspike, which I was happy to help him with. Soon after, a couple more of them wanted to do that too. Then one guy wanted to make a sheath for his knife to match the marlinspike sheath, and another one jumped on the same idea. So I have spent a great deal of time helping and instructing in leather work and metalwork this time.

An interesting thing was to see how they each had ideas as how they wanted the head/handle made. So each has his own very distinct marlinspike. 
So far we have made heads from leather, wood, laminated wood, copper & brass and steel.
Most of the marlinspikes have been around 10" long, so they work well as personal tools that can be brought with them into the rigging. A couple of them have been 13-14" and a bit beefier, intended to be used at the deck mainly for splicing wire.

A great thing about all the projects is that people have all been incredibly proud upon completion, and they have each succeeded in making a functioning tool that they can use for the rest of their career. And I am happy because I think that I may have planted a small seed of making in each and everyone of them.


Adrian's marlinspike

14" (as far as I remember)

Wood from various ships he has worked on

Laurids' and Simon's Marlinspikes

Laurids' sheath for the marlinspike

Simon has made a sheath for his pocket knife

Aske's sheaths

Brass & copper head

Nice work for someone new to leather working.


Tuesday, June 11, 2019

Statsraad Lehmkuhl details 3, the Boston Teapot Trophy

The Boston Teapot Trophy is a trophy that is awarded to the sail ship that covers the greatest distance over the course of 124 hours.
Why they have chosen that time frame I have no idea of, but as it happens, Statsraad Lehmkuhl has won the trophy 8 times.

Our ship is the current holder of the trophy, and due to that, the actual trophy is sitting on a shelf in the CEO's office.

The trophy itself is a copy of a teapot which was made by Paul Revere (yes, that Paul Revere!). Whenever we hold a meeting in the CEO's room, I find myself drawn to the box that holds the trophy.

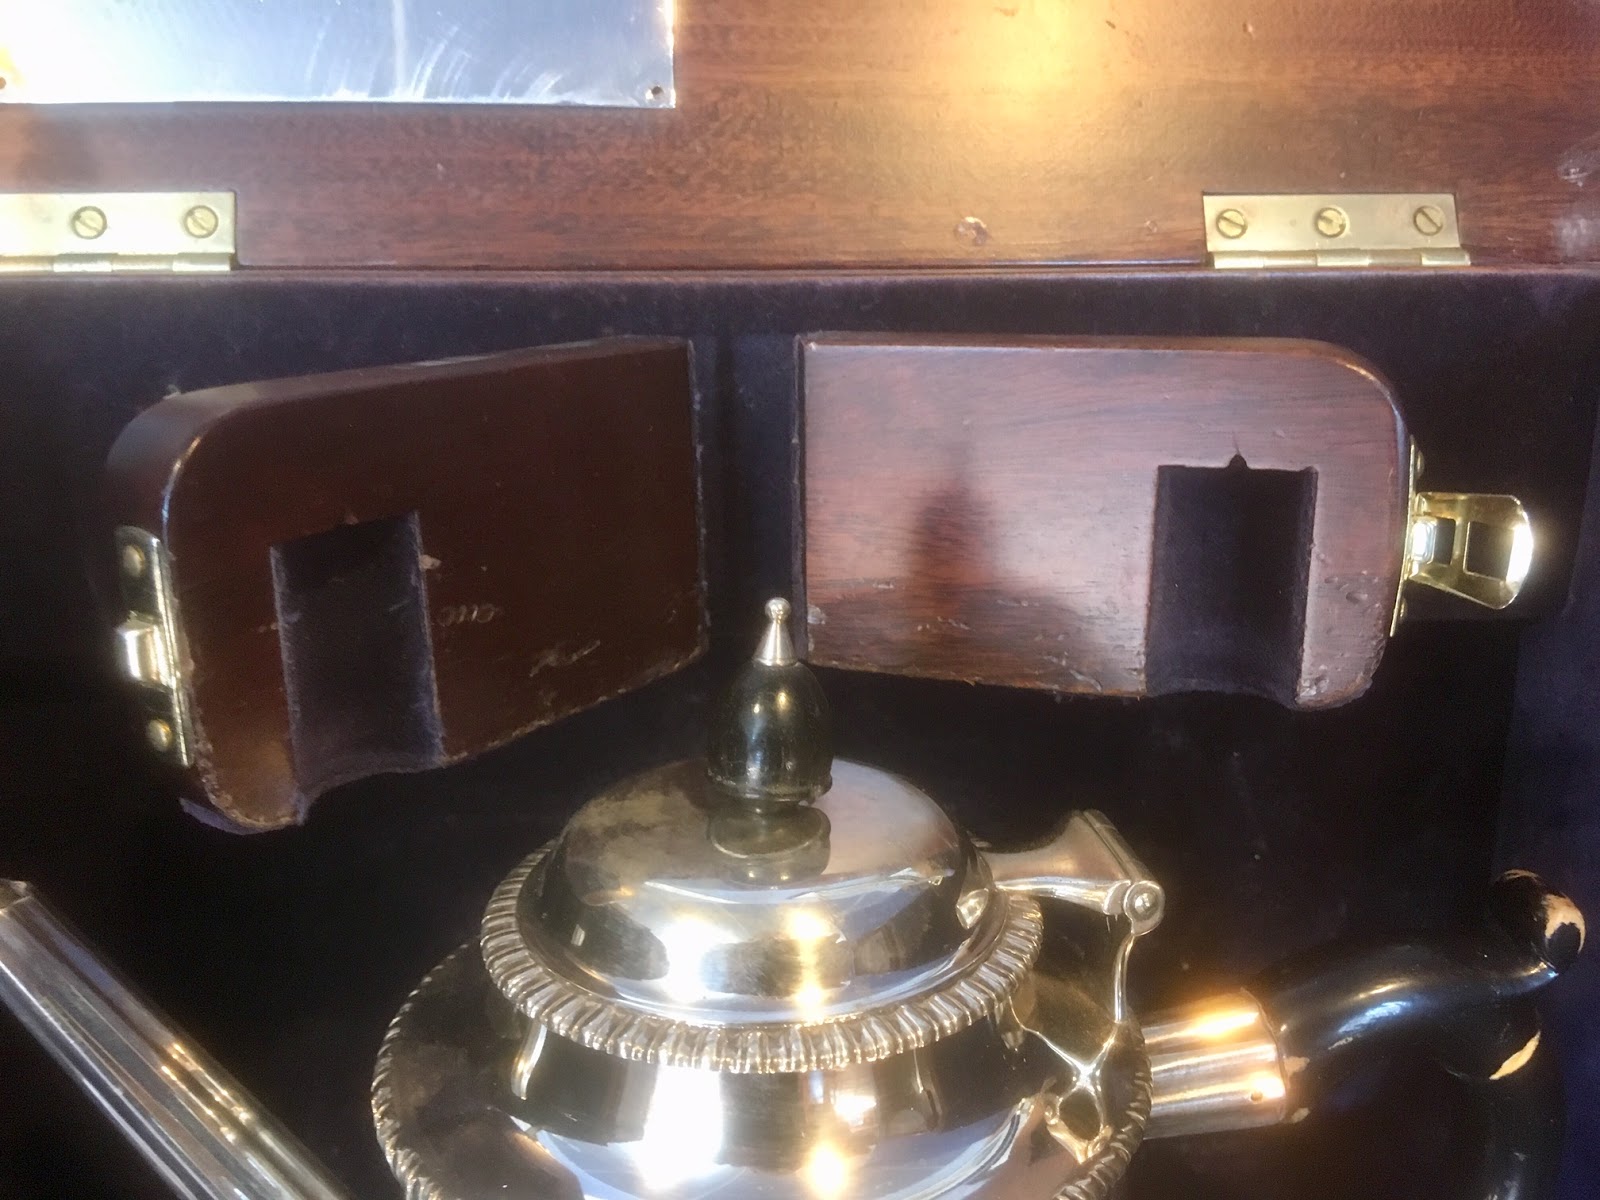
Today after the meeting, I quickly snapped a few pictures of the box. I tried a little bit to remove the teapot, but I couldn't see a proper way of doing it, so I stopped before breaking something. While writing this, I got to think of that I think the correct way is to lift out the upper part (the teapot itself), and then remove the base.
I tried to pull a bit at the middle shelf surrounding the teapot.

Technically the trophy isn't part of the ship, but this is my blog, so I decide that it is OK anyway.
According to a link I found, the Trophy was established in 1964

You will be able to find some pictures of the teapot itself in the first link, but here are a couple of other pictures of some details of the box.

I can't see how the box itself is constructed, I mean if it is with secondary wood and veneered shell -or solid wood with blind dovetails. But the overall size of the box is something like 16" x 16" and 8" deep and inside it is lined with some dark blue velvet.
Neither of the screws are clocked which I find a bit strange, after all I am certain that the box was made by someone professional.
The original silver plate on the right hand door has nice engravings, whereas the new silver plate inside the lid has got some not so nice machine type engravings. This is to be expected,as engraving is not something that any goldsmith can do anymore as far as I have understood.
The bracket holding the top of the teapot in place is clearly made with a Forstner bit. I think that is the one detail that look the most out of place to me. Using a Forstner bit is OK to remove the material, but it wouldn't have taken much to take a spade bit of a similar size and ground it to a round shape. Then carefully rounded the bottom of the hole.

Now all this may sound as I am ungrateful for the Trophy which is not the case. Instead I would say that I find it intriguing that after having built stuff myself - I am able to see that not everything that was made 50-60 years ago was better than what could be built today.
Maybe the cabinetmaker tasked with the job had to work on a tight budget because the teapot itself had cost more than anticipated, so a bit had to be saved on the box. Or maybe it was someone who had never heard of clocking screws? We will probably never know.


Silver plate on top of the box.

The closed box.

Hinge stay, new silver plate visible inside the lid.

Description of the inspiration for the trophy. 

Teapot lid holding bracket closed.

Let's just use a Forstner drill, no one will ever notice..

Sunday, May 26, 2019

Statsraad Lehmkuhl details 2, braces blocks

This is one of the details that somehow looks incredibly attractive in my eyes.
We have four of those "stations" on the ship. Each consists of 3 blocks of varying sizes, all mounted pivot-able on a common axle.

Each block is for a brace. A brace out here is a line/rope that will pull a yard and thereby altering the angle of a sail in relation to the ships hull. That way you can adjust the sails to perform if you alter the course.

These particular braces blocks are located on the port side on the main deck, and are connected to the three lower sails on the fore mast.

The lower sail is named the "Fore sail", and its brace is "fore brace".
The sail just above is the "Fore lower topsail", and its brace is " fore lower topsail brace"
The third sail from the deck is the "Fore upper topsail", and its brace is "fore upper topsail brace" (what a surprise!)

The block for the fore sail brace is the biggest one, it measures 12" in height, 15.5" in length and it is 4.75" thick.
All three blocks are made out of mahogany.


Port fwd braces blocks station.


After sunset 


The author of this blog 
(we had a pirate cruise for kids today)


Thursday, May 23, 2019

Statsraad Lehmkuhl details 1, mast centering blocks

As you might have seen from Don Williams' blog post where he visited the ship, there are an incredible amount of details on this ship.
I will try to see if I can make it a habit to blog about one detail of the ship on a regular basis.

Those details are not necessarily the most important ones in respect of keeping the ship afloat, but they are details that have intrigued and impressed me.

All our masts are the original ones from 1914, they are made out of steel plates that have been rolled to shape and then riveted together, They taper all along the length, and I am still horrified thinking of that in order for those mast to be riveted, it means that someone had to hold a bucking iron on the inside of the mast. Clearly those were the days prior to any interference from occupational hazard inspectors!
Using ear protection was not custom at that time, so I am afraid that the building of this ship and others have caused deafness to a lot of ship yard workers who had to endure the noise from riveting and other operations.

The main mast (the middle one) goes through 3 decks. The main deck, the tween deck and the provisions deck before it is finally seated in the ballast deck.

The mast can be dismounted from the ship, and we do this occasionally for inspection purposes.  I haven't participated in this yet, but I hope that I will be on board next time we have to do it.

Where the mast passes through a deck, it does so in an opening that is a bit larger than the mast, something like 6" larger in diameter.
Today's detail are the small blocks of wood that are later on pressed down to fill out that void, and thereby centering the mast in the hole. The blocks are made out of oak and fits neatly around the mast. The uppermost blocks (where the mast passes through the main deck) are covered with sailcloth/canvas that is painted to make the penetration watertight.

The bottom of the main mast of Statsraad Lehmkuhl
Seated firmly in the ballast deck.

Mast centering blocks seen from below (penetrating the provision deck)

The same blocks seen from above (penetrating the provision deck)

Mast and centering blocks and the provision deck.

The blocks in the tween deck penetration seen from below. 


The covered blocks on the main deck (it is raining)
Notice the figure sewn canvas covering.