Showing posts with label Hardware. Show all posts

Wednesday, April 12, 2017

Dutch tool chest build 1, ageing hardware using an onion

I regularly participate in a panel for market research by answering a questionnaire online.
Often one of the questions is something like this:
Do you try new things or discover new trends sooner than your friends?
To which I always answer: "absolutely not"
This hasn't got a lot to do with woodworking, but it will mean that I can safely start building a Dutch tool chest now. A lot of the blogs that I read have already featured a DTC build, so I can in no way claim that I am a vanguard in this type of build which just suits me fine.

One of my favourite daydreams is to teach a small DTC class at home, it will probably be the boys who will have to attend it, but nevertheless I need to build one of those chests first to get the feel of it. It might also be that there is a little more interest in a build where you can see and touch an example of the end product.

There isn't a lot of hardware needed for a DTC. Technically you could get away with a couple of hinges and that is it.
Other pieces regularly involve a set of lifts and a hasp for a padlock.
I have a lot of chest lifts at home, and I was too cheap to purchase some locally here in Norway. So for this build I have settled for a set of strap hinges and a small hasp. Depending on the time frame and my mood, I might try to make a set of lifts myself, steel or perhaps some beckets.

The hinges and the hasp were zinc plated with a thin layer (electroplated). I decided that they looked a bit too shiny for my taste, and I decided to give them a bit of artificial age.

First the zinc was removed by immersing the pieces in a mixture of water and sulphuric acid.
Chemistry did its thing and in a short time the pieces were down to the bare metal.

My next plan was to give the  pieces a brown colour. So I experimented by using chlorine on the hardware. A thin layer of rust appeared almost instantly. The problem was that every time I removed the pieces and rinsed them the rust disappeared too. I guess I should have been a bit more patient, but after a couple of hours I grew tired of that experiment and decided to think of another interesting way of adding age to the hardware.

I have used a propane torch earlier, with very fine results, but I wanted to see if there was a way that someone who didn't have access to such a tool could also do a satisfying job of adding a bit of age to some hardware.
During my time as an engineer on a high speed ferry, I did a lot of cooking during the winter months when the ship was laid up. A colleague of mine once wanted to show me how soup was coloured traditionally, namely by burning an onion either directly on the hot plate or in the pot that you would later use for the soup. The result was impressive, the stainless steel pot turned as black as coal, and the fire alarm went off. I think we ditched the soup, but the experiment had been fun.

On this ship we have an excellent extraction fan for the galley, so I turned it to maximum and placed the hardware directly on the stove.
After some time it started turning blue, and I then rubbed the surface with an onion. The steel immediately turned darker. About three sessions of rubbing gave me the colour that I was looking for. After the hardware had cooled down I rinsed it with some water to remove a few fine particles of burnt onion.
To avoid the pieces sliding around during the rubbing, I used a regular fork to hold them and also to turn and remove them from the heat when I was done.

It looks as there s a bit of blotching for a lack of a better word, but that is due to my first experiment with the chlorine, which left some parts of the metal very lightly pitted after the rust attacks. I guess that after giving the hardware a light coat of oil it will be much less visible.

Onion coloured hardware.

After the first dip in the chlorine solution.

hardware in a chlorine solution.

Heating on the stove.

Blue colour means it is getting pretty warm.

First onion rubbing.


Tuesday, November 8, 2016

Traveling bookcases in elm 2, one bookcase completed.

This is not an example of me turning out a complete traveling bookcase in a matter of days.
I just never blogged much about the build because it was going to be a gift for Laura's birthday. I have shown the bookcases to her already, so it is safe to blog about them.

The shells for both sets were completed a couple of weeks ago, just prior to the DCBE.
I had prepared stock for the drawers and the shelves for one of the units, and with the new beautiful dovetail saw that Pedder gave me, my fingers practically itched to start dovetailing.
My plan was to line the drawers with green felt, this meant that I could safely cross the baseline on the half blind dovetails. Something that I normally never do. I didn't even do it for those on the carcase itself.
The dovetailing went easy, and I had made a template for marking out the place to make a recession for the flush mounted handles. This recession was made using a Forstner drill.
Basically I just followed the excellent instructions for mounting hardware that can be found in the book Campaign Furniture by Christopher Schwarz.

Before finishing I also made ready for installing the brass corners. I did all of the chiseling and routing, so it would just be a matter of putting the corner guards in place and then drill a couple of pilot holes before mounting the screws.

I applied two coats of "Superior" shellac, using an old piece of a T-shirt instead of a brush. I find that I can get a more even coat that way. After each coat I very lightly sanded the surface using some grit 320 sandpaper, just to remove any nibs from the surface.
After the shellac, I applied a coat of my home made paste wax from beeswax, orange oil and a bit of turpentine.

After the wax, I installed the flush drawer pulls and corner guards.

The two shells were brought inside, and I used some thinned hot hide glue to attach the felt.
Attaching the felt took a bit longer than I expected, but I wanted it to look good, so I took my time. I first glued on the piece covering the back and the top, then each side got their piece attached.
When the glue had dried, I trimmed the excess using a blade from a hobby knife which I had honed a bit extra. Felt is hard to cut if the blade isn't really sharp. The dados for the shelves were the last thing that I trimmed.

The final thing was to install the hinges and admire the first completed bookcase.
I have timed the build, but since the timing is for two bookcases, I haven't added it all up yet. So I'll wait with that till I complete the second unit. Hopefully that will be done before Christmas.

Traveling bookcase in elm, green felt lining.


Closed traveling bookcase next to Roorkee chair.


Opened traveling bookcase.

Using flash to show the green felt.

Felt lined drawers.

Half blind dovetails.

Brass corner guard.

Brass corner guard and half blind dovetails.


Saturday, October 29, 2016

DCBE 2016, Roubo campaign stool.

The day before yesterday, I started a Roubo style campaign folding stool in elm and canvas, and that is one of the quickest projects that I have ever done.
Technically it doesn't count as a chair, but we agreed that it was OK to make it during the event despite that.

I silver soldered a tri-arm bolt from some of the 8 mm lag bolts that we used for the arm rests on the Roorkees. I think that it took me around 5 minutes in total to make such a bolt.
First I cut some lag bolts to a correct length so the legs would rotate on the part without a thread.
Next the ends were filed so they had a 120 degree angle on the end, and I placed them on a piece of heat resistant brick. The brick I used is actually a spare vermiculite stone for our wood burning stove, but it won't damage the stone to do a bit of use before one day replacing one of the stones inside the stove.

The legs for the Roubo campaign stool are pie shaped. It is relatively easy to make those on a table saw. Just remember that they shouldn't be 120 degrees, but more something like 115 degrees. Otherwise the chair won't be able to open up the way it should. After sawing them out to something like a diamond shape, I drew a circle with a compass, and worked to this line with a scrub plane and a smoother. Finally I sanded it to a very round shape.
The holes were drilled with the help of a piece of wood with a V shaped notch in it to hold the leg in position.
I applied two coats of shellac and followed by some homemade paste wax made out of beeswax, orange oil and a bit of turpentine.

I didn't have anymore leather of the same colour as that on my Roorkee, so I tried to use some canvas instead. I am not quite decided if I like it or not.
The good thing about it is that it is lightweight, and it doesn't look too heavy like some of the leather versions I have seen. It also folds really easy, which I doubt that a leather version would do. But the colour would look better with leather.


Roubo folding campaign stool.

Diamon shaped legs.

Don't aim for 120 degrees like this!

This is how they should look.

Opened legs with a 115'ish degree angle.

Lag bolts cut to length.


The completed bolt before trimming the excess thread off.
Placed on top of the legs (still at 120 degrees).


Tuesday, September 13, 2016

Danish rocking chair with rocker bracket.

Our oldest son Gustav took some pictures of our rocking chair, and sent me the pictures. That helps a lot in explaining how a rocker using the IPA rocker spring looks.

I don't know who has made the rocker itself, but I know that Mettes grandmother made the upholstery. So I guess that once you could buy those rockers and finish them yourself.
There are a lot of similar old rockers for sale in Denmark, so maybe a company produced them, or you could make one yourself using a set of drawings.
I have seen a little variation in how the legs are attached to the lower platform, but apart from that they all sport a lot of bulbous turnings everywhere.

I would like to make a newer version of this chair, without all those decorative turnings. My chair should also have a curved lower platform, where the platform ant the actual rockers were mirror images of one another. The back should sort of flow from the rockers instead of being planted like it is on the old chairs. The armrests should also be a bit more integral

A fine thing about this idea is that the rocking motion won't mar the floor and the rockers can be kept fairly short, so the chair don't take up that much space.
The chair is comfortable to sit in, so it is just the design I don't completely agree with.

Danish type rocker, matching stool next to the door.


Fancy turnings.

The fabled IPA rocker spring.

Complete under carriage, with 2 springs.

Wednesday, September 7, 2016

I have a hardware problem

I have read once in a while, how some people think they  have a sharpening problem. Not that they are not good at sharpening, but they tend to do it so much that they sort of become obsessed about it.

Well, I am afraid that I have the same problem regarding hardware or more precisely hardware catalogues.

The small barn I am building will require some windows and also a door. Not surprisingly I intend to make those myself. A thing I will not make myself are the hinges and the locks etc. I won't be making the glass either by the way.

We happen to have two hardware manufacturers in Denmark that I know of. They both produce pretty much the same stuff, but one of them seems to have a bit broader selection. It is also the one that is closest to my home, just around 50 miles (80 km).
A/S J.Petersens Beslagfabrik
It is a factory that is run by the third generation of founders family.

They have a catalogue, and I just can't stop flipping through it, amazed at the different types of speciality brackets and hinges that are available. (The full catalogue doesn't show up in the English version of the home page, but there are some parts of it that does.)

My problem is that I end up not looking for hardware for a project, but often instead dreaming of projects for a piece of hardware.

I have purchased some of their hinges once in a while, and they are of a solid quality. So far my favourite item is the "lemmehank" which I used as handles for my Roy Underhill joiners toolchest.

 I try to avoid their homepage as much as I can because I end up spending way too much time dreaming.
This time what got me started was a thought about maybe building a rocking chair for the DCBE. Rockers can sometime mar the floor, but luckily IPA brackets have a solution for that.
The rocker spring.

The idea is that instead of rocking directly on the floor, you make a level platform and attach a rocking chair on top of it. The rockers can be fairly short, like 20".
A set of these brackets is mounted inside at the lower part of the rockers, and will keep everything in place.

We have a rocking chair at home like that, so I'll try to get Gustav to take a picture of it so I can show the principle.

One day I think I'll make a rocker just for the sake of supporting the continuous production of this fairly obsolete piece of hardware.

Does anyone have a similar hardware problem?

Wednesday, March 16, 2016

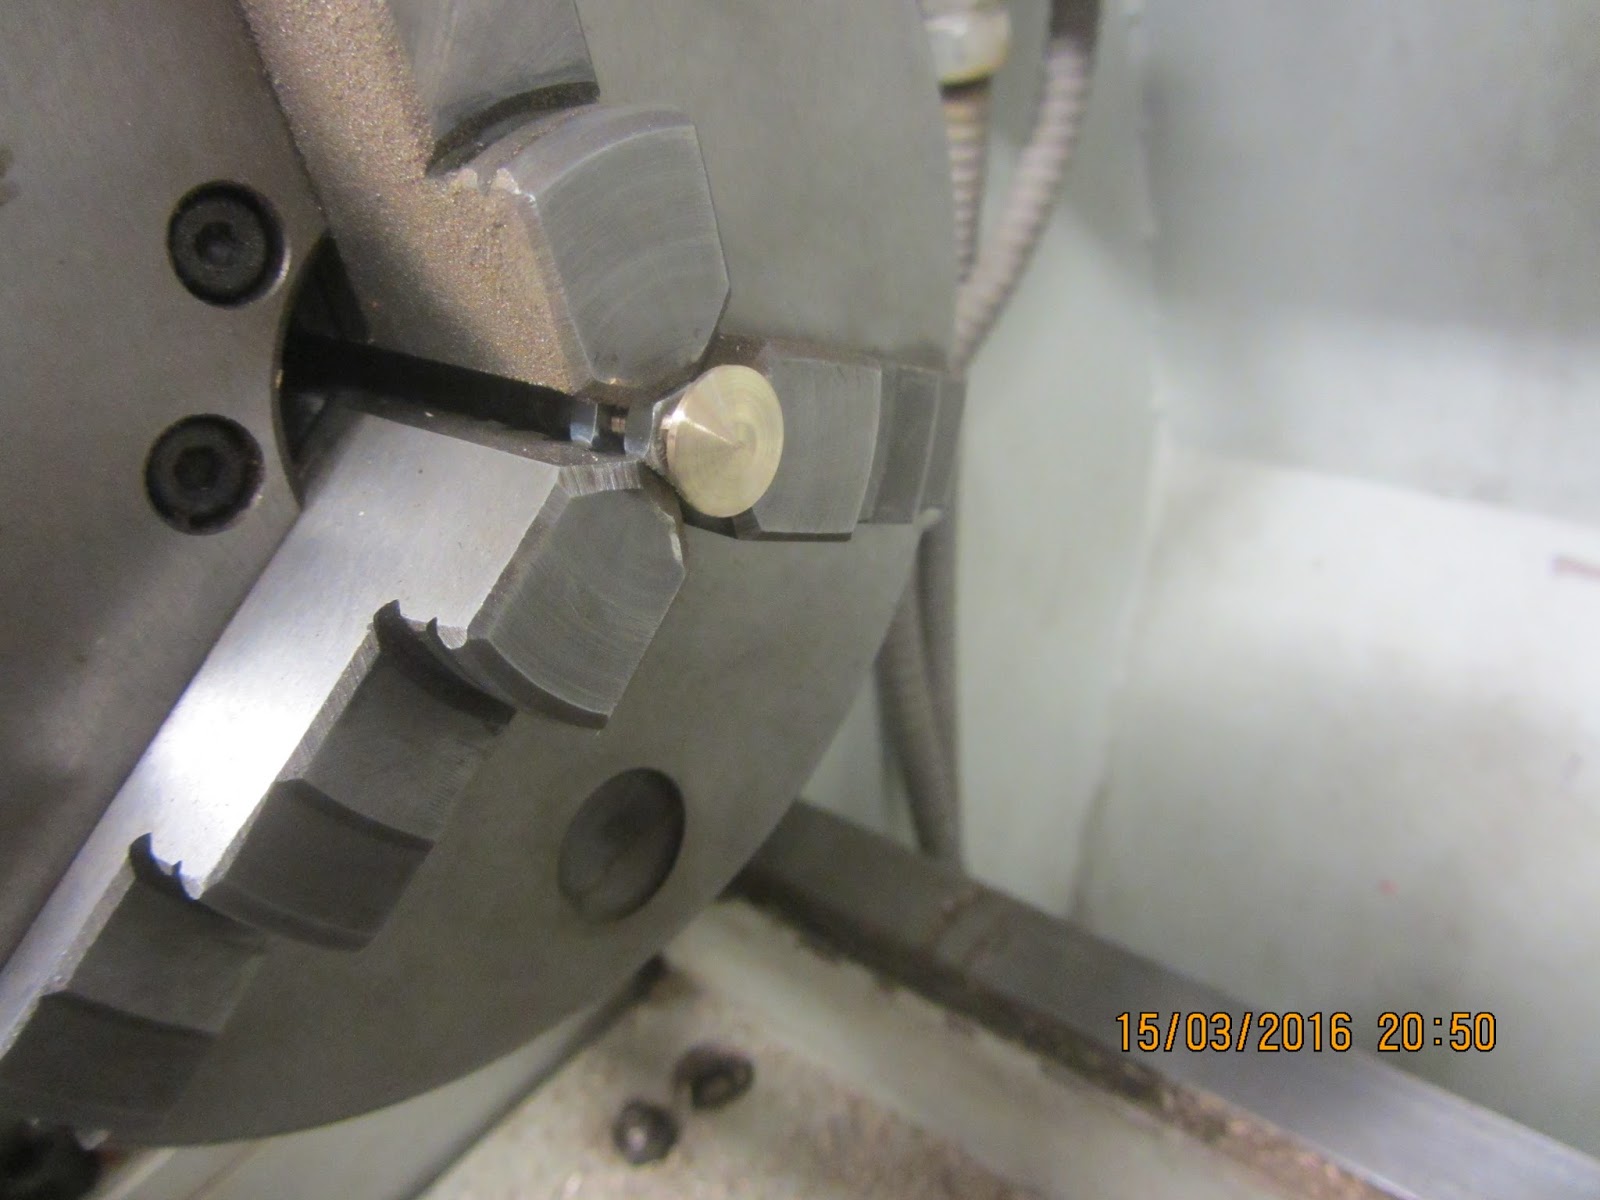
Making saw nuts

Several readers (OK two) asked if I could write a post about how I make my own saw nuts.

My blog has been accepted to such prestigious places as Unpluggedshop.com and norsewoodsmith.com, both places dedicated to hand tool blogs.
I hope I won't get expelled by having a single post where the majority of the work is done at a machine. And it isn't even woodworking.

As Jeremy cleverly remarked, having access to a metal lathe is step 1. But if you have got that, there is no reason why you shouldn't make your own saw nuts. I won't go into details about how to use a lathe, but merely show step by step how I have done it.

Corresponding text is written below each picture.


A finished set of screws and nuts for a children's saw.


Making a saw screw:

Step 1) 
I turn the overall dimensions with a roughing tool. This leaves some angled transitions where the diameter changes


Step 2)
I removed the angled transitions with a parting tool.


Step 3)
A square is made using a file.


Step 3) 
View from a different angle.


Step 4)
Cutting a thread with a die.


Step 5)
Turning the compound rest to an angle of approximately 5 degrees.


This is the "normal" position of the compound rest.


Step 6)
Parting the screw using the feed of the compound rest to form a slightly cone shaped head.


Making a saw nut follows the same principles. But the thread is internal.

Using a parting tool to remove the transition.

Screws and nuts as they look after parting. 
The small piece on top is cut off with pliers and filed smooth.

A screw is mounted in the chuck using two regular nuts to protect the thread. The head is sanded using grit 280 emery cloth. 

The nuts first receive a slot made by a hack saw. I mount them on a regular screw with the same thread before clamping the regular screw in the vice. After the slot is made, the regular screw is installed in the chuck of the lathe, and the head of the nut is sanded the same way as the screw.


Tuesday, January 19, 2016

Campaign hardware from Toplicht, a product review.

After reading "Campaign furniture", I have decided that I would like to make a set of travelling book cases.

Due to the Danish import regulations, it is immensely cheaper if I could source some hardware from Europe.
I managed to find some chest locks from Rutlands in England, that were reasonably priced.
They also carried brass corners, but those were kind of expensive.

A good friend of mine once suggested Toplicht as a possible source for some specialty hinges.
I sent for their catalogue, and I have also browsed their web page. The result: They really do stock most of what you could imagine.

I ordered the following items:

Brass corners at a price of just below 6 Euro a piece it is a stark contrast to the prices demanded elsewhere. The corners are cast brass with a thickness of approx 1/16". If you order more than 5 there is a discount.

Brass drawer pulls These look very much like the later type pulls shown on page 10 in "Campaign furniture". They seem to be a little bit thicker than 1/16. These are only 9.90 Euro a piece, if you order a single piece. Like the corners, these pulls also come with a discount if you order more than five.

Brass hinges These hinges are 5/64" thick and seem to be of a good quality. They are 13.90 Euro a piece, so they are a lot more expensive than the usual hinges I buy at the lumber yard, but the quality level is also quite different.
To get a discount on the hinges, you will have to buy at least ten.

The shop was really fast, I ordered the stuff Friday and I got it today. All the items were wrapped in newspaper for protection. Not that it matters much with brass hardware, but it gives a fine impression of the store, that they make sure everything is securely wrapped.

I ordered the locks Friday as well, but those haven't arrived yet, so therefore there is no review on those.

So if you need campaign hardware, I recommend Toplicht.de as a supplier. They have loads of interesting pulls and specialty hinges etc. and the prices seem very reasonable, actually downright cheap for some of the items (please note that I am in no way connected or affiliated with Toplicht).
.
Brass corner, 2" x 3/4"

Brass pull, 2.75" x 1 5/8"

Monday, November 23, 2015

Treasure chest with curved lid part 9, The finished chest.

I asked my wife what finish she would like to see on the Shaker cabinet, and her answer was Danish oil (what a surprise..)
I had hoped for a paint finish, but since it will probably be given away for someone as a Christmas present, I chose to stick to what she wanted.

But there were no restrictions to the treasure chest with curved lid that I made some time ago. That thing has just been sitting idle under a table to be out of the way.
I asked Asger if he would like to paint it, and he was really exited about it. I decided to give up most of the control and told him that he could choose the colour.
We looked at the paint shelf, and I tried my best to advocate for a green, blue or red coat of paint. But Asger was not convinced that it was the right path. Finally he made up his mind and settled for Massey Ferguson light grey, a classic tractor colour.

He rolled on a coat of paint that quickly got absorbed by the wood. So we agreed that was a primer, the next day he rolled on another coat, and that helped a lot.

Finally I added the last layer using a brush instead of the roller, because our cheap roller more or less dissolved in the oil based paint.

I had made some hardware on the ship while I made the chest itself. An escutcheon and parts for some lifts. 
The lift handles themselves are old handles from some metal pails that comes with various chemicals and soap.

Since I made a treasure chest, I opted for some fantasy inspired hardware. something that could spark an interest in a child. So I made a dragon/vampire bat as a theme. 
It turned out better than I had hoped for. But I think they would have stood out more if the chest had been in a different colour.

The finished treasure chest.

Asger sanding

Asger painting

Painting

Dragon escutcheon

Dragon lift

Sunday, July 19, 2015

Treasure chest with curved lid part 8, assembly

After I had glued up the lid, I cut the ends of so they were level with the sides. Then I started rounding over the outside of the lid using a plane.

This was when I realized yet another drawback of this design. Work holding for such a shape is difficult to say the least. It reminded me of trying to hold a fresh seed from a water melon. Not the most efficient shape if you want to retain full control over the situation.

I took a break from the free hand planing, and decided to glue up the lower part of the chest. This went conspicuously smooth. Even the diagonal measurements were spot on.

More planing and I was satisfied with the shape of the lid. I sanded the surface with some grit 60 to make it a bit more smooth.

I planed the lower part of the chest  to remove any protruding pins or tails. My solution with the floating bottom that has a lip made it impossible for me to plane the lowest part of the chest. So I had to use a chisel, and later I will follow up with some sandpaper.

The lock was mounted after making a mortise. I had to bend the upper plate just a bit, since the upper edge of the front board is not square to the front, another disadvantage of making slanted sides.

I  more or less try to follow the advice given in "The joiner and cabinet maker" from Lost Art Press, when it comes to mounting a lock. The most important thing is to keep everything centered around the pin for the key. Since all locks I have ever been able to find are full mortise locks, my biggest challenge is to not break through the sides of the board. If I succeed in making the mortise, the rest usually goes pretty smooth.

Next task was to fit a striking plate in the lid. I marked out the position from the lock, and I even remembered to make the mortise below the striking plate wider that the square hole itself so the lock would actually work.

The hinges were mounted their own width from the ends, which is pretty common.
I started mounting them on the lid, because I could use the lower case for holding the lid while I performed the job. This was for once in this project a nice work holding solution.

Since the lid did indeed end up being 1/4" too narrow, I decided to mount the hinges so this would be visible on the back of the chest. That way the front will look as nice as possible. I thought about removing about 1/8 from the front and the back, but discarded that idea, because it would make the lock visible from the front. Further more I was afraid that it would lead to that the mortise for the striking plate could penetrate the front of the lid effectively ruining the project.

I still need to make some feet and an escutcheon for the chest, and I am considering making some lifts for it as well.

View from the front.

Work holding of the lid.


An escutcheon will add to the look.

Interior of the chest.

Tuesday, February 10, 2015

New tool chest for the sea 9, the completed chest.

After letting the paint dry for two days, I decided to use Sunday evening to mount the hardware on the outside of the chest.

At first I removed the masking tape from the jointing edges of the led and the carcase.
I had tried to place the tape so there should be a very small green line all the way around this edge, but it didn't quite look very good. I don't know if it is standard procedure to paint this part of a chest, but as it is now it doesn't look too good.
Seen from the outside, you can get a glimpse of wood that is unpainted, and when the chest is open, you can see the remnants of a bit of green on the edge.
I have considered if painting this part black would look good, maybe I'll do it at some point at home.

To protect the paint a bit from dings and scratches, I places it on a piece of cardboard on our workbench. I started by mounting the lid corner reinforcements. Then moved on to the top corners for the carcase, and finally I turned the chest upside down and even placed a piece of rag between the top and the cardboard to protect the show side of the chest while working on it.

All reinforcements were installed in the same way: I positioned the bracket in the recess, and then made a pilot hole for two of the screws using one leg of a divider. (We don't have an awl out here).
A screw was mounted in each hole and they were clocked.
Now with the bracket in place, I made the other pilot holes and mounted the rest of the screws.

Finally I used a file to ease off a few of the edges that were protruding a bit into the chest.

The escutcheon was mounted using a few drops of paint on the backside as glue, and then some small brass nails held it in place.


I then found all the tools and tried to load them in the chest.
There was just enough room for my old tools and the "new" moving fillister plane. Although I had to take out the grooving plane from the original cardboard box, to be able to shoehorn it into the box.
I'll tell my daughter that I would like to get some small sewn bags to but my planes in. Kind of like plane socks. She has rediscovered the joy of using a sewing machine, so that should be a fine project for her.

I didn't take any pictures of the loaded chest, but I managed to put the shooting board in there as well.
The empty weight of the chest is 3.2 kg (6 Lbs), and the curb weight is 11 kg (22 Lbs). So I am still able to bring clothes with me to the ship without breaking the maximum weight limit for my bag.

The finished tool chest.