Showing posts with label Tool chest. Show all posts

Sunday, October 19, 2025

Dovetailed box for a Mafell ZSE 330K

 Last time I was home, I bought a Mafell ZSE 330K. It was for sale in the northern part of Germany, just about an hour or so south of the border, so I was lucky since most of the machines I find for sale in Germany are situated in the southern part of the country.

It came with a transport cart for use on the job site, but I wanted to make a box where it could be stored and also where I could keep any tools needed for the regular use of the machine.

I happened to have some thin larch boards that I had milled once, and there was just enough to make the sides of the box. They were planed int he thickness planer and ripped before gluing them into some panels.

The panels were trimmed to size on the table saw, and I marked up for some dovetails. Since it was going to be a tool box, I opted for regular through dovetails. With pins on the end boards where I would mount some chest lifts.

I gang cut the tails, and after some uneventful chiseling, I could mark the pins. Some more chiseling and the sides were assembled. 
I hadn't really planned on what to use for a bottom, but I didn't want the box to be heavier than needed since the Mafell itself is no light weight machine. I had a piece of 15 mm plywood, and I planed a rabbet along all sides of it so the bottom would fit inside the sides and still have a flat part to be glued to the underside of the sides. This also allowed me to nail from the sides as well as straight from the bottom to give a strong joint.

Fitting out the box was an incredible enjoyable and relaxing part of the project. I was in no hurry, and I tried to not fuss too much over ultra fine finishing details. 
The fence for the saw is kept in the bottom, around it, there were room for the tools needed to adjust and service the saw. I included 3 spanners, a screwdriver and chain saw file. There is also a room for the riving knife and the chain + saw bar. I drew a line around each part and wrote what should go where. 

When the interior was fitted, I mounted a set of chest lifts. To give a bit more for the screws to bite into, I glued a small piece of plywood to the inside where each lift was going to be.

The lid was made from an old glued panel from an old solid kitchen cabinet door (or something like that). It was a panel that I had kept on the loft of the barn for purposes like this. 
To keep the lid from scooting around, I added some strips on the underside, that works as dust seals as well as helping to keep the lid in place. I didn't mount any hinges or any locking devices. The idea is that you can just lift of the entire lid and gain access to the saw and tools. I was afraid that if I had hinged the lid, I would have to add straps or similar to prevent it from falling over and ripping the hinge screws out. And all that would just make it more difficult to reach inside the box.
I was happy to see, that when everything was in place, there was still room for a 5 L jug of chain saw bar oil. So the box contains all that I need to use the saw at any job sites.

Box complete with lid.

Box without contents.

Bar along upper wall, tools & parts in place.

Saw body in place.

Company name without the log on the side.


Saturday, February 19, 2022

Gerstner inspired tool chest, completion

 I have been doing a bit of organizing and clearing out in the workshop, mostly still to accommodate lots of stuff from my dads shop. On one of the shelves in the shop I found the remnants of the Gerstner inspired tool chest that I started 8 years ago. I took a close look at it and decided that either I should throw it out, or I should invest the needed few hours and complete the project. 

After a bit of discussion with myself I decided that even if the project wasn't super good looking, it still deserved to be completed, and I could potentially use the tool chest for small stuff.

A couple of years ago I had made some stock ready for the fronts and sides of the drawers. I laid out some dovetails and started sawing and chopping away. I managed to mess up the design of the dovetails for the back of the drawers since I forgot to take into account that it should only be as high as down to the groove for the bottom. Nevertheless I decided that I could live with it and I proceeded.

When the drawers were complete I drilled a hole for mounting a small knob on the front. 
I then mortised in a lock on the fall front and made a small mortise for the lock to catch on in the carcase.

Then I assembled the tool chest with the self made fall front mechanism - only to discover that the knobs were a bit too long, so the fall front couldn't close. I took the easy and ugly route and gouged a small indent where each of the knobs touched the fall front. 

Finally I gave the drawers and the carcase some dark wipe on oil and let it dry for the night. It sits pretty on the shelf now, but I still haven't started to put stuff into it. 

I have to admit that the small tool chest doesn't look as elegant as I remembered. The wood wasn't perfect, and if I had to remake it again, I would probably reduce the thickness of the carcase, but as far as I remember, my main reason for starting the project back then was because I wanted to see if I could make a fall front mechanism out of wood.


The completed Gerstner inspired tool chest.

Drawers ready.

Getting ready to install a lock.

Oil on the drawers.

Messed up the length of the knobs..

Fall front almost closed.

Closed and locked.


Friday, March 12, 2021

Details of Gustav's DTC

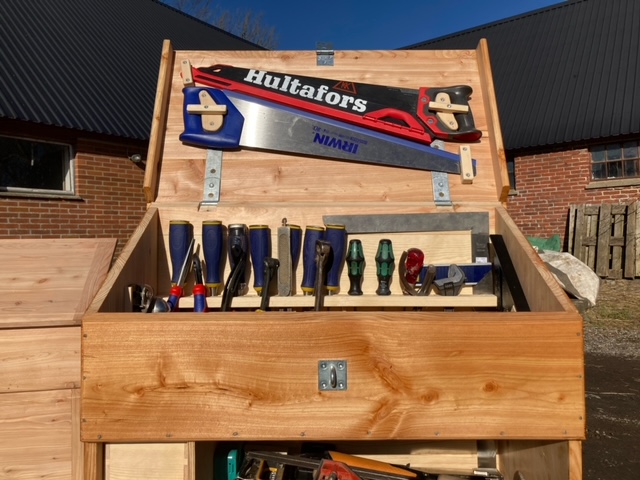
I asked Gustav to take a few pictures of how his block plane was held in his DTC. He also supplied a few other pictures of details.

The block plane which was a gift from Brian Eve of Toolerable sits on the left side of the chest in the top compartment. The inspiration for the holding arrangement also came from Brian, who has his block plane sitting in a leather pouch in the same spot.
Gustav chose to make his out of wood. Each side is made out of two strips of wood glued together via a triangular piece. The entire holding arrangement was glued and tacked to the side of the chest after the two sides were dry. 

In the other side of the chest, his speed-square is mounted using a piece of wood with a groove in it and a notch in the outer tool rack. The framing square simply sits along the backside of the chest being supported by the narrow slots in the shelves. We had to cut off 1.5" of the long leg of the square to make it fit inside the chest, but It sits very well protected now.

The two drawers are dovetailed with through dovetails. The bottoms are massive wood planed down to 1/4" thickness and held in a groove in the front and sides and overlapping the back of the drawer. We made them the traditional way because I know that once in a while it can be useful to have an example of a drawer to show to people. For instance if you need to show your friends what a dovetailed joint looks like.
The pulls are thin leather straps nailed to the bottom of the front. The straps will bend when the battens for locking the fall front are inserted, and they don't protrude so much that the drawers needed to be made shorter. The notches for allowing the locking battens just need to be a bit deeper to accommodate the folded leather.

Thin strips hold the block plane securely in place


Hultafors speed-square on the side.
Framing square in the back


Dovetailed drawers with leather pulls.


Wednesday, March 10, 2021

Dutch tool chests

Gustav has started training to become a carpenter. I can't remember if I have blogged about it, but I guess not since I haven't blogged much the last year.
Anyway, the path he takes is four and a half years, and gives him a certificate as a trained carpenter and a high school diploma at the same time, so that if he wishes to go study later on in life to become e.g. architect, he doesn't need to take any additional classes before enrolling into that education.
The carpenter training is mixed school and apprenticeship throughout those years. During the first apprentice period, each apprentice gets his own set of standard tools from the carpenter. These tools are normally supplied in a rectangular plywood box. If you read the description of the idea/regulation behind the carpenter training, it is stated that during the first apprentice period, the apprentice should be given the possibility to make his own tool chest for the standard tool set, so that he can bring those tools with him for the coming school periods.

Most apprentices just use the standard plywood box. Some will try to make a few divisions in the box and maybe a tool rack of some sort. I had told Gustav that I'd be more than happy to make a small class for him and a friend where they could each build a DTC.
I milled wood for 3 chests, and bought hardware for them too, but for some reason the friend was unable to participate anyway, so we ended up just building two chests. One for me and one for Gustav.

I tried to work a little bit faster than him so he could look at my chest for the next step in the process, but I tried to mainly work on it while Gustav was also in the shop. I showed him the different possibilities such as breadboard ends or battens to keep the panels flat, and how the edges could be treated using a router, a rabbet plane or just a chamfer.

When the chests were complete, Gustav really took off fitting the interior of his chests with tool racks and special holding arrangements for saws and squares etc. I didn't have any special ideas for what tools I wanted to put into my chest, so I just made a chisel rack mainly to show Gustav how one could be made. 

At that point whenever Gustav's friends came by for a chat or a cup of coffee, they would as always start out in the shop, and Gustav would proudly show them his DTC with tools and lockable panel and all. 
All the friends were awestruck. you could practically see the envy in their eyes. When Gustav demonstrated opening the lid and removed the two sliding battens to open up the front. It might as well have been the "Resolute desk of the movie National treasure". 

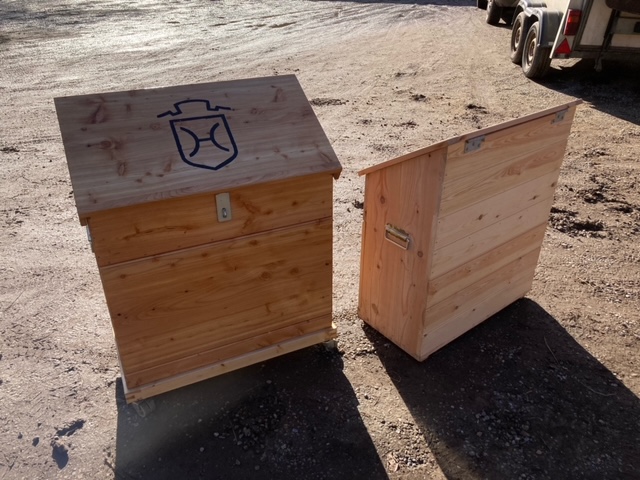
With his chest complete, He felt that it was too nice to be painted and he opted for varnishing instead. He plans to use the Holsteiner breed logo as a mark, to identify which ones are his tools, so he started up painting it on the lid before the varnishing.

This might sound corny, but I think that I am just as proud as Gustav is. Helping your son to build a tool chest is an incredibly fine and meaningful way to spend some time together. And I enjoyed every minute of the build seeing his skills grow through the project.


Gustav's chest

Dovetailed drawers to the left


Batten /dust seal holds the lid flat

Holsteiner horse breed logo

The unfinished chest is mine..


Wednesday, April 26, 2017

Dutch tool chest build 6, painting and thoughts about the build.

There are some adventurous woodworkers out there who will make their own paint, I have tried that before with various success, but I felt that there was no need to stretch my luck anymore on this project. So I decided to go for the sure thing and find a bit of grey oil based paint.
A small DTC doesn't take much paint, so if you need to buy or mix paint yourself, a small portion wil get you a long way.

Inside the chest, on the sloping part of the back, I have chiselled MMXVII, just like I normally do, but I felt like it could be interesting to paint some sort of decoration on the outside too that would show the world that this is my tool chest.
Brian Eve has got his Spanish bull painted, and that looks good, but if I made a bull it would be a shameless copy.
I like beavers because they are woodworking animals, but people might think that I was from Canada (which sadly I am not).
Termites are sort of woodworking creatures as well, but I don't like those.

I have wished for an exlibris stamp for my birthday, and my daughter Laura and I did a bit of brainstorming about that. I guess that brainstorming for my part is mostly keeping quiet, but we ended up combining two of my favourite things: Newfoundland dogs and gambrel roofs.

So I enlarged our stamp suggestion and used that as a decoration. Maybe someone will think that I actually live in Newfoundland in a house that has got a gambrel roof :-)

I am pretty good at sketching gambrel roofs, but I genuinely suck at drawing Newfoundland dogs. So In order to get by I taped the print out onto the lid. I then traced all the lines and the outline of the dog using an awl. I didn't poke through the paper, but the pressure is enough to leave a faint line in the painted surface. It is very similar to how I do when I mark out for the name signs for horses that I have made earlier.
The template was removed and I just had to colour inside the lines. This would most likely have been a bit easier with a smaller paint brush.

All in all, I find that the Dutch tool chest is an interesting and satisfying project to make. The project can be completed in a variety of ways, simple or difficult according to the abilities or the desires of the maker.

For a simpler version,  the chest can be made with rabbets instead of dovetails for the side to bottom assembly, and the fall front and the lid can be made with regular battens nailed on instead of sliding dovetails and breadboard ends.
Similarly the project can be made more complex e.g. by using stopped dados or sliding dovetails for the shelf, and using breadboard ends on the fall front or perhaps use a frame and floating panel construction for the lid and the fall front. 

As I have demonstrated, the chest can be made out of reclaimed dumpster wood or pallet wood. Using this kind of wood can give some challenges in preparing the stock, but after all, it is a tool chest, and not a jewellery chest, so I can live with a less than perfect surface, as long as the chest is sturdy.

I have to accept the fact that the project was a bit too large for me to do out here. I mean physically too large. I had difficulties planing the lid and the sides due to their size, and that pestered me during most of the project.
Having completed this project, I now remember one of the reasons why I normally make smaller items out here.

I haven't added any handles to the chest, but I think I'll do that once I get home, and can use some of the handles I already have in my shop.

Painted and decorated Dutch tool chest

Newfoundland dog and gambrel roof

Scrub planed back.

Template.
 
Precision paint brush.


Monday, April 24, 2017

Dutch tool chest build 5, the lid and assembly.

I had glued up 4 boards to form the lid, so in my mind I just had to do a bit of smoothing, mount some breadboard ends and be done.
The reality was a bit different. The lid had warped, so I had to struggle to flatten it. A thing that really didn't help was the size of the lid. I could barely fit it on the workbench, and it scooted around because I couldn't place it in a single position that would enable me to plane the entire piece.

After a lot of time and cursing I decided that it was flat enough. The problem was that it wasn't the same thickness all around.
The top of the workbench is not flat, and I didn't see any point in continuing knowing that it would hardly get any better, so the lid just had to stay that way.

I marked up for some breadboard ends, and the first one didn't fit very tight. I fiddled some time without any obvious improvements, I mounted it hoping and expecting that the second end would turn out better.

At first the second end really did fit better, but the first dowel that I drove in burst out a huge chunk of wood from the backside. I guess the board is a bit punky.
The second dowel broke before getting through the board, but the third one came all the way thoguh as it should.
It bothered me that the second dowel never went all the way, so I decided to remove it and install e new one.
A drift pin, a hammer and a smart blow Took care of the problem with the dowel stealing all the attention, Instead the new attraction was the 6" long and 1.5" wide chunk that separated from the breadboard end. And somehow the dowel managed to stay put.
More cursing..

I squirted some glue in the crack and put a clamp on it. There was no point in trying to do anything abut it until the glue had set and I had cooled down.

Next I turned my attention to the carcase and did a bit of planing in a vague attempt to level the dovetails and the ends of the backboards.
Again the work was obstructed by lack of workholding, a not completely flat floor etc.
The back was the last thing I tried to plane. I decided from the start that I would only use the scrub iron on the back, because there had been enough misery already. The back ended OK, with clearly visible diagonal strokes from a scrub plane. At least it will show that it is handmade.

A set of skids were mounted under the bottom, and this part went without any hick-ups at all (very strange).

The glue on the lid had dried sufficiently to continue with that part.
I used a saw to cut the lid to the correct length and to remove the parts of the breadboard ends that extended a bit. Some planing actually made it look pretty good, almost level and fairly square.
So I decided to make a bull nose profile on all the edges.
A bull nose profile is hard to mess up, unless you make the rabbet too deep, so it will terminate at the same depth as the groove in the breadboard end. If you do that the result is clearly visible.
If you also ad a some grain blow out due to rabbeting cross grain you will know why there was even more cursing.

Finally I installed the hardware which didn't cause any real problems compared to the earlier difficulties I had experienced.

Assembled Dutch tool chest.

First blow out.

Second blow out. 

Chest partly opened.

Dutch tool chest opened.


Friday, April 21, 2017

Dutch tool chest build 4, fallfront and the shavings deflector.

The panel for the fall front need something to keep it straight, and also something to catch the lower lip of the carcase. It seems as the traditional way of doing this is to attach a couple of battens using nails.
Another method that involves just a little bit more work is to insert some battens in sliding dovetails.
Now there is a plane that is designed for that specific purpose, but mine is at home, so I had to do it with my smoothing plane instead which means that my battens visually taper and don't cover the line up as they would have if I made them the other way.
Since this isn't a show surface it will be just fine.

A narrow board was divided to form two wedges. The surfaces were cleaned up with the plane. Each of the edges were planed at an angle, so the end of each wedge resembled had a trapezoidal shape.

I marked out where I wanted the pieces to go and clamped down the first wedge. Using itself as a guide, I sawed along its edge using my small dozuki. When I had reached my intended depth I loosened the clamp and shifted the wedge a bit to saw the other side of the dovetail dado.
Once the sawing was completed I removed the material with a chisel.
A router plane would have been the obvious choice, but the body of my small homemade one is so narrow that it would fall into the dado. And a chisel does the job fast and well enough in this case.

The wedge was marked out so I could saw off the lower part of the wedge, to enable the protruding end to grip behind the lower front lip. Finally the edges were chamfered with a chisel and the wedge installed.
The second wedge was negotiated in the same way.

A board was split and resawed and planed for making the locking pin. It was cut to length and a hole drilled in the upper part to give something for the fingers to grip when it has to be pulled out.
The bridge shaped piece that will hold the upper part of the fall front was a quick saw and chisel job.

Ralph asked about the shaving deflector for the Stanley No 50 combination plane (mine is actually a Record plane).
As you all know, taking pictures isn't my strongest side, but hopefully the pictures of the deflector mounted in the plane will give a bit of an idea on how it works.
The backside is sloped to match the blade.
The inside is sloped to that the lowest point of the deflector is positioned as far outwards as possible. This slope guides the shaving to the centre of the plane where it can escape without being jammed.


The completed fall front.

Sawing the side of the sliding dovetail dado.

Resawing the locking pin.

Shaving deflector seen from the side of the plane.

Shaving deflector seen from the front.

Shaving deflector seen from the top of the plane.


Thursday, April 20, 2017

Dutch tool chest build 3, tongues & grooves and assembly.

Having completed the dovetails, I made a dry test fit of them. While the sides and the bottom were assembled, I measured the length of the shelf.
The shelf was cut to the correct length, and the parts were glued up. Oh yes, I made the rabbets for the shelf before I glued it up.

The lower front lip and the upper front each had a bead planed to soften the transition where each part will meet the fall front.
I mounted the parts a bit too long, and when the glue had dried I trimmed them to the correct length.

My Record combination plane has got a blade for making tongues, and I was really anxious to try it.
At first it was a complete and utter failure. I could at best take a shaving that was 7" long before the plane was blocked with shavings and I had to use a screwdriver to pry them out.

I stopped for the say and chatted a bit with Brian Eve instead.  He asked about the plane and did the smart thing: He visited Patrick Leach's Blood and Gore page. I have visited that page numerous times, but I don't know why I didn't think of doing it this time.
It turns out that there is supposed to be a "shaving deflector" that has to be used while planing tongues. Patrick also states that these are very commonly lost.
A bit of Internet searching and I had found some close up pictures of what it should look like. Since it looks a bit complicated, I decided to fabricate one of my own design instead. I think it took me roughly 20 minutes work, and I had a shaving deflector ready for testing.
The deflector was installed and I sort of expected the plane to jam within 5" this time - so I started out with a very short stroke. No blocking.
I got cocky and tried to do a 10" stroke. Still no jamming, Actually it seemed to work as it should. Finally I tried taking a planing the whole length of the 25" board. Two fat shavings ejected perfectly from the plane! I could even take fairly heavy shavings, so in a very short time all the tongues were completed.

On those boards I made the grooves next, and followed with some side beads.
These boards were all installed as the back of the carcase. I used a dab ob glue in the middle of each board, and two nails. so in theory the middle of the narrow boards will be fixed by the glue, and the nails closer to the sides will allow for some wood movement.


Chest assembled with fall front set loose in its place.

After the glue up.

Trimming the ends of the lower lip and the upper front.

Record No 50 combination plane tonguing.

Homemade shaving deflector for Record No 50 or Stanley No 50

Sunday, April 16, 2017

Dutch tool chest build 2, stock preparation and dovetails.

There is a large dumpster filled with old pallets and boards used for packing materials just next to the ship, so rather unusual for me, I don't rely solely on palled sides for this build.
The sides are a bit less than 8" wide, so I only had to glue on a 4" board to get the desired width for my panels.
I found a nice 1x4" pine board that I have glued to the old pallet sides.

For the lid I have decided to try and make it completely out of pine, since it will be the most visible part of the project, and the pine I have found seems to be a bit more stable than the fast grown spruce used for pallet sides.

I planed the panels for the sides, the bottom and the shelf and decided which panel should go where.
The planing was kind of hard, because the panels took up all the space on my work table. I just had enough room to start the plane about 1" before the blade would get in contact with the wood. I can suddenly remember why I make mostly smaller projects out here.

I cut the sides to the required shape with a 30 degrees slop on the top and square bottom. The bottom was made next, and before I started on the dovetails, I tried to determine where to put the shelf .
The official plans have a suggestion, but given that I don't follow them anyway, I decided that I might as well try to figure something out myself.

I took my 1" chisel (the biggest chisel I have with me on the ship, and placed it on the side board. I added a bit of air above and below it, so I could have a similar tool sitting in the future tool holder, and still be able to close the lid. When I later compared the position of my shelf with the plans, it was almost identical.

A bit of work with a divider and the dovetails were stepped off. I made a small template that had a bold angle to it, I just eyeballed it, so I don't know what it is in degrees or in proportions.
But it would at least make the angles the same for all the dovetails.
As per my normal routine out here, I do the pins first, because it is easier for me to transfer the layout to the tail board with the work holding that is available to me.

The dovetails ended up being nice and tight. Now I just hope that the dados for the shelf will turn out OK too.

Stock before planing.

jointing the sides of all panels at the same time.

Laying out the position of the shelf using a chisel.

Dovetailing.