Showing posts with label Painting. Show all posts

Monday, July 1, 2024

Chimney Cupboard

 Back in January 2023 I built a chimney cupboard again. Like last time (2017) I used the plans from Bob Rozaieski, as they were published in Popular Woodworking. I built the cabinet with the intention of having it on display to show potential customers what we could make for their tack rooms. 

The cabinet I built previously has been a great source of storage space in our own tack room, and I still like the look of it a lot. It is such a classic shape in my opinion.

All of our other products are made out of high grade pine, but since I didn't have a customer, I didn't want to spend more money than needed to get some really nice wood, so I made this one out of spruce boards. Admittedly I regretted it as soon as I had to stain it. Pine stains nice and evenly. Spruce doesn't..

I can't remember how long time it took me to build it, but it is a reasonably fast build. It might have been around 14 hours or so, I forgot to write it down at that point. Since it was intended to be for sale I wanted to make it as fast as I could, and while the cabinet can easily be made purely by hand tools, some operations like making dadoes for the shelves are fast if done using a router. Also the raised panels for the doors I usually make on the table saw. 
Another thing I normally do is to install the raised panels in a rabbet instead of in a groove. that way I can assemble the door frames first, then make a rabbet all along the inner edges and install the panels using some small strips of wood and some brads. 

I didn't sell the cabinet, so after at bit of time I decided that I might as well start putting it to good use. So I filled it with a lot of the remedies that I use for repairing stable rugs. 

The cabinet would probably look better if it was painted compared to stained and varnished, but it is easy to wipe over with a damp cloth when it is varnished, and if it was installed in a tack room that would be appreciated. 
I can't praise the cabinet highly enough regarding storage space based on footprint. There is just so much useful space inside the cabinet, and the simple yet elegant lines still makes it a favourite of mine. 

It is without a doubt one of the most rewarding builds that I can think of. It is easy to accommodate in a small space like a flat or a small shop, and it easy and fun to make. Most people that sees it like it instantly, just like a hanging Shaker cabinet appeals to most people. 


Flattening the back a bit

A No 8 that I bought from Brian Eve

Marking out for the face frame

Face frame mounted.

The divider is simply glued to the front of the shelf.

Ready for finishing

Plenty of storage space in here.

Roman numerals and our branded logo

Stained and varnished.

I didn't finish the inside.

Spruce doesn't stain very well..


Sunday, July 12, 2020

Building a Mini Max hydroplane

Readers with a good memory might be able to remember that two years ago Gustav, Asger and I constructed a Mini Max hydroplane in the summer. 
The plan was always to make another one, so each of the boys had their own. 

And last year we completed the second one. 

The construction is really simple, but the boat just looks nice and is a fun project to build. 
Asger decided on the paint scheme for this one and he was determined that it should just be a blazing orange on the top and white inside and on the bottom. 
I had purchased an outboard motor from one of my friends, and we decided to try and make a steering wheel for it so it felt a bit more like a racing boat.

Near our summerhouse, there is an old shop that has been under the same ownership since 1970. They carry basically everything. Form tape recorders (though not modern anymore) to regular dairy products and household items.
The shop is well worth visiting just to see the enormous amounts of weird old stuff for sale. 
Prime examples are: blades for scythes size No 4, made in the Soviet Union, 
400 or so pairs of old rubber boots that are frequently treated with a bit of silicone oil to prevent them from cracking while still in the store. 
And the list goes on!

The orange paint that the boat is painted with is bought at that store. It is an old can since there is no MAL code on it (mandatory from some time in the 1980'ies in Denmark I think)
The colour agent is lead chromate which also sort of fell out of favour a couple of years ago. But that sort of stuff is still available on the shelves of this shop.

We will try to get it stored at the summer house, since it is a lot nearer to the water. Then there is a chance of it to see more action.
 
Gustav testing the steering mechanism.

Asger painting the hull.

Completed paint job.


Wednesday, November 15, 2017

Getting off the couch (chimney cupboard)

One of my long time couch builds has been a chimney cupboard as built by Bob Roziaeski for Popular Woodworking Magazine some years ago.
I think that it is fair to say that the greatest obstacle for me when it comes to such a build, is to glue up some boards to the correct width for me to use. I don't know why I have such a hard time pulling myself together to glue up some wide panels, but it is just the way it is.

Anyway, this Saturday evening, I started the project, determined to finish the cupboard before going back to sea. The idea was to put the cupboard into the saddle room, to help organize some of the smaller stuff used for the horses, so it wouldn't be a deal breaker if the surfaces weren't super smooth which can be hard to obtain with larch sometimes.

Saturday and Sunday was spent gluing up stock and dressing it to the correct thickness by means of the jointer/planer.
I wanted to prove to myself that I was able to make a speedy build without too much fussing over details. I decided that I could use my router instead of a dado plane, since I haven't got one of those, and I think that a router is a bit faster.
The rabbet along the back edge of the sides were made with a moving filister plane.

I pretty much followed the descriptions from the magazine, but instead of making a groove for the floating panels for the doors, I made a rabbet with the router and squared up the corners using a chisel. Then I sawed some thin strips to hold the panels in place.
An advantage with this approach compared to a groove is that it is very easy to assemble the door frame at first, and then fitting the panel to the hole. The downside is that it doesn't look quite as nice. But the ease and speed of this construction method trumped.
The raised panels were also made on the table saw instead of using the moving filister plane. That worked really well and was very fast.

For the hinges I used some that I had purchased from Lidl. they are very coarse compared to the hinges that I regularly use, but they fitted the project quite nicely.

Two small porcelain knobs and a couple of toggles to keep the doors closed made up the rest of the build.

While visiting Brian Eve in Garmisch a couple of years ago, I bought some "old fashioned milk paint" from a local dealer in the town.
I have never seen it for sale in Denmark, and I have been hoarding the paint ever since - waiting for just the right project.
I decided that this cupboard would look just fine in Lexington green, so I mixed the small bag of powder and started painting.
The paint was very interesting to use, it dries quickly and covers really well. I like the chalky texture and colour of the finished surface too, so I am tempted to try to make some experiments with milk paint at some point.

Once the paint had dried, the toggles and knobs were mounted back in place again, and Asger helped installing the cupboard in the saddle room, and he also helped organize the various small pieces of equipment so the shelves were soon filled.

Mette really likes the cupboard and she thinks that it is almost too nice to keep in the saddle room. So with a bit of luck I might be "allowed" to make another one at some point.

Chimney cupboard, Lexington green

Mounting the panels with strips, "horns" not trimmed yet.

Completed cupboard.

After first coat of paint.


Chimney cupboard with open doors.

Wednesday, April 26, 2017

Dutch tool chest build 6, painting and thoughts about the build.

There are some adventurous woodworkers out there who will make their own paint, I have tried that before with various success, but I felt that there was no need to stretch my luck anymore on this project. So I decided to go for the sure thing and find a bit of grey oil based paint.
A small DTC doesn't take much paint, so if you need to buy or mix paint yourself, a small portion wil get you a long way.

Inside the chest, on the sloping part of the back, I have chiselled MMXVII, just like I normally do, but I felt like it could be interesting to paint some sort of decoration on the outside too that would show the world that this is my tool chest.
Brian Eve has got his Spanish bull painted, and that looks good, but if I made a bull it would be a shameless copy.
I like beavers because they are woodworking animals, but people might think that I was from Canada (which sadly I am not).
Termites are sort of woodworking creatures as well, but I don't like those.

I have wished for an exlibris stamp for my birthday, and my daughter Laura and I did a bit of brainstorming about that. I guess that brainstorming for my part is mostly keeping quiet, but we ended up combining two of my favourite things: Newfoundland dogs and gambrel roofs.

So I enlarged our stamp suggestion and used that as a decoration. Maybe someone will think that I actually live in Newfoundland in a house that has got a gambrel roof :-)

I am pretty good at sketching gambrel roofs, but I genuinely suck at drawing Newfoundland dogs. So In order to get by I taped the print out onto the lid. I then traced all the lines and the outline of the dog using an awl. I didn't poke through the paper, but the pressure is enough to leave a faint line in the painted surface. It is very similar to how I do when I mark out for the name signs for horses that I have made earlier.
The template was removed and I just had to colour inside the lines. This would most likely have been a bit easier with a smaller paint brush.

All in all, I find that the Dutch tool chest is an interesting and satisfying project to make. The project can be completed in a variety of ways, simple or difficult according to the abilities or the desires of the maker.

For a simpler version,  the chest can be made with rabbets instead of dovetails for the side to bottom assembly, and the fall front and the lid can be made with regular battens nailed on instead of sliding dovetails and breadboard ends.
Similarly the project can be made more complex e.g. by using stopped dados or sliding dovetails for the shelf, and using breadboard ends on the fall front or perhaps use a frame and floating panel construction for the lid and the fall front. 

As I have demonstrated, the chest can be made out of reclaimed dumpster wood or pallet wood. Using this kind of wood can give some challenges in preparing the stock, but after all, it is a tool chest, and not a jewellery chest, so I can live with a less than perfect surface, as long as the chest is sturdy.

I have to accept the fact that the project was a bit too large for me to do out here. I mean physically too large. I had difficulties planing the lid and the sides due to their size, and that pestered me during most of the project.
Having completed this project, I now remember one of the reasons why I normally make smaller items out here.

I haven't added any handles to the chest, but I think I'll do that once I get home, and can use some of the handles I already have in my shop.

Painted and decorated Dutch tool chest

Newfoundland dog and gambrel roof

Scrub planed back.

Template.
 
Precision paint brush.


Monday, March 6, 2017

A small barn for the summer house 9, painting the windows.

After preparing all the individual pieces for the windows, they were assembled. I used a plane for adjusting the size to a pleasing reveal all around each one of them.
The flat parts of each window were also smoothed with a plane, to ease any small differences from the manufacturing.

I consulted Olav for some advice, and he suggested that the traditional way to go would be to coat the rabbet for the glass twice with shellac prior to painting and adding glaziers putty. The reason behind this approach should be that the shellac keeps the putty "soft" longer, because it prevents the linseed oil from migrating from the chalk and into the wood. 

While I am not be someone who dives into testing new stuff, I am normally ready to try out something old and tested straight away. So I took Olavs advice and used up the remaining shellac mixture I had left over from the travelling bookcases.
While I was at it, I also coated all the knots with shellac.

The hardware for the windows look good in my opinion, but it is the most traditional way to cover it in paint as well, that actually made painting a bit easier, since I shouldn't try to avoid getting paint anywhere.
For the painting itself I have strapped a frame to the workbench and mounted the windows on it. That way I didn't have to invent any work holding for the painted windows. The outside of each frame will not be painted since it will be hidden inside the wall. So it seems to be a fairly efficient way of doing it.

The biggest obstacle was Bertha who found it incredible interesting that I was mowing a small paint brush up and down, so she came close to have a look. I managed to get her ushered away with only a few white parts on her coat of fur.

Complete window.

one large and two small windows painted.

Inside corner with shellac applied.

Tuesday, October 11, 2016

North Sea school box 7, all done.

As I promised in the last post, I got Gustav to take some pictures of the school box.
It also turns out that he would like to have the box. So that made both him and me glad.

I have applied 6 coats of shellac. The first 3 coats were a 50:50 mixture of Komet and Superior (tones)
and the last 3 coats were just Komet which is a fairly yellow colour. Actually I think it looks kind of like the colour of a Spanish guitar.

Applying the shellac was simple, and it looked fine until I looked really close. At that point I could clearly see strokes from the brush and where I had overlapped.

Still I must admit that I think shellac has a future in my woodworking.


North Sea school box completed.

Houndstooth dovetail on skirt.

Houndstooth dovetail on skirt.


Secret compartment closed.

Secret compartment opened.

MMXVI (2016)


Sunday, October 9, 2016

North Sea school box 6, completion and finish.

Contrary to my normal practise, I decided to complete the school box build before starting on something else. Projects that come home from the ship have a grave risk of ending up in the "on hold" projects line. Prime examples are the Gerstner inspired tool chest that hasn't been touched for about two years.
It helped a lot that there wasn't much to do, in fact I just had to plane the lid a bit more, due to some more cupping of the panel, and then make a dust seal to go around it. Attach the lid and finish the box.

In a rush of self confidence I made a small set of houndstooth dovetails for the dust seal. In the same rush of self confidence I thought that it was smart to saw of the rear part of the dust seal in a 45 degrees angle. I am still a bit unsure why I considered it a good idea at that time. Because it looks strange and a square cut would have been a little less work and have looked a whole lot better.

The front of the dust seal was glued to the lid, and the side pieces attached with some lang headless brads. I home they are sturdy enough to help keep the lid in place. My idea is that they should sort of work as battens.

I planed some chamfers and sanded the box outside and that, as they say, was that.
The original book text describes how the lid is secured by means of some fabric tape/straps that will keep the lid from opening too far.
I found an old piece of leather strap that could do this trick too. I made some holes and attached it with two nickel plated brass screws.

Finishing is done with shellac. It is my first attempt of mixing my own, and I have tried to make a 2Lb cut mixture.
I have two tones of shellac: Komet and Superior. At first I mixed two small batches of each to see if there was much difference in the colour. It didn't seem that way, so in the end I mixed them both together because I think that will give me enough to cover the box a coupe of times.


North Sea school box with first coat of shellac.

North Sea school box prior to coating.

Wednesday, December 16, 2015

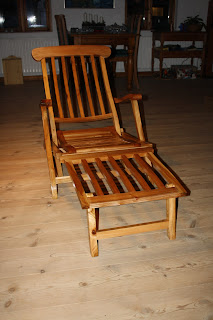
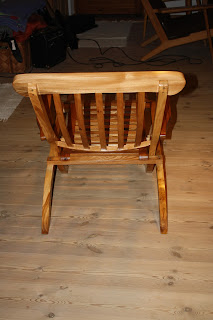
Titanic deck chair

For once I have made a project which does not involve pallet wood. And furthermore isn't it a box of any kind.

My wife has wished for a deck chair for a couple of years, but I haven't found the time to build her one until now.

The plans for this chair can be found at Popular Woodworking, they were issued in 2012, 100 years after the sinking of the RMS Titanic.

I made my chair out of elm which originally comes from trees belonging to my neighbor. They were among the first boards that I ever milled, so they have air dried for some 8 or 9 years now.

The construction of the chair went along OK, but with a few screw ups along the way, some were my own fault, and some were due to the cut list and plans.
It is not a quick project, but that should come as no surprise with 43 individual parts, of which 26 of them have to be shaped on the band saw.

As a finish I applied two coats of oil based marine varnish.

Since I will sign on the ship tomorrow, I won't be home for Christmas this year. I have therefore already given the chair to my wife, so now it is OK to blog about it, even though it is a present.
That is also the reason why I didn't blog about the build itself.

Titanic deck chair made of elm.


Monday, November 23, 2015

Treasure chest with curved lid part 9, The finished chest.

I asked my wife what finish she would like to see on the Shaker cabinet, and her answer was Danish oil (what a surprise..)
I had hoped for a paint finish, but since it will probably be given away for someone as a Christmas present, I chose to stick to what she wanted.

But there were no restrictions to the treasure chest with curved lid that I made some time ago. That thing has just been sitting idle under a table to be out of the way.
I asked Asger if he would like to paint it, and he was really exited about it. I decided to give up most of the control and told him that he could choose the colour.
We looked at the paint shelf, and I tried my best to advocate for a green, blue or red coat of paint. But Asger was not convinced that it was the right path. Finally he made up his mind and settled for Massey Ferguson light grey, a classic tractor colour.

He rolled on a coat of paint that quickly got absorbed by the wood. So we agreed that was a primer, the next day he rolled on another coat, and that helped a lot.

Finally I added the last layer using a brush instead of the roller, because our cheap roller more or less dissolved in the oil based paint.

I had made some hardware on the ship while I made the chest itself. An escutcheon and parts for some lifts. 
The lift handles themselves are old handles from some metal pails that comes with various chemicals and soap.

Since I made a treasure chest, I opted for some fantasy inspired hardware. something that could spark an interest in a child. So I made a dragon/vampire bat as a theme. 
It turned out better than I had hoped for. But I think they would have stood out more if the chest had been in a different colour.

The finished treasure chest.

Asger sanding

Asger painting

Painting

Dragon escutcheon

Dragon lift

Tuesday, February 10, 2015

New tool chest for the sea 9, the completed chest.

After letting the paint dry for two days, I decided to use Sunday evening to mount the hardware on the outside of the chest.

At first I removed the masking tape from the jointing edges of the led and the carcase.
I had tried to place the tape so there should be a very small green line all the way around this edge, but it didn't quite look very good. I don't know if it is standard procedure to paint this part of a chest, but as it is now it doesn't look too good.
Seen from the outside, you can get a glimpse of wood that is unpainted, and when the chest is open, you can see the remnants of a bit of green on the edge.
I have considered if painting this part black would look good, maybe I'll do it at some point at home.

To protect the paint a bit from dings and scratches, I places it on a piece of cardboard on our workbench. I started by mounting the lid corner reinforcements. Then moved on to the top corners for the carcase, and finally I turned the chest upside down and even placed a piece of rag between the top and the cardboard to protect the show side of the chest while working on it.

All reinforcements were installed in the same way: I positioned the bracket in the recess, and then made a pilot hole for two of the screws using one leg of a divider. (We don't have an awl out here).
A screw was mounted in each hole and they were clocked.
Now with the bracket in place, I made the other pilot holes and mounted the rest of the screws.

Finally I used a file to ease off a few of the edges that were protruding a bit into the chest.

The escutcheon was mounted using a few drops of paint on the backside as glue, and then some small brass nails held it in place.


I then found all the tools and tried to load them in the chest.
There was just enough room for my old tools and the "new" moving fillister plane. Although I had to take out the grooving plane from the original cardboard box, to be able to shoehorn it into the box.
I'll tell my daughter that I would like to get some small sewn bags to but my planes in. Kind of like plane socks. She has rediscovered the joy of using a sewing machine, so that should be a fine project for her.

I didn't take any pictures of the loaded chest, but I managed to put the shooting board in there as well.
The empty weight of the chest is 3.2 kg (6 Lbs), and the curb weight is 11 kg (22 Lbs). So I am still able to bring clothes with me to the ship without breaking the maximum weight limit for my bag.

The finished tool chest.

Friday, February 6, 2015

New tool chest for the sea 8, green paint and tills

Yesterday one of the able bodied seamen found the missing green paint, so I immediately started humming the old song by "The Everly brothers": Dream dream dream. (Instead I used the word green)

I found some cardboard that I could place the chest upon while painting, and attached 4 screws underneath the chest to give some clearance so that I could paint the bottom first and then place it on the screws and paint the rest of the chest at the same time.

Before applying the paint, I sanded the surface using grit 120 and 240. I also added some masking tape on the hinges and on the mating surfaces where the lock meets the carcase.

First I painted the recessed corners where the reinforcements will go with a brush. After that I used a paint roll to apply paint to the surfaces of the chest.

The colour is used on the deck of the ship for identifying systems used for pumping drill water.
In the engine room it is also used as a code for sea water  systems.
And now it will also be internationally recognized as a colour code for tool chests for the sea.

While the paint started drying, I proceeded with some tills for the tool chest.

The materials for the tills were some boards that I planed for the Gerstner inspired tool chest as far as I remember. So I was glad to be able to use them for something and not having to prepare any additional stock.

The tills won't be sliding tills, because I would like the contents of the chest to be as stable as possible during the handling of my bag.
I decided that I could use the 6 mm birch ply from the bottom of the old sea chest, as bottoms for those two tills. Again saving myself from preparing stock, and using the old chest for something sensible instead of just throwing it away.

The sides of the tills were dovetailed with regular through dovetails. They had a nice tight fit so I didn't use clams on any of them, but just measured the diagonals to check that they were square. Then they were placed on a transformer and left to dry.

Today I attached the bottom and planed the sides a bit before lightly sanding the surface.

I also lightly sanded the painted chest, and added a second coat.

The next big thing is to decide what the escutcheon should look like..


Green chest, 2nd coat of paint still wet


Tills for the tool chest.


Wednesday, October 29, 2014

The painted door in the stable.

Today it wasn't raining, so I decided to move swiftly and paint the door.

I normally like to use oil base paint, since I haven't got much faith in latex /acrylic paints.
The colour is called Swedish red. It is a Danish produced paint from Esbjerg Paints. The label of this paint is called Arsinol, it is intended for outdoor use.

The paint has got some added thickener (I think it is called thixotropic), so it doesn't drip very much. It covers really well, so all in all I find it an OK paint.

The handle is placed high up on the door, but since the holding arrangement for the latch is also embedded in the brick work, I had to stay with that position.

The outside.

The inside.


Tuesday, June 3, 2014

Tumblehome sea chest, the completion

Yesterday, I made a lower skirt for the tumblehome sea chest.
I like to change the orientation of the dovetails for the lower skirt, so it can better resist the outward thrust of the bottom, if it should expand at some time.

A great advantage of fitting skirts to a canted chest is that the further down you press the skirt, the tighter the fit will be.
I took a critical look at the surface of the chest itself, and it doesn't look very good. The spruce I have used was definitely not furniture grade, so I am convinced that I will paint the chest once it is done.

While waiting for the skirt to dry, I glued up a panel for the lid.
I figured that a small experiment wouldn't hurt, since the chest isn't designed for anything special. So Instead of my usual floating panel type lid, I decided to go for a flat panel with nailed on battens to prevent it from warping.
I dovetailed two battens to a piece of wood that will act as a front dust seal. After the glue had dried, I mounted the assembly on the lid.
I glued the front dust seal piece onto the lid, and then I reinforced it with some clenched nails just to keep on experimenting.
The two battens were attached with clenched nails, but no glue. My theory is that the front piece will stay put due to the glue and the nails, and the nails holding the battens will prevent the lid from warping, but still be flexible enough to accommodate seasonal movements.

The lid is secured with a leather strap which I took from an old bridle for the horses. I punched a couple of holes in it, and mounted it using some brass screws.

Before painting the chest, I decided where to put the lifts, and I made pilot holes using an awl.

I couldn't make myself use the milk paint which I bought two years ago in Germany. I haven't been able to locate a dealer in Denmark, and I didn't want to risk waste the paint on an experimental chest like this one made out of crappy wood.
I looked at my shelves and found some machine enamel in the RAL colour 6011 (Reseda green / Hannover Green). It is produced in Denmark by a company called Esbjerg Paints. and I figured that if it can stand up to agricultural machinery, then it will be OK for my chest.
The red colour is Swedish red wood protection from the same company. I used it for painting a door on the backside of the barn a year ago.

After letting the paint dry for a couple of hours I estimated the paint to be at least dry enough to allow for mounting of the lifts.
The mounting itself went suspiciously easy, so maybe I am having a lucky day.

All that is left is to present it to SWMBO and see if she would like it in the stable or inside the house.
I think it might end up in the stable, since we need a new box for curry combs, and this chest will be perfect for that. In addition it is very stable and can be used as a small platform for standing on, when the hair of the horses needs to be groomed and braided before going to a contest.


The finished chest.

View from the other end of the chest.

Clenched nails and holding strip.