Wow, this title reminds me of papers you had to write in the school, except that here I get to choose the subject.
We are currently waiting for the crew change helicopter to arrive, so we can start our journey towards home. So I started rethinking the building of the sea chest, what was a success, and what wasn't, which tools did I miss the most etc.
Tools:
I really missed a marking gauge, I think it would have enabled me to make tighter dovetails. I used an ordinary pencil, and it worked, but it is easier to achieve a consistent look through using a proper marking gauge.
Some real sandpaper would have been nice, and perhaps to a finer grade than 120.
I kind of missed a mallet, but I got by using an ordinary hammer or a rubber hammer. So it didn't stop the project.
A scrub plane or a cambered blade for the Stanley No 3 would have made the stock preparation faster.
Both the mallet and the marking gauge could have been manufactured onboard, but I wanted to finish the chest instead of straying from the path and making various side projects.
I actually tried to make a plow plane that used the 1/4" chisel as a blade. That was not a success. I tried to make it in about 1 hour, and not surprisingly it did not work very well. The reason for the plow plane was due to my original plan of making a panel lid with mitered bridle joints at the corners.
Techniques:
I have become way better than I ever imagined at preparing stock by hand, and I have learned how to use a planing stop and just letting the board rest freely on the table. This is something I would never have dared to tackle at home, but I didn't have the option out here.
The grain orientation on the stock varied from nice, straight and easily planeable to unruly, twisted, interlocking, multiple directional and generally difficult granin. I discovered that traversing produced a slightly fuzzy, but flat surface without too much tearout. this is where som more sandpaper would have been really handy.
Gluing up the oily woods always needed 24 hours in the clamps. And I think that my glue problems were more traceable to the wood than to the glue afterall. Some hide glue would probably have helped.
A fresh hacksaw blade can be used as a pull saw, for fine cuts, or it can be used mounted in the hacksaw as a normal dovetail saw. The kerf will be wider than on a normal saw, but this is mostly notable in the corners of the dovetails, where you need to clean a little more with a chisel.
One of the advantages of a hack saw is that you can get blades with a different toothing, and it is very quick work to change the blade. I think the blades I used were 18 TPI, but 24 TPI is also normal.
If I am going to teach my children to saw dovetails, I will let them use a hacksaw, because it is not destroyed if they twist it in the kerf, as could be the case with a real dovetail saw with a fine blade.
Making things with canted sides is not difficult, you just need to trim the edges afterwards, due to the inevitable height difference there will be du the the different angles. And it makes it at lot easier to fit the shirt, since you can assemble the skirt off the chest and slide it on once it is dry. And a side benefit is that the further down you press it, the tighter the fit will be.
The angles of the sides are 8 degrees, and I didn't have any problems concerning getting the clamps to hold at this angle. I didn't make any wedges to straighten up the pressure, but just used a normal offcut under the jaws.
Tuesday, April 2, 2013

Sunday, March 31, 2013
The finished sea chest
This is the end of the road for this project.
I have spent 67 hours all inclusive i.e. making handles and fabricating nails.
I sanded the chest down to grit 120 which is the finest grade we have onboard (emery cloth). I had dismounted the handles before doing this, so I didn't have to work around them.
I waited about 2 hours after the sanding, to let the dust settle before applying the finish.
The finish that I have used is "clear urethane electrical isolation" I am pretty sure that it is normal urethane varnish inside a green aerosol can.
The wood absorbed the first and second coat rather fast. I waited approximately 30 minutes between each coat. Then I waited about one hour and lightly touched the surface with a schotch brite pad. Wiped it lightly with some paper and gave it a final 3rd coat.
In an ideal world, I would have waited longer between the coats, and also given it some more coats, but since I am signing of Tuesday, I had to finish the chest.
Once I determined that the 3rd coat was dry enough, I remounted the handles and carefully moved the chest out of the workshop and into a corner of the engine room where it would be out of the way and maybe drying a bit faster.
You never know if someone has got to use the workshop during the night, so I could not just leave it on the table.
Enough talk. Here are the pictures of the finished sea chest.


I have spent 67 hours all inclusive i.e. making handles and fabricating nails.
I sanded the chest down to grit 120 which is the finest grade we have onboard (emery cloth). I had dismounted the handles before doing this, so I didn't have to work around them.
I waited about 2 hours after the sanding, to let the dust settle before applying the finish.
The finish that I have used is "clear urethane electrical isolation" I am pretty sure that it is normal urethane varnish inside a green aerosol can.
The wood absorbed the first and second coat rather fast. I waited approximately 30 minutes between each coat. Then I waited about one hour and lightly touched the surface with a schotch brite pad. Wiped it lightly with some paper and gave it a final 3rd coat.
In an ideal world, I would have waited longer between the coats, and also given it some more coats, but since I am signing of Tuesday, I had to finish the chest.
Once I determined that the 3rd coat was dry enough, I remounted the handles and carefully moved the chest out of the workshop and into a corner of the engine room where it would be out of the way and maybe drying a bit faster.
You never know if someone has got to use the workshop during the night, so I could not just leave it on the table.
Enough talk. Here are the pictures of the finished sea chest.


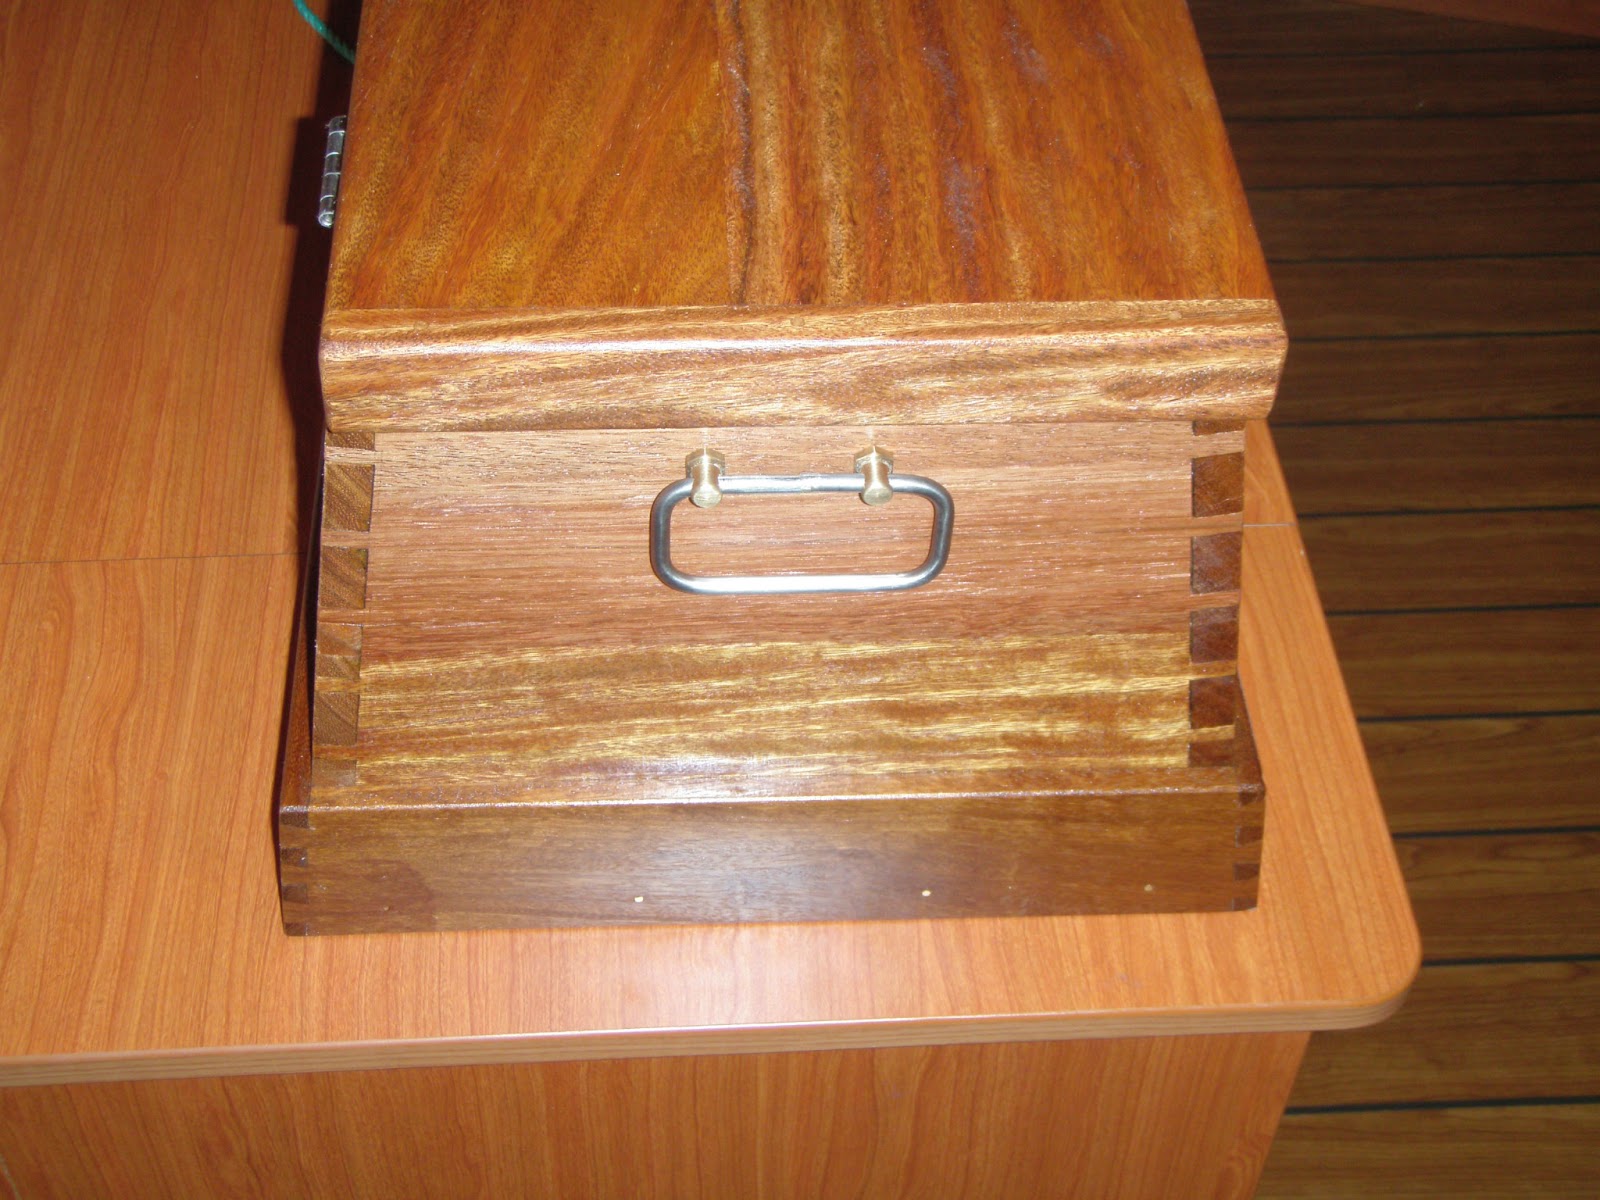
Saturday, March 30, 2013
A tight mini skirt and a nice bottom
I found an advantage in building a chest with canted sides:
The skirt could be assembled off the chest, and later slid onto it, and the further down it is pressed, the tighter the joint gets.
Since it is a small chest with an even smaller skirt, I find it fair to call it a mini skirt.
The mini skirt extends about 1.5 cm below the bottom of the chest. This was done on purpose, and not because of some measuring error!
My theory is that a sea chest should be lifted above the floor since you could have water on the floor for different reasons: cleaning, heavy weather throwing in a lot of water when the hatch was opened, someone coming drenched from watch etc. If the bottom of the chest is lifted of the floor, the skirt might be wet, but your dry clothes inside the chest will remain dry.
This could also be achieved by a pair of sacrificial rails under the length of the chest, but I chose this option because I think it looks good.
The lid is fitted with breadboard ends that look like cleats, since they extend below the lid. This is something I have seen on pictures of the sea chests, I can't think of any particular reason why they were made like that, but sailors are pretty traditional, so I followed suit.
These are the first breadboard ends that I have ever made, and they are not quite as tight as I would have liked them to be, but they are OK.
They are drawbored, and the two outer tenons have elongated holes to accomodate the eventual seasonal movement of the wood. No glue was used.
I made the dowels by splitting some of the wood that was left over from the drawers, then they were shaped by hammering them through a 4.2 mm hole in a steel plate.
The holes in the actual top and breadboard were 4.0 mm, so they had a nice tight fit.
The handles have been mounted fairly high upon the chest due to tradition and since I had the drawer arrangement in the one end that was a bit of an obstruction. Originally the idea was to use wooden cleats and make some beckets, but being an engineer, I opted for the hardware road instead.
The tradition with high fitted lifts of any sort is that the will assure a low point of gravity when the chest is hoisted onboard using the handles. You wouldn't want a top heavy chest turning over and spilling all your clothes in the water.
The chest has been assembled, so all there is left to do is to nail the bottom through the mini skirt, sand it and then apply some finish.


The skirt could be assembled off the chest, and later slid onto it, and the further down it is pressed, the tighter the joint gets.
Since it is a small chest with an even smaller skirt, I find it fair to call it a mini skirt.
The mini skirt extends about 1.5 cm below the bottom of the chest. This was done on purpose, and not because of some measuring error!
My theory is that a sea chest should be lifted above the floor since you could have water on the floor for different reasons: cleaning, heavy weather throwing in a lot of water when the hatch was opened, someone coming drenched from watch etc. If the bottom of the chest is lifted of the floor, the skirt might be wet, but your dry clothes inside the chest will remain dry.
This could also be achieved by a pair of sacrificial rails under the length of the chest, but I chose this option because I think it looks good.
The lid is fitted with breadboard ends that look like cleats, since they extend below the lid. This is something I have seen on pictures of the sea chests, I can't think of any particular reason why they were made like that, but sailors are pretty traditional, so I followed suit.
These are the first breadboard ends that I have ever made, and they are not quite as tight as I would have liked them to be, but they are OK.
They are drawbored, and the two outer tenons have elongated holes to accomodate the eventual seasonal movement of the wood. No glue was used.
I made the dowels by splitting some of the wood that was left over from the drawers, then they were shaped by hammering them through a 4.2 mm hole in a steel plate.
The holes in the actual top and breadboard were 4.0 mm, so they had a nice tight fit.
The handles have been mounted fairly high upon the chest due to tradition and since I had the drawer arrangement in the one end that was a bit of an obstruction. Originally the idea was to use wooden cleats and make some beckets, but being an engineer, I opted for the hardware road instead.
The tradition with high fitted lifts of any sort is that the will assure a low point of gravity when the chest is hoisted onboard using the handles. You wouldn't want a top heavy chest turning over and spilling all your clothes in the water.
The chest has been assembled, so all there is left to do is to nail the bottom through the mini skirt, sand it and then apply some finish.
 |
| Elongated hole in the tenon for the breadboard ends. |
 |
| The lid and the breadboard end ready for assembly. |
 |
| The tight mini skirt. |
 |
| The nice bottom surrounded by the mini skirt. |


Thursday, March 28, 2013
Toolbox for children
My younger brother sent me this picture of a toolbox which he made for his sons. Actually he made two, one for each of them, but he only sent me one picture.
I like the sheer look of it, with nice bright colours for the door and window.
The door handle looks like it is made of a headless nail which has been bent.
he is going to make a small workshop class together with some Japanese magazine, and 10-20 children will each make their own toolbox.
I guess the workshop will take place in Tokyo (where he lives), and he speaks fluent Japanese if anybody should be interested in participating.

I like the sheer look of it, with nice bright colours for the door and window.
The door handle looks like it is made of a headless nail which has been bent.
he is going to make a small workshop class together with some Japanese magazine, and 10-20 children will each make their own toolbox.
I guess the workshop will take place in Tokyo (where he lives), and he speaks fluent Japanese if anybody should be interested in participating.

Wednesday, March 27, 2013
Hardware for the sea chest (metal working)
Hinges.
Someone onboard have once ordered a bunch of different hinges, so I have found some nice wide brass hinges that will fit the chest with a little bit of work.
Handles.
We have some metal chemical drums (5 gallons), with a metal handle on top. I have thought about using them, but they are not stainless nor brass. So I don't want them on the chest.
I ended up with the following design, which is a compromise. It should have been all brass or bronze, but we didn't have any 6 mm bronze rod, and I didn't want to waste a lot of material by turning down a 12 mm rod. Therefore the handle itself is made out of a stainless steel pipe . The holders are made of brass.
The holders are 40 mm in length (total) and have got an 8 mm thread. The plan is to drill a hole through the ends of the chest, and attach the completed handle by means of an acorn nut on each holder.
I turned them on the lathe out of some 12 mm hexagonal stock.
The handles are made out of 6 mm stainless stel pipe which has been bent and silver soldered withthe holders in place.
One of the handles is 4 mm longer than the other, but I don't think that it will show when they are mounted on the chest.
Lock.
Most sea chests seem to have had a lock, which I think is rather strange, since it was unthinkable, that anybody would ever lock their sea chest while onboard. If you locked your sea chest, you didn't trust your ship mates, and that was unheard of.
I once read in an old book, that if you actually locked the chest, then yourship mates would usually nail your lid on while you were on duty, as a way of expressing disgust in that you didn't trust them.
It is still a bit like that (at least in the Danish merchant marine).
If you are in your cabin, you pull the curtain in front of the doorway. This means that someone is in the cabin and it is treated as a closed door. But the person inside is awake and you can knock on the wall next to the doorway and ask to come in and have a chat.
If you are not in the cabin, the curtain is drawn aside, and the steward can go in and do the cleaning of the cabin.
If the door is closed, the person in the cabin does not want to be disturbed, he could be sleeping or making a telephone call to his home or just wan't to be left alone.
A closed door is treated like a locked door ashore, in the middle of the night, no matter what time of day it is. It is considered to be very bad manners to knock on a closed door.
You only lock your door during port stay.
There can be exemptions, e.g. in high risk piracy zones it is OK to lock the door even at night.
Someone onboard have once ordered a bunch of different hinges, so I have found some nice wide brass hinges that will fit the chest with a little bit of work.
Handles.
We have some metal chemical drums (5 gallons), with a metal handle on top. I have thought about using them, but they are not stainless nor brass. So I don't want them on the chest.
I ended up with the following design, which is a compromise. It should have been all brass or bronze, but we didn't have any 6 mm bronze rod, and I didn't want to waste a lot of material by turning down a 12 mm rod. Therefore the handle itself is made out of a stainless steel pipe . The holders are made of brass.
The holders are 40 mm in length (total) and have got an 8 mm thread. The plan is to drill a hole through the ends of the chest, and attach the completed handle by means of an acorn nut on each holder.
I turned them on the lathe out of some 12 mm hexagonal stock.
The handles are made out of 6 mm stainless stel pipe which has been bent and silver soldered withthe holders in place.
One of the handles is 4 mm longer than the other, but I don't think that it will show when they are mounted on the chest.
Lock.
Most sea chests seem to have had a lock, which I think is rather strange, since it was unthinkable, that anybody would ever lock their sea chest while onboard. If you locked your sea chest, you didn't trust your ship mates, and that was unheard of.
I once read in an old book, that if you actually locked the chest, then yourship mates would usually nail your lid on while you were on duty, as a way of expressing disgust in that you didn't trust them.
It is still a bit like that (at least in the Danish merchant marine).
If you are in your cabin, you pull the curtain in front of the doorway. This means that someone is in the cabin and it is treated as a closed door. But the person inside is awake and you can knock on the wall next to the doorway and ask to come in and have a chat.
If you are not in the cabin, the curtain is drawn aside, and the steward can go in and do the cleaning of the cabin.
If the door is closed, the person in the cabin does not want to be disturbed, he could be sleeping or making a telephone call to his home or just wan't to be left alone.
A closed door is treated like a locked door ashore, in the middle of the night, no matter what time of day it is. It is considered to be very bad manners to knock on a closed door.
You only lock your door during port stay.
There can be exemptions, e.g. in high risk piracy zones it is OK to lock the door even at night.
 |
| The holders straight from the lathe. |
 |
| Handle before straightening. |
 |
| Finished handles. |
 |
| Holder and silver soldered handle. |
 |
| Holder on handle. |
Tuesday, March 26, 2013
Secrets of the sea chest
As promised in an earlier post, I will show the secrets of the sea chest.
Since the sea chest itself is rather small, 50 cm long, 35 cm wide at the base and a total height of around 30 cm, the drawers are farily small, and the secret drawers are even smaller.
But the most important thing is: They are there for the curious spectator to find.
 These are the two regular drawers in place beneath the till.
To give you an idea of the size; each drawer is 9 cm high.
 Here, the drawers have been removed granting access to the two locking keys that hold the vertical divider in place.
 Now the locking keys have been opened and the vertical divider is pulled out.
 The two secret drawers are accessible from behind the vertical divider.
 The entire backing plate for the lower drawer is being pulled out. It rests in a narrow dado in the side wall and in the horizontal divider just above it. There is a small secret compartment at the back end of the backing plate.
 The entire backing plate for the upper drawer is being pulled out. This one too rests in a dado in the side wall and in the horizontal divider. Like the lower unit, there is also a small compratment at the back end of the backing plate.
 This view from above shows the arrangement of the drawers and the secret drawers and the secret compartments.
To the left is the lower set and to the right is the upper set.
The secrets in retro perspective.
I took a little time figuring out how I was going to do this. One of the hardest parts was to accept the fact, that the secret drawers didn't have very much pratical use based on their small sizes.
The actual making of the drawers and compartments took quite some time because I had to process some stock to a small size, and then I had to glue the splitting and wait etc.
I think that I will try to make some more secret comartments or drawers in the future. I would like to do some with a series of locks, both quaker locks and sliding keys. But all in all it has been quite fun to make them and I hope my family will enjoy finding them.
Since the sea chest itself is rather small, 50 cm long, 35 cm wide at the base and a total height of around 30 cm, the drawers are farily small, and the secret drawers are even smaller.
But the most important thing is: They are there for the curious spectator to find.

To give you an idea of the size; each drawer is 9 cm high.


To the left is the lower set and to the right is the upper set.
The secrets in retro perspective.
I took a little time figuring out how I was going to do this. One of the hardest parts was to accept the fact, that the secret drawers didn't have very much pratical use based on their small sizes.
The actual making of the drawers and compartments took quite some time because I had to process some stock to a small size, and then I had to glue the splitting and wait etc.
I think that I will try to make some more secret comartments or drawers in the future. I would like to do some with a series of locks, both quaker locks and sliding keys. But all in all it has been quite fun to make them and I hope my family will enjoy finding them.
Saturday, March 23, 2013
Sea chest build part 11
Finally the drawers are all assembled.
I made an insert bottom for the two main drawers, and nailed
them in place with shortened homemade nails.
The last secret drawer was glued up, and should be ready for
the final trimming today. 
I turned some drawer pulls, which didn’t take very long. The
first one took an estimated five minutes, and the rest three minutes each. Turning something to the correct diameter is
easy on a metal lathe. Once you know which dial position corresponds to an 8 mm
diameter, it is very quick work. In addition they don’t have to be 100% alike.
I used the trusty hacksaw as a parting tool, to avoid changing the setting of
the iron and thus disturbing my quick 8 mm setting.


The drawers with their pulls glued in place.

Subscribe to:
Posts (Atom)