Sunday, January 29, 2017

All animals are equal, but some are more equal than others.

Normally the Danish society is perceived  as being very equal. Men can work in a kindergarten and women can become police officers etc.

According to Bertha, there seems to be some segregation though.

The other day Gustav and a friend were training horse jumping on the riding court, and Bertha wanted to participate. 
Liberty for all and the stuff about each individual should pursue his or her happiness free from intervention from the state. Well not in Denmark.

The department of local homeland security (my wife) apprehended Bertha after a short appearance on the riding court. 

So that is why she is looking a bit disappointed.
For the sake of any PETA members reading this, Bertha was released as soon as the training of the horses stopped.


I am not allowed to participate..

WSBO 5, Shelf completed

After gluing up the shelf, I just had to wait for the glue to dry before sawing off the protruding pegs and wedges for the dowel.

After sawing them all off, I sanded the surface flush.

I measured out for the two holes for mounting the shelf and bored those too.

That was all the work that was required today.

For me the biggest obstacle isn't to build the stuff. It is to take a decent picture of it.
At home I would have hung the shelf on a door or some other wood clad surface, and I could have taken some pictures of it.
But out here I don't want to make any holes for temporary mounting of my shelf. I tried to make use some tape, but that didn't work well either.

In the end I tried to make a cyclic wall (I think that is the name) using a floor mat and taping the top if it to the wall.

I had to balance the shelf to get it to stand by itself, so the hooks are not hanging quite as they will when the shelf is really mounted.


The completed shelf.

View from the other side

Details of mouldings.

Shelf lying on the back, note the position of the hooks (Thanks gravity..)


Saturday, January 28, 2017

WSBO 4, making hooks and glue up.

The shelf I have at home has got some hooks hanging on the dowel. These were some that I made and installed many years after making the shelf as my sloyd exam project.
I wanted to make some hooks for this shelf as well, and they are not hard to make with some very basic hand tools.

The hooks at home are made out of heavy copper wire. Out here I have access to bronze brazing rods that are 3 mm thick (1/8"). They will work just as fine, but they are a little bit harder to bend.

I placed two extension pieces from a regular 1/2" square ratchet/socket set in the vice. The distance between them were probably 1/2" or so.
I start by making the eye of the hook.
When that is done, I fold the hook end around the other extension piece and make sure to fold it a bit longer due to the tendency of the metal to spring back.
Once I had made a bunch of hooks I used some pliers to cut them free of the rod that I made them of.
The places that I cut were rounded using a needle file.

Before the glue up I marked the position of the individual pieces in relation to each other, and I drilled some pilot holes for the screws.
The shelf and the supports are fastened to the back piece by means of glue and screws.

The shelf is temporarily screwed to the supports to keep it in place while the glue dries. Once the glue is dry I will remove the visible screws and replace them with a small wooden peg.

The had a kerf sawn in each end before I mounted it, and a wedge is glued into it.

When I had everything glued up and only needed to screw in the two last screws for temporarily holding the support in position with the shelf, I decided that the support was a little bit out of square. I pressed at it but it didn't move. I very lightly tapped it with my hand, but it still didn't move.
Then I gave it a smart blow of the hand, and the support broke in two...
I guess the dowel was a tight fit.
The broken off piece was recovered and glued back. After cursing a bit I managed to get a couple of clamps on, and finally the last two screws were in place.

Bending a hook.

Seven bronze hooks lined up.

Glued up shelf.

WSBO 3, supports and planing a dowel.

Since the design of my shelf is traditional, it requires a bit of curves on the supports.
The biggest obstacle for me is to make nice curves with a panel saw or a hack saw.

After sketching about 10 different lay outs, I settled for two curves.

I flattened the back of the board for the supports, and then I marked the finished size out on the board regarding the length / height of the supports. And cross cut the pieces.

Next I used a divider to make some pleasing curves and I clamped the two supports together and tried my best to saw near the line.
The convex curve was fairly easy to do, I just had to remove the waste every once in a while, and then come back at another angle.
The concave curve was a bit more difficult, but a hacksaw can follow a curve if it isn't too tight, so it ended up OK.

A rasp would be great for cleaning up such curves, but I had to resort to a couple of files and some 60 grit emery paper.

After that I marked out for where I wanted the hole for the dowel to go. I sandwiched the supports between some sacrificial scraps of wood and clamped it all to the table of the drill press.
I found a 16 mm drill and drilled the holes in one motion.

I ripped a piece of wood some 3/4" square, to make a dowel. I tried to find a piece of wood with straight grain to make it easy for me during planing.
A sticker board was set up and I started by making an octagonal. After that I simply tried to turn the dowel for every stroke, and it quickly turned reasonably round.
The sticker board was not helping anymore, so I changed tactics and held the dowel in my hand. That worked for a while, but not very well.

Finally I clamped my plane upside down in the vice and used both hands to maneuver the dowel over the blade. That trick gave me a lot of control, and the dowel ended up very round.
Finally I sanded it to an even rounder shape and checked that it could enter the holes in the supports.

Trying to saw a curve.

Rough shape of the supports.

Getting ready for drilling.

Stock for the dowel.

Almost complete.

All pieces of wood ready for assembly.


WSBO 2, Assembling the back piece and making the shelf.

After a quick lunch and a cup of tea, I began making the half lapped joints for the back piece.
Since I had made mouldings on the sides of the strips to be used, a little more work than usual was involved.

Normally it is just a question of marking up some square lines and sawing and chiseling the waste out.
Here I had to make some miters too, in order for the moulding to flow around the corner.
A great tool for a task like that is a router plane, but it can also be done just using a chisel. So given my limited tool kit, that is how I did it.

I marked out the depth of the half lap from the front of the strips of wood. That way any inaccuracies will be on the back side where I can easily trim them away with a plane once the glue is dry.

The back piece was then glued together and left to dry.

For the shelf I wanted to make another moulding at the top of the front.
I changed the blade for a large beading, and the result was beyond my expectations. I immediately decided that I could make another beading on the front itself, so that the moulding would look like a 3/4 dowel.
This went OK, but not as good as the last. This is where proper grain orientation is important. the grain in the pallet sides are not completely consistent, so suddenly it was reversed and I had a little bit of tear out.

I then tried to make a smaller beading on the portion that was left, but that totally messed up for my. So I had to change the plane into a rabbet plane and make an attempt of cleaning the mess up.

I cut the shelf to length and managed to get the saw to jump out of the kerf and onto the part to keep. So I shifted the kerf and made the shelf 1/2" shorter.
Then I started thinking about if I could make something interesting for the ends of the shelf too. A beading always look nice, and perhaps this Stanley plane will work really fine going across the grain.
It doesn't work well across the grain, especially not on some softwood from a pallet. Again I had to resort to the solution of shortening the shelf to remove the remnants of the disaster.

Some people learn from mistakes, whether they are made by themselves or by others.
I generally fall into the group that people learn from..


The glued up back piece.

The shortened shelf.

WSBO 1, stock preparation and making mouldings

It should come as no surprise to regular readers of this blog, that the stock for this build will come from a pallet frame.

Right now our ship is laid up and we haven't received new pallets for quite some time, but I found an old set of pallet sides that I could use.
The grain is not as straight as I would like it to be, but it will probably be OK.

First I sawed off the four hinges of the pallet frame, and then I decided on which piece was going to be the top and the supports and the back.

I ripped the stock and cut it to length with a bit extra.

Next I used my plane is a scrub set up, and dressed the boards to a bit over the final desired thickness. Once all of the boards had been scrub planed, I switched to the smoothing blade, and made the surface look nice.

My idea is to start with the back piece, then I can make the supports and the actual shelf while the glue of the back is drying.

So the next logical step was to plane down the sides and make sure that the 3 pieces for the back were of the same width.
They were then crosscut and I tried to establish how I wanted them to end up being oriented on the finished shelf.

I clamped up something like a sticker board, and using my Stanley No 50 combination plane I made mouldings on the edges of each boards.

The next task is to make the joinery for the back and assemble that.


My selection of materials.

Maximum length of material.

Cross cutting pieces for the back.

Sticker board set-up.

Monday, January 23, 2017

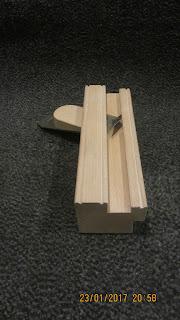
Spill plane build 3, the completed plane

With the back fence glued on, the next thing was to attach a front fence. This is the fence that the material will naturally rest against, given the position of the blade.
Originally I wanted this piece to be in the total height of the plane plus a bit more for the fence part, but since I didn't bring enough beech with me, I had to try to make it some other way.
The fence had to go so far in that it would cover the forward corner of the blade at all times. I also wanted it to cover the entire escapement hole.
I measured those two distances and found out that I had to make a 3/4" rabbet that was 3/16" deep.

Olav was so kind as to give me a Stanley No 50 combination plane. This plane should be able to make rabbets, dadoes, tongues and grooves plus mouldings.
Therefore I had left my trusted grooving plane and moving fillister plane at home.
I read the instruction manual and got the plane set up to work as a rabbet plane. The depth of cut was harder to adjust than I had expected, but the rabbet ended up looking OK. I guess that beech is a fairly hard wood to work with a plane. At least I am not used to working with it.

Once the rabbet was complete, the fence was glued to the body of the plane. While the glue dried, I worked a bit on the wedge. The fat part of that received a semicircular shape. I also trimmed the thin end so it would not protrude past the rear fence when inserted.

When the glue had dried I drilled the escapement of the fence. Some work with a file, chisel and sandpaper resulted in an escapement that looked just right to me.

I couldn't resist the urge to test cutting a moulding with the plane. I set up the plane and in very short time I had a nice crisp looking moulding added to the rear fence. Since I had so much fun doing this, I quickly decided that the front of the rear fence and the forward fence would benefit from having a similar moulding. I think it makes the plane look a bit more finished.

The ends of the plane were squared off using a saw and the marks were removed with a file and some sandpaper.

All edges were chamfered slightly and MMXVII (2017) was chiseled onto the side of the plane.

I tested it, and it works better than I had ever imagined. A thin shaving will result in a tightly coiled spill some 3/16" at the fat end.

I intend to use my spill plane as a stationary plane. I think it will be easier to make some sort of arrangement that will catch all the spills that way, compared to if the work piece is stationary and the plane is moved back and forth.

This is the first real plane that I have ever made, and I think it has been an interesting project. The dimensions don't matter much, as long as they will fit the blade you plan on using. The body could be made from whatever wood you happen to have at hand, but a hard dense wood will surely hold up to more use than if you made the plane out of balsa wood.
I am tempted to make another plane like it, to give away as a present. In my opinion it would make a really fine and personal gift to someone who uses a wood burning stove.
Once my boys get over the fact that there are no secret compartments in the plane, I am sure they will enjoy making spills in the workshop with me. If that happens I will conclude that the project has been a success.
Spill plane made out of beech.

Escapement side of spill plane.

MMXVII

Unorthodox size of the forward fence.

Test spills compared to a ball pen.