Friday, June 28, 2024

Stuff our company makes

2 years ago, Gustav and I started a small company called Hest & Hus ApS.

Our primary plan was to buy and renovate a small house that is to be rented out. We are nearing the completion of the renovation, and it has been a thorough round with new electric wiring, new plumbing, insulation, new floors, new kitchen etc. 

But in addition to the house renovation, I have been able to actually make money in my workshop! 

The biggest customer group we have is horse people, and since a lot of the stuff associated with horses is quite expensive, it is worth to repair. 
In the shop I have 2 leather sewing machines. A Singer patcher and a Singer class 7 (saddlemakers sewing machine). The patcher is used for repairing stable rugs (horse blankets), and other small articles such as girths etc. Once in a while something will be made out of such heavy fabric or heavy leather that I use the Singer class 7 for the repair job. 

Repairing things appeals a lot to me, and there is a need for people who can do repairs on horse rugs at a reasonable price and within a reasonable time. It isn't the most exciting thing to do, but it is honest work and it generates a pretty steady income.

Once in a while I also get some jobs repairing saddles. It is mostly the girth straps that need to be replaced, and that on the other hand is a task that I find really interesting and challenging. It is almost completely handwork to do these repairs. On the odd occasion, I can use the class 7 to stitch something at the bottom of a saddle flap, but mostly hand sewing is needed.

We make something called "event inventory" (directly translated from the Danish stævneinventar). It is stuff that you can bring with you to a horse event and use it for holding your equipment like saddles, saddle blankets, headstalls and halters etc. 
We also make these things for tack rooms, where the customers decide on the size they want. Those things are all made out of pine that is stained and varnished. The saddle blanket holders and the headstall holders are made with leather straps that are used to fix the items to the front of a horses box in an event stable. 

Saddle blanket holders in the workshop.

Headstall holders and saddle blanket holders in an eventing stable.

Close up of a headstall holder.

Headstall holder. The wooden hooks are made with splines for strength.

Headstall holder with 4 hooks.

Headstall holder with 3 hooks (plus a curious horse)

Saddle holder for 3 saddles for a tack room.

Bit holder for a tack room

I bought an engraving machine to make name tags.

Logo on the bit plate.


Wednesday, June 26, 2024

Installing a new sawmill

 My old sawmill, which I installed in 2007 has always had a little bit of problems with the feed mechanism. I fixed it so that it was able to go in reverse something that it was unable to when I bought it, but the change of forward speed never worked really well. It was technically worn out, and I didn't want to invest the time in rebuilding it completely when it worked OK for my use.

About two years ago, my old friend Gert (who had sold me the sawmill) called me and told me that he had bought himself a Woodmizer, since he was getting a bit older he felt that he wanted something that could automatically wrestle the logs instead of having to do it manually on the circular sawmill. 

So he wanted to ask me if I wanted to buy his circular sawmill that he had bought back when he sold me the old one.

I immediately confirmed that I would love to buy it, and we agreed that I should find a time to come and test it and see it in action. 
That new saw was somewhat bigger than the old sawmill, and it has got a different feed mechanism that works flawless. 
My wife got diagnosed with breast cancer (she is all well now) so I told him that I couldn't come and get it as quickly as I had hoped for, but he was completely cool with that, and last autumn I found the time to go down and dismount the sawmill and transport it home. I think it took about 5 trips with the car and the boogie trailer, but I was able to get it all home on my own. Luckily the saw could be divided into manageable sections, and that was a huge bonus compared to my old sawmill.

The sawmill sat in the machinery shed for the winter and the spring, and at a point Asger our youngest son asked me if he should help me sell the old saw on Facebook marketplace. 
I doubted that anyone would want to buy it, but it wouldn't cost much energy to try and sell it. Within the first week, we had 4 potential buyers, and one of them even offered more than the asking price and was willing to come and get it fairly quickly. So suddenly the sawmill was dismantled and out of the barn.

After a weeks hard labour removing the old concrete pillars, we started mounting the new sawmill. Asger suggested that we painted it as soon as we installed it, since he reasoned that I would never get around to doing it later on. 
So I settled on a nice blue colour, and the entire thing received a coat.

The individual sections were moved into the barn and lined up, after which I dug out underneath the mounting frames and cast some concrete with threaded rod to hold it to the floor. The reason for digging out after moving it into the barn was so that I could use some pieces of pie as rollers to move the sections on the concrete floor, something which would have been much more difficult if there were a lot of holes in the floor.

The new sawmill utilizes the electric motor as a flywheel, and since I don't have enough amperage to run the electric motor (it needs 60 A fuses on a 400 V 3 phase grid), I am going to do the same as with the old sawmill which is to run it off the PTO of the tractor. 
I just need to make an adapter so I can mount a PTO spline shaft on the rear end of the electric motor where the cooling fan normally sits. This is something I still need to do.

 So the sawmill isn't fully operational at the moment, but it is close. So next time I get home I might be able to fix the spline shaft adapter, the extraction fan and join the two table parts. That's all that needs to be done for me to have a functioning sawmill again.

Beginning the installation, 3 section out of 5 are in the barn at this point.

The first 4 sections are assembled and roughly aligned.

The electric motor is installed and painted. The blade is a 40" blade, so it is a bit bigger than the blade of the old saw (36"). That coupled with a lower table means that there it much more of the blade above the table so I can split bigger logs now :-)


Thursday, March 17, 2022

Marine life

 Today just when lunch was over for my shift, someone came down to the messroom and said that there were a couple of whales really close by. So I took my cup of coffee, fetched a jacket and went up to see if it was possible to get a glimpse of them.

There were two humpback whales and a playful sealion maybe 25 yards away from the ship. 

I managed to get a picture and a decent video of one of the whales and the sealion sort of photobombed all the videos I tried to take. :-)

It is awe-inspiring to see such a huge animal so close by. And almost equally impressive to watch a sealion scoot around like a happy kid in a water park.

Humpback whale in the South Atlantic Ocean


Sunday, March 6, 2022

Drain grates

 During the hurricane we had last time I was on board, we lost a couple of drain grates. 

The drain grates help to keep large objects out of the drain pipes from the gutter on the main deck. Large objects could be stuff like an apple or an orange or a water bottle. If they would fall into a drain pipe it would take quite some job to get them free again, so it is much better for us to prevent the blocking from happening. 

The first time I was on board this ship, I made 4 drain grates, so I took upon myself to make a couple of replacements this time also. But instead of following the same procedure as last time, I decided to see if I could make them without soldering them together.

My idea was to make a brass pipe using rivets, and hammer one end so it would flare out. Then finally I would ad some pieces of copper pipe on top as the regular grate part.

I marked and cut a strip of brass sheet (1 mm / approx 3/64" thick). On one end I formed something like a rabbet, and then I bent the piece over a piece of pipe, so it ended up being round and of the correct outer diameter. 

Using a piece of bronze welding rod, I made some small rivets. I would have used ready made rivets if I had some, but making them yourself is also fast.

Holes were drilled in the ends of the brass strip, and the cylinder shape was riveted together.

Using a piece of sturdy pipe as an anvil, I started hammering along one of the ends of the cylinder. The idea is to thin and thereby stretch the material so it will eventually curve out. Machines exist that can help you with that, but it is not equipment that we have on board, so the trusty hammer was the choice.

After a couple of rounds of hammering, the brass hardens. to keep it from cracking and also to make it easier to continue the forming, I annealed it using an oxygen/acetylene torch. 

At a certain point the flared end almost naturally starts to bend over in a 90 degree angle to the cylinder, and that means that the forming is almost done. The only thing left is to use a flat anvil and level out the flared part.

My last design used two pieces of copper pipe bent to a 90 degree bend, and this design would also work very well with a riveted construction. So I found an old piece of copper pipe and made a couple of bends that were separated from the pipe using a pipe cutter. The ends of each bend were hammered flat and they were then riveted to the flared part of the cylinder.

The strange thing is that this way of making drain grates actually seemed faster than my previous design, and I hadn't expected that. My main reason for not soldering was actually that I wanted to see if I could use a bit less oxygen and acetylene. That was also accomplished, but the speed surprised me.

Brass plate with strip cut of (enough for two drain grates)

A riveted cylinder marked before starting the hammering.

Flared out end of the drain grate.

The two copper bends are riveted in place


Side view of the drain grate showing the rivets.

Drain grate in place in the drain pipe.


Monday, February 21, 2022

Started a business today

 After thinking about it for many years, I started a business today together with Gustav.

The business is called Hest & Hus ApS, meaning Horse & House ltd.

Our major plan is to invest in a house that we can refurbish and then rent it out. But given that we are now officially a company also means that we can legitimately sell labour such as in carpentry jobs or woodwork projects or leatherwork projects. 

The idea is that since we both have a regular income, we are planning on letting all the money we make in the company stay there for further development of the company.

The hardest thing for me is to accept that I am helping financing the Danish society with all its flaws. But so be it..


Saturday, February 19, 2022

Gerstner inspired tool chest, completion

 I have been doing a bit of organizing and clearing out in the workshop, mostly still to accommodate lots of stuff from my dads shop. On one of the shelves in the shop I found the remnants of the Gerstner inspired tool chest that I started 8 years ago. I took a close look at it and decided that either I should throw it out, or I should invest the needed few hours and complete the project. 

After a bit of discussion with myself I decided that even if the project wasn't super good looking, it still deserved to be completed, and I could potentially use the tool chest for small stuff.

A couple of years ago I had made some stock ready for the fronts and sides of the drawers. I laid out some dovetails and started sawing and chopping away. I managed to mess up the design of the dovetails for the back of the drawers since I forgot to take into account that it should only be as high as down to the groove for the bottom. Nevertheless I decided that I could live with it and I proceeded.

When the drawers were complete I drilled a hole for mounting a small knob on the front. 
I then mortised in a lock on the fall front and made a small mortise for the lock to catch on in the carcase.

Then I assembled the tool chest with the self made fall front mechanism - only to discover that the knobs were a bit too long, so the fall front couldn't close. I took the easy and ugly route and gouged a small indent where each of the knobs touched the fall front. 

Finally I gave the drawers and the carcase some dark wipe on oil and let it dry for the night. It sits pretty on the shelf now, but I still haven't started to put stuff into it. 

I have to admit that the small tool chest doesn't look as elegant as I remembered. The wood wasn't perfect, and if I had to remake it again, I would probably reduce the thickness of the carcase, but as far as I remember, my main reason for starting the project back then was because I wanted to see if I could make a fall front mechanism out of wood.


The completed Gerstner inspired tool chest.

Drawers ready.

Getting ready to install a lock.

Oil on the drawers.

Messed up the length of the knobs..

Fall front almost closed.

Closed and locked.


Thursday, January 20, 2022

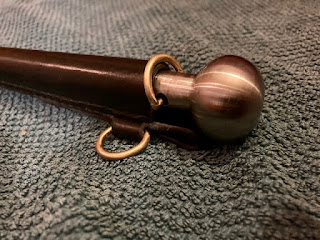
Marlinspike with a leather sheath

 I have helped a lot of my colleagues turning marlinspikes out here, and I have made some myself as well, but those have either been for the ship's bosun shop, or as gifts to other colleagues. I have however never made one for myself. 

Probably since I don't need a marlinspike, but this time I decided to make one for myself anyway.

I found an old steel bolt for the cylinder heads of the main engine, and I deemed that it would be perfect for the purpose.
The shape is the one I usually help the trainees to achieve, a long sleek body with a mushroom shaped head. The conical body gradually turns from round to oval the nearer to the tip of the tool it gets. the tip itself is ground or filed flat and gets and edge of approximately 60 degrees.

The dimensions for my marlinspike is a length just shy of  12", the head is 1.25" in diameter, the upper part of the body is 19/32" which tapers to a width of 1/4" at the very tip. Just above the ground part, the width is 3/8" and the thickness is 9/32" (due to the oval shape).

A hole was drilled in the upper part and I made a small D-ring of bronze that I silver soldered in place, this is so that the marlinspike can be secured with a lanyard when working aloft. I made an extra D-ring that I could mount on the sheath, so that the securing line has a place to be secured to.

For the sheath I decided to test myself a bit, and make it as small as possible.
A wedge shaped piece of leather was sewn to the backpiece. this would form a rabbet that the rounded part of the sheath could register to. 
During the sewing of the wedge, I mounted the D-ring on the sheath. The wedge also moves the marlinspike a bit forward of the back piece, so that it will in theory stay a bit more clear of the hip when worn in the belt.

The rounded part was first made wedge shaped, so that the sheath would also taper in its length, both in width and height. I sewed it on using angled stitches that would enter the side of the rounded piece and pierce through to the back of the leather. 

Finally the edges were trimmed and polished a bit.