Wednesday, April 30, 2014

Tumblehome sea chest 5, the bottom

We had some semi bad weather yesterday, so I was glad that I had decided to try tackling the bottom of the chest. That is a  little more coarse woodworking than dovetailing and making a complex glue up.

For those pallet wood builds, the following approach is working fine for me:

First; I'll flatten the boards on one flat side, and maybe touch up the sides as well if they need it. The back is left coarse, and the boards don't necessarily have the same thickness.

Second; is making either a rabbet for ship lapping or a tongue and groove. On this chest I made 2 tongues on the centre board and one groove in each of the other boards.
I use my Stanley grooving plane for making tongues and grooves (and rabbets if needed). It is surprisingly effective, When you have only got one flat side, this side will be the reference side to all work done. This is possible as long as you remember to start with the widest setting on the tool, that way there will still be some wood for the fence to touch when you need to make the groove closest to the reference side of the board.

For this particular chest, I just had enough wood left over from the initial board (6m in length) to make a complete bottom. 3 pieces covered the width and I had an additional 1 cm on each side.
Making the bottom a bit too large and then sawing of the excess is an easy way to do it with canted sides.

Third;  I attach the bottom to the chest. The bottom is mounted with the nice looking side (the reference side) on the inside of the chest. The rough side becomes the lower bottom of the chest.
I would prefer to use nails to stay a little classic, but we haven't got any on board, so I used some screws instead.
The wood is so soft that I didn't have any problems with setting the head of the screws about 1/8" below the surface. This low setting is crucial for the next step.

Fourth; with the bottom attached I use my scrub iron in the plane and level out the underside of the bottom. I usually work across the grain as it is easier to remove more material that way. Since the screws are set really deep in the wood, I can plane away without being afraid of nicking the iron.
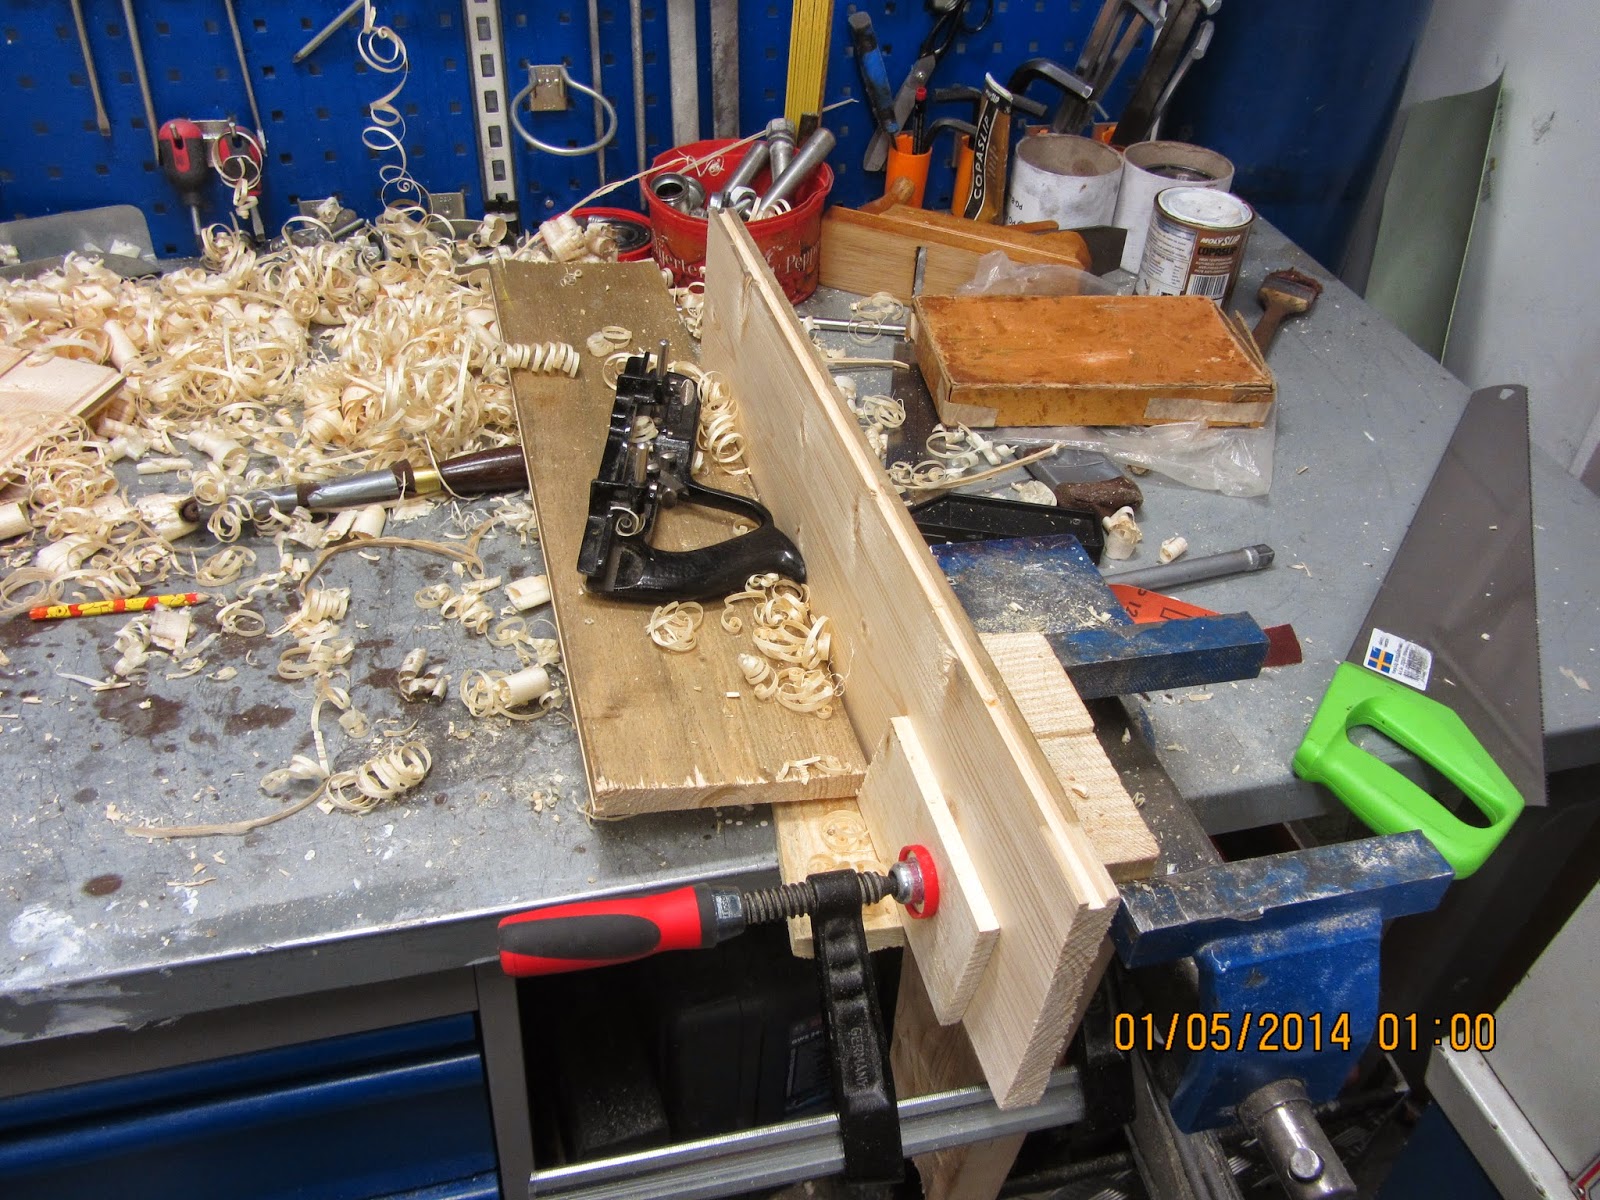
Making a groove.

Bottom mounted.

Planing the bottom, note the cupping of the boards.


Monday, April 28, 2014

Tumblehome sea chest 4, glue up

After a fairly quiet day, I found myself in the workshop trying to get things ready for the glue up. The boards for the interior shelf and till were cross cut to length and each piece test fitted in the corresponding grooves.
The till and the "high edge" were glued and nailed together prior to installation, to minimize the number of loose boards that I had to incorporate in the glue up.

I had made some really nice dowel protrusions on the lid which I had positioned a little bit out of the way, so that I wouldn't accidentally knock it down while moving around with the rest of the parts, which is something that I have experienced on occasions. The board that falls down usually get some heavy bruising or break of some small delicate detail.
In that respect, putting the board to the side was a success.
What wasn't so successful - was that I managed to forget about it, and I therefore glued up the entire carcase without the lid..
The only good thing is that I had put it aside so early in the process, so I also forgot to drill the holes. Therefore if you don't know that the original design called for a lid, you won't know that it is missing.
Actually the lid wouldn't have fitted anyway, since I forgot to take into account that the sides were sloping, so the lid should be even narrower than I had made it.

Apart from the less than perfect lid business, the glue up went pretty smooth considering the canted sides.
I actually forgot to check if it was square, so I have just been down in the engine room again to check it. The diagonals are a bit off, but I can't do anything about it now anyway. It isn't a lot, so it will still be OK.

The wood that I have used for the carcase is far from perfect. It is flat sawn spruce that was a bit on the wet side when I started. The panels have started cupping quite a lot, and some of the ends have shrunk a bit too. This resulted in some cracks when I negotiated the pins and tails together. I still believe that the chest will end up looking OK, because the plan is to paint it once it is finished. The thing is that I have started to get the idea, that maybe once I should try to make a decent chest out of some wood that didn't come from a pallet or some other shipping aid.

The glue up

Interior view, till (without lid) and the "high edge".

Sunday, April 27, 2014

Tumblehome sea chest 3, Improved planing stop

For the interior parts of the chest, some 1 cm (3/8") thick boards were needed. I found some old pieces that could be sawn and planed to fit.
A total of 5 small boards are required for having a normal till with a lid, and the German narrow till (the "high edge").
For the "high edge" I was able to rip a board down the middle, and it gave me close to the dimensions that I had imagined while considering the build. The vertical part of it is 4 cm, and the horizontal part i.e. the bottom is 3 cm. This gives an interior of the "high edge" of 3 x 3 cm.

The front board of the normal till is 9 cm high, and the bottom board is 10.5 cm wide. The lid is 10 cm wide, and due to the canted ends, it protrudes approximately 1 cm over the vertical front. This is to make it easy to grip the lid with your fingers for opening.

The plan is to make two small dowel shaped protrusions on the back side of the lid, which shall fit into two corresponding holes in the sides of the chest. This way, the lid will be hinged by itself. I have seen this approach used on some old chests, and it is fairly simple to execute.

I have improved upon my planing stop. It used to be a loose piece of wood lying on the top of the workbench and touching the bulkhead. Occasionally it would fall down or move around which didn't make things easier.
I have tried to clamp the planing stop onto the bench, but then I risk hitting the clamp with either the plane or my hand. So I have moved away from this idea.
The latest fashion regarding planing stops is to tape them to the bench top and to the bulkhead. If you use yellow/black warning tape, you can give the whole set up a real quality look!
Look at the picture and judge for yourself, I am sure you will agree, that the same effect can not be had using blue masking tape or ordinary duct tape.
The next level will be to find a planing stop that is a little longer, to prevent my hand from hitting the bulkhead while planing. That would really take the set up to a higher level.

After planing all the boards needed, I tried to position them on one side of the chest, and it looked OK.
The next logical step is to cut the pieces to length and drill the holes for the hinged lid of the till. Then all should be ready for gluing up the carcase.

The improved (professional looking) planing stop.

Aerial view of the till and the "high edge"


Friday, April 25, 2014

Tumblehome sea chest 2

I decided to do a little research prior to building this chest, and this time I turned my attention to Germany to see if there were any differences compared to my earlier studies.
This is not phd grade research, so as soon as I find a serious looking page, I pretty much leave it at that.
German page on sea chests

One difference which is very visible, is the small shelf running along the back side of the sea chest. This is a feature I haven't seen anywhere else. According to the text it was also used in other chests as well.
It was used for savings, and according to the home page, it is the foundation for a well established phrase in German meaning that one has got some savings: "Etwas auf der hohen Kante". Literally meaning: Something on the high edge.

The open chest in the middle of the page has got the small shelf at the right side of the chest, indicating that the owner of the chest was a left hander.
The small shelf (hohen Kante) can be seen in this picture as well.

I cut the last set of dovetails for the chest itself, and I even remembered taking a picture of the sawing.
Using a hack saw is easy (for me at least), there is an appropriate weight to the tool, and the blade is equivalent to a rip filed saw. The toothing might be on the fine side for some, but you can get different blades so you can experiment. I am using a 24 ppi blade because that was just what I had in the workshop. The kerf is a little wider compared to a real dovetail saw, but not wider than the kerf you would get by using e.g. a bow saw.

I tested the assembly by pressing the dovetails together half way by hand, and they look decent. some glue and a little bit of planing and I think they might even look fair.

Due to a bunker operation, I couldn't get more than 20 minutes in the shop, but it was enough for me to cut the tails on the last board and do the test assembly. I have brought the pieces with me to the ECR (Engine control room), so I can mark out the position for the small shelf.
To be efficient, I try to do stuff like that whenever I have a spare moment where I have to stay put in the ECR anyway. That way I can use the precious workshop minutes on putting steel to the wood.

The dovetail sawing set up.

The test assembly (dovetails pressed half way).


Wednesday, April 23, 2014

Tumblehome sea chest

During the building of the small fairy tale bed, I found myself dreaming of making something real again. I know that a doll bed is for real, but somehow I found myself constantly drawing small tumblehome sea chests on every scrap piece of paper lying around.

The other day we received some stainless steel tubes that came strapped to a nice wide board, so suddenly I had 18' of a 6" x 1" spruce board at my hands..

The board was transformed into some 12" wide panels that could be used for the build.

I have decided to try to make as quick a build as possible, so there will be no secret compartments or fancy metal working involved.
One of the reasons is that it is not easy to plan some regular woodworking out here, the other is that I would like to finish the chest before going home.

The chest will be smaller than original sea chests to make it easier for me to transport it home, and because I find it easier to find use for smaller chests in the household compared to large chests. The chest should end up being around 24" x 16" with a height of 13-14" depending on how deep I make the skirt and how thick the lid will be.

Today I cut the panels to length and started on the dovetails. Normally I prefer dovetailing with tails first, but due to the lack of decent work holding out here, I do it pins first. For this build I have chosen to use a ratio of 1:6 for the angle of the pins/tails.
The design will be a tumblehome sea chest with canted sides and canted ends.


Chopping out the waste between the pins

Test assembly of the first corner


Sunday, April 20, 2014

And they lived happily forever after..

I planed some grooves in the sides and the ends. Then I planed the bottom so that it could fit into the grooves. 
Everything was sanded and the corners were sawn of the bottom to make room for the posts.

I started by glueing up the headboard, and put in a small headless brad to reinforce things a bit. Then I did the same thing to the foot end of the bed.

The sides were attached to the posts of the headboard and the bottom was slid in. After that the foot end of the bed was attached. 

All that is needed now are a bunch on mattresses, a pea and a princess. Then the fairy tale can begin over and over again in the mind of my niece.


The fairy tale bed on the floor of the control room.


What did I learn about the build:
-It is a quick build that can be made together with children if it has to be.
-Nailing the bottom on will probably give a more stout construction, but either my bottom wasn't wide  enough, or the ends were too wide.
-A little paint and some gold enamel on the crown will make the bed more "royal", after all princesses do like pink, cream and gold colours (as far as I remember from when my daughter was younger).
-I had to struggle some to find the motivation for this build. I have to accept the fact that I prefer making chests and slightly larger pieces. So I guess that I will have to give in to that feeling and start making something along those lines.

Wednesday, April 16, 2014

Fairy tale woodworking 2

After some busy days, I managed to get a little time in the workshop this evening. I have now made the posts for the bed along with the headboard and the footboard (if that is the name?) and the sides.

The posts each have two mortises for receiving the sides and ends.

I decided to try to make some acorn shaped tops on the posts, but I'm not quite sure how they will look once they have been sanded.

The next step is to make some grooves for attaching the bottom of the bed, and then off course to make the bottom.

After that it should be a matter of sanding the parts and assemble the bed.

I have made a carving of a small princess' crown on the head board as a decoration, that way the bed can not be mistaken for an ordinary doll bed.

Some of the mortises and tenons are a bit too loose, but I intend to ad some small nails to reinforce the joint anyway.

The preliminary assembly.


Wednesday, April 9, 2014

Fairy tale woodworking

Once upon a time a woodworker was asked by his wife to make a small bed.

The bed was supposed to be the size of a doll bed, but not of any specific size.

The plan of the wife was to present this little bed to a very young niece as a present for her to play with.

Along with the bed, the wife was planning to make several small mattresses and a small doll with a princess' crown on her head. At one side of one of the several mattresses there would be sewn a small green round object - A pea.

With the bed, the mattresses, the princess and the pea, the young niece should be able to play with the things in a way that was already described in an existing fairy tale.

Now two questions arise:
What fairy tale could that be?
Will the woodworker be able to undertake such a task while on board his ship?

The last question is probably the hardest, but lets see in a couple of days.