Given that the weather on the Norwegian west coast has been bad ever since I signed on the ship, there really hasn't been any possibilities of starting a project.
I did however bring with me a copy of Campaign furniture by Chris Schwartz.
The book is written in a clear and informative language, and there are loads of historical informations to be found.
The projects found in the book strikes me as very well chosen. Based on that they can be used in a normal household today.
I am pretty sure that CS also knows how to make a campaign bed, but that would probably be more of a curiosity to most people, and not something that a lot of people would actually make.
The projects do not appear to be listed according to their difficulty, but more based on how popular that type of project was originally.
In the beginning of the book a lot of general information on campaign furniture is given, changes in styles through the years. General information on hardware and wood species etc.
I personally like the small quotes from older books, such as a guide to India travelers and small original ads for companies that supplied campaign furniture 150 years ago. These small distractions engage my sense of curiosity and imagination.
There is also a whole lot of general information on joinery techniques, and techniques for installing hardware, with all the small but important information provided. Especially when it come to the descriptions on how to install hardware, the book is very thorough. This is in my opinion a very noble approach, as the hardware installation is often a "make or break" operation on a piece of furniture.
The reader is taken step by step through the installation of half mortise locks and corner guards etc. with clear pictures and instructions.
In my opinion the best example of the thoroughness of those descriptions is that CS explains that typically a corner guard will have a very slight radius on the inside corners. And next he describes how to deal with this.
That is information I haven't seen anywhere else. Actually the book can be recommended just based on the instructions for installing hardware.
Regarding the projects themselves, the instructions are equally clear and informative. Each build is described in a logical sequence, and operations that might be difficult are explained in detail regarding what can be done to ensure a success.
There are no descriptions of the exact hardware needed for each project, which is kind of liberating. I guess this is done to allow the builder to use whatever hardware is obtainable in that persons part of the World.
As usual with books from Lost Art Press, the book itself oozes of quality. Nice binding, thick paper, good looking photos and drawings etc.
I would recommend the book to anyone remotely interested in items of campaign style, and also to those who are looking for some detailed instructions in how to mount hardware.
If you should you purchase the book, or the electronic version or both depends on how you like to read. But the book itself is a handy size and of such a quality that it is a joy to read it. So I would just go with the hardbound book. But then again, I am pretty conservative when it comes to things like that.
Sunday, December 27, 2015
Wednesday, December 16, 2015
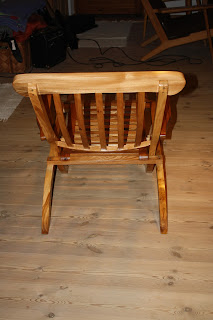
Titanic deck chair
For once I have made a project which does not involve pallet wood. And furthermore isn't it a box of any kind.
My wife has wished for a deck chair for a couple of years, but I haven't found the time to build her one until now.
The plans for this chair can be found at Popular Woodworking, they were issued in 2012, 100 years after the sinking of the RMS Titanic.
I made my chair out of elm which originally comes from trees belonging to my neighbor. They were among the first boards that I ever milled, so they have air dried for some 8 or 9 years now.
The construction of the chair went along OK, but with a few screw ups along the way, some were my own fault, and some were due to the cut list and plans.
It is not a quick project, but that should come as no surprise with 43 individual parts, of which 26 of them have to be shaped on the band saw.
As a finish I applied two coats of oil based marine varnish.
Since I will sign on the ship tomorrow, I won't be home for Christmas this year. I have therefore already given the chair to my wife, so now it is OK to blog about it, even though it is a present.
That is also the reason why I didn't blog about the build itself.

Titanic deck chair made of elm.


Monday, November 23, 2015
Treasure chest with curved lid part 9, The finished chest.
I asked my wife what finish she would like to see on the Shaker cabinet, and her answer was Danish oil (what a surprise..)


I had hoped for a paint finish, but since it will probably be given away for someone as a Christmas present, I chose to stick to what she wanted.
But there were no restrictions to the treasure chest with curved lid that I made some time ago. That thing has just been sitting idle under a table to be out of the way.
I asked Asger if he would like to paint it, and he was really exited about it. I decided to give up most of the control and told him that he could choose the colour.
We looked at the paint shelf, and I tried my best to advocate for a green, blue or red coat of paint. But Asger was not convinced that it was the right path. Finally he made up his mind and settled for Massey Ferguson light grey, a classic tractor colour.
He rolled on a coat of paint that quickly got absorbed by the wood. So we agreed that was a primer, the next day he rolled on another coat, and that helped a lot.
Finally I added the last layer using a brush instead of the roller, because our cheap roller more or less dissolved in the oil based paint.
I had made some hardware on the ship while I made the chest itself. An escutcheon and parts for some lifts.
The lift handles themselves are old handles from some metal pails that comes with various chemicals and soap.
Since I made a treasure chest, I opted for some fantasy inspired hardware. something that could spark an interest in a child. So I made a dragon/vampire bat as a theme.
It turned out better than I had hoped for. But I think they would have stood out more if the chest had been in a different colour.

The finished treasure chest.

Asger sanding

Asger painting

Painting

Dragon escutcheon

Dragon lift
Wednesday, November 11, 2015
Shaker hanging cabinet, North Sea edition, completion
I started by trimming the back of the cabinet to the desired size, that meant also sawing out a curve on the top, and making a keyhole slot for the future hanging of the cabinet.
The back is attached using only nails. This is to allow for the inevitable wood movement. If I had glued on the back, since it is such a wide piece of wood, it would be like asking for trouble.
The door had managed to contract itself a bit during a couple of days, so I had to saw about 1/4" of the thin end of the battens before pushing them back in. So far they are able to keep the door flat.
Next up was to make a small locking device. I tried to make it look like the ones I have made before, since I find it a pleasing design. It is just made from a bit of wood I had left over from the stiles.
My last cabinet of this type had a semicircular door knob, because that is what my youngest son thought would look the best. On this one I wanted to try something a bit different.
The inspiration is some drawer pulls that my father has made for my parents cottage in Sweden.
This one is just smaller.
Making it was basically a paring exercise with a chisel.
Before mounting it by simply by gluing it into a hole in the door, I sanded the front of the door, as the knob would have prevented me from going continuously with the grain during sanding.
After the glue had dried a bit, I cut off the protruding part on the inside and sanded the inside again.
I discovered that I didn't bring any screws that were long enough to satisfactorily mount the locking device with. So I drilled a small hole, and mounted it temporarily with one of my longest screws (something like 3/4") When I get home I'll find a nice round headed screw and mount that instead.
After planing a little bit on the side of the door to get an even reveal, I started mounting the hinges.
These were placed their own distance from the top and the bottom, and it went fairly smooth.
When I tested the door after mounting the hinges, there was a bit of binding just before it closed. A bit of investigation revealed that the door was a bit thicker in the middle than at the ends, but a few swipes with the smoothing plane corrected it.
All there is left to do out here is to mark the cabinet with Roman numerals and pack it for a safe trip home.
Once I get home I'll try to decide how to finish it.
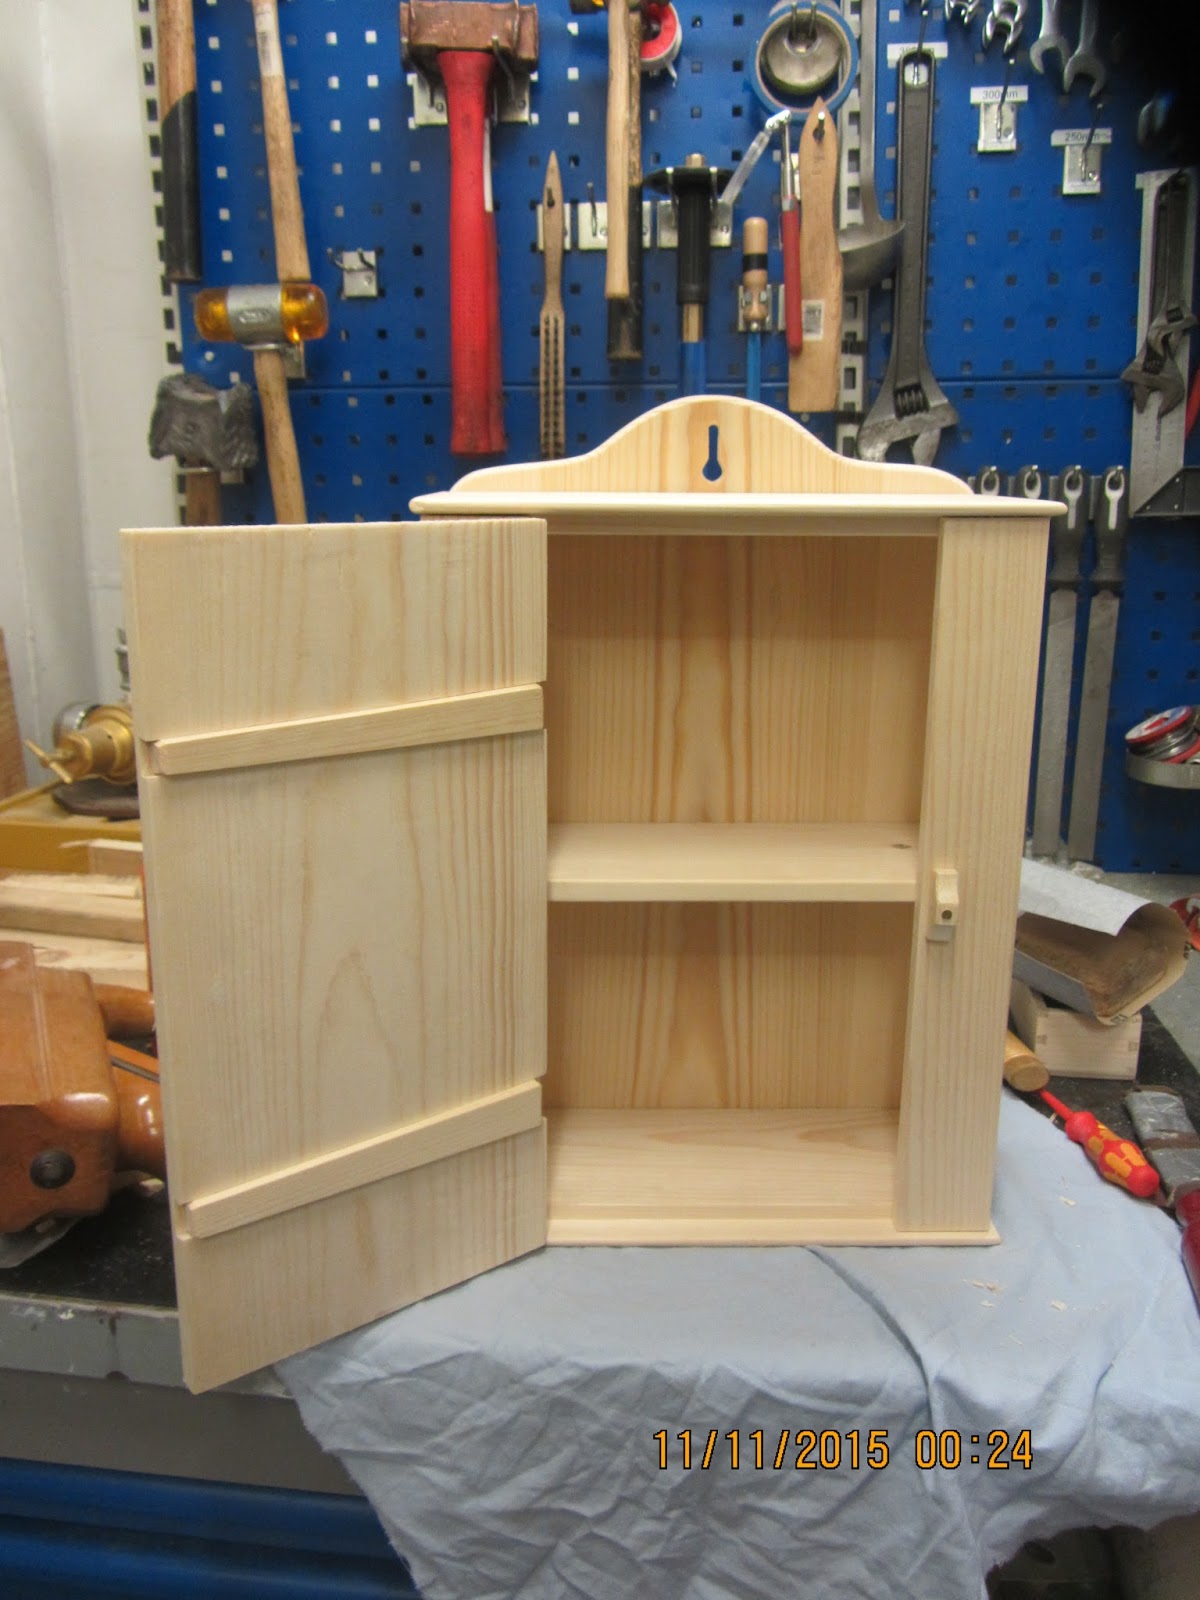
Shaker hanging cabinet, North Sea edition.

Shaker hanging cabinet, pallet wood build.

This batten is now too long.
Tuesday, November 3, 2015
Shaker hanging cabinet, North Sea edition, stiles and door.
Since I want the door to be as wide as possible, I found it to be the smartest move to finish the door first, and then adjust the width of the stiles to fit afterwards.
I added a small chamfer to the end of the battens, to soften up their appearance before inserting them in the door and tapping them into place. This should also prevent any grain blow out if someone hits them harder with a hammer in the future.
With door at the correct width, I was able to establish the width of my two stiles. These were ripped to the correct width and the sides cleaned up with a plane.
I crosscut them what I believed was the correct length and followed up with the shooting board to make a fine fit. Somehow I managed to make them bot a bit short, but not enough to warrant making a new set.
When that was done I simply glued them into place. A few brads or nails would make it even stronger, but I doubt that strength is much needed with a cabinet of this size.


The door was planed to the same thickness as the stiles, and then I squared it up on the shooting board.
The original version of this little cabinet has battens that are nailed on to keep the door flat. Since I have taken the trouble to make blind dovetails for the case instead of using nails, I figured that i'd might as well attach battens using sliding dovetails.
At home I have a special plane for that purpose, but I didn't bring it with me, so I'll use a slightly different approach.
My idea came after chatting with Brian Eve over at Toolerable. He showed me a picture where he had done it this way, and I wanted to try it out myself.
First I made a set of battens that tapered slightly in width. I planed the narrow sides of the battens at an angle.
I then used the battens themselves as sort of a template to guide my saw.
A thing to remember is that it should be possible later on to tighten up on the battens if they become loose. So the taper on the door part needs to be a bit narrower than the battens.
After sawing out the sides for the door part of the sliding dovetails, I removed the waste with a chisel and followed up with my router plane.
I added a small chamfer to the end of the battens, to soften up their appearance before inserting them in the door and tapping them into place. This should also prevent any grain blow out if someone hits them harder with a hammer in the future.
With door at the correct width, I was able to establish the width of my two stiles. These were ripped to the correct width and the sides cleaned up with a plane.
I crosscut them what I believed was the correct length and followed up with the shooting board to make a fine fit. Somehow I managed to make them bot a bit short, but not enough to warrant making a new set.
When that was done I simply glued them into place. A few brads or nails would make it even stronger, but I doubt that strength is much needed with a cabinet of this size.

Marking up for the sliding dovetails.

Guiding the saw.

Testing the fit.

The finished door with battens in place.
Saturday, October 31, 2015
Shaker hanging cabinet, North Sea edition, blind dovetails.
This was my first attempt on making blind dovetails, but I figured that it couldn't be that hard, ad if I messed things up I could always reduce the size of the cabinet a bit and nail it together like the original version.
I know of two types of blind dovetails, one of them leaves a bit of end grain visible, and the other ends in a mitre.
The mitre model is probably more difficult, and it would be better for something like the corner of a fine chest. When I am going to try out that method, I think I would like to do it at home in my own workshop.
The end grain model (for a lack of a better word) on the other hand is perfect for this application since the end grain will be concealed due to the rabbet I made.
After a bit of thinking I decided that the best way to make them would be to start out with the pins. That way I could mark out the tails afterwards.
I chiseled out all the waste so I could stay within my layout lines. If this had been for e.g. a carcase for a campaign chest, overcutting the baseline wouldn't have posed a problem at all, but this will be very visible inside a small cabinet, so I wanted to make it look as nice as possible.
Once I had made all my pin boards, I marked out the tail boards directly from them.
I soon discovered that I had made a small mistake:
My pins were so small at the thin end, that I didn't have a chisel that would fit inside them to clean them up. It wouldn't have been a problem on regular through tails, but in this case it wasn't the smartest move.
My solution was to use a small screwdriver as a chisel, and it went surprisingly well. Probably because the wood is soft and the inside surfaces of the tails will never be seen anyway.
While I had the outer case dry assembled, I marked out the length of the shelf directly from the case.
The shelf was sawn of at the correct length and the ends were cleaned up using the shooting board.
Before glueing up the assembly, I rounded over the protrusions, and sanded the parts.
To protect the pieces I put a piece of cloth on the workbench before I started the glue up.

So far it looks just like half blind dovetails.

These are the blind tails.

My first assembly of a set of blind dovetails.

Shooting board in action.

Dry assembly.
Friday, October 30, 2015
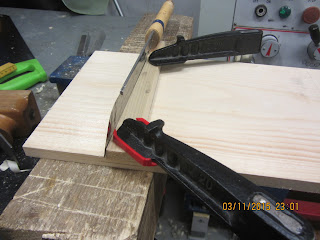
Shaker hanging cabinet, North Sea edition, dadoes and rabbets.
With the sides trimmed to the correct thickness it was a small job ripping them and touching up the edges with the plane.
The narrow strips of wood from the ripping will eventually form the stiles of the front of the cabinet.
The sides themselves, need a dado for the shelf. I am just going to put in one single shelf in the middle of the cabinet, though you could also put in more shelves if you wanted to. I guess that two shelves would be the maximum practical number, to prevent the height between each shelf to become too low.
Technically there is nothing wrong with putting the shelf other places than in the middle, but since I don't know what I'll use the cabinet for, I'll go the conservative and safe route.
Since I don't have a dado plane, I usually make my dadoes by marking them up, and sawing to the desired depth. A fine crosscut saw is ideal for this job.
I normally clamp a piece of wood right next to where I am going to make the cut, to help guide the saw.
Once I have made the cuts, I remove the waste using a chisel and then I clean up the bottom of the dado with a router plane. If you have a real router plane i.e. a plane which is easier to adjust then my homemade router, It is easy to remove all the waste using such a plane. Just remember to gradually increase the depth of your cut. You'll be able to control the router plane better if you don't take a huge cut such as 1/4".
The top and bottom needs some rabbets. The design calls for approximately 1/4" of wood to protrude from the carcass as a decorative element.
Since I am going to try making blind dovetails, my rabbets on the sides will have to be 11/32" wide (9 mm) That way I can have 1/8" of wood left to cover my dovetail and still meet my design criteria of 1/4" protrusion.
The rabbets on the front will need to be 1/4" plus the thickness of the sides themselves (3/8") = 5/8" wide.
For all the rabbets I used my rabbet plane, but if you haven't got one of those, you could also make them the same way that I made my dadoes. But that would probably require a bit extra sanding eventually.

Sawing the sides of a dado.

Cleaning out the waste from a dado with a chisel.

The rabbets on the top and bottom boards.
Wednesday, October 28, 2015
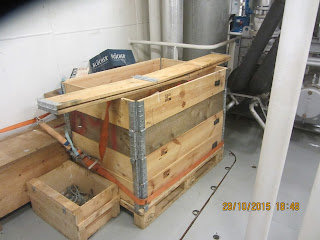
Shaker hanging cabinet, North Sea edition, pallet sides.
Ralph commented on how all the pallets he encountered were made out of fairly narrow boards.
European standard pallets (Euro pallet) are made using something like 1x5" boards for the top and also the lower part.
The things to get hold of are not the pallets themselves, but rather the pallet sides if they are fitted.
These are hinged sides that are made out of some 7.5" wide boards of 3/4" thickness. Mind you that these sides are not intended as furniture wood, so there is sometimes a lot of cupping or twisting in them. It can be a bit hard to see beforehand, as the hinges are really stout and hold the relatively short boards flat.
We often receive spare parts on pallets with sides on them, and since we are not part of the return system, we don't deliver them back or reclaim money for them.
The general idea is that like a Euro pallet, you can trade them in, but it is not worth the trouble given our small throughput of these.
Today I got about an hours work in the workshop trying to dimension tome stock.
The bottom and the top will be almost the full thickness, since I plan on dovetailing the carcase together. There will be a rabbet to allow me to do some half blind dovetailing, or perhaps I will try to make blind dovetailing of some sort.
The sides and the front I planed to around 3/8" thickness. The plan is to rip the full width boards, and that way make one side and one front from the same board.
Both these two boards were fairly flat, so there wasn't much work in getting them to the desired thickness.
The back panel on the other hand has got a pretty significant cupping.
across a width of 15.5" there is almost 3/8" in the middle. I even tried to correct it a bit when I glued up the panel, but it will still take some work to get it flat. The goal for the back is something like 1/4", so I should be able to get it out of the glued up piece despite the far from flat condition.
One thing that is bugging me a bit about the use of pallet sides is that I have never been able to think up at a fine solution for using all those heavy hinges.
I just saw the off and throw them away.
They have stamped reinforcement in them, and they are wide and coarse, not exactly the classic qualities you want for small woodworking projects - but maybe one day I'll be able to think of something and I'll regret throwing out a great number of them along the way.

Pallet with sides mounted, + one loose side on top.

A hinge for a pallet side.

My cupping back panel.
Monday, October 26, 2015
Shaker hanging cabinet, North Sea edition.
While I am still going to continue with my drawings for the small barn, I really need to build something again, to get myself out of the low productivity period that I seem to be having.
I have spent some time pondering what to build, and though I know that some time ago I made a lot of suggestions on the blog, and also received some from nice people commenting, I have chosen to do something completely different.
As you are probably all aware of, I have had a tendency to build chests out here. One form or another, which is technically OK, but I need to do something else. I can't keep on with the same projects over and over again.
Out here I have so far only built one small cabinet though: The hanging cabinet with many drawers. It was an interesting build, but I eventually finished the drawers at home. I.e. it was a bit of a large project to complete in a limited time. But the cabinet itself was interesting to build.
So suddenly I got inspired to build a North Sea version of a Shaker hanging cabinet.
The initial plan is to be inspired by the small Shaker cabinet from New Lebanon. I'll base the size on the availability of wood (pallet sides again).
I am not planning on doing anything really fancy, just more or less build it like I did together with the boys a couple of years ago: Shaker hanging cabinet.
To not completely forget how to dovetail, I think that I'll attach the bottom and the top using half blind dovetails. I suspect that the Shakers would have approved of that too.
First task as usual is to find some wood and get started.
It turned out that one frame of pallet sides should provide enough material for this cabinet. There is going to be a lot of planing, in order to reduce the thickness to something that will look acceptable.
Today I just sawed the pieces to rough length and glued together a back panel. The top and bottom were smoothed out and that was about that.
My next move is going to be to prepare the sides and the top and bottom so I can dovetail them together. I'll also need to make a shelf and cut a couple of dados for it.
But that will be another day. So far I am content with just having started a project again.

A future cabinet.
Saturday, October 24, 2015
A small barn for the summer house.
My wife came up with a really nice suggestion this fall.
She suggested that we could build a shed at the summer house next year.
Since Gustav is going to have his confirmation this next spring, we could use a low budget holiday, and spending it by building something at the summer house is actually pretty close to my idea of a great summer.
My idea is to make a small barn like structure with a gambrel roof. I want to make it with some sort of a timber frame, and I plan on milling most of the wood myself.
I wanted to make it as large as possible with my own timber, which means that it will be 14' x 14'.
In order not waste my time by making a construction drawing of a small barn, only to find out that I can't build it due to regulations, I did something a bit unusual:
I started by visiting the building regulations department at the town hall.
Much to my surprise I was able to find a friendly person to discuss the case with, and she looked at the various regulations and said that as far as she could see, I could go ahead with my project based on the information that I had given her.
The Danish building regulations are changed regularly, and especially in summer house areas they can differ a lot compared to the general regulations, because some special local rules may apply.
So I have brought some paper and and a mechanical pencil with me to sea this time. My idea is to make the drawings out here, and then submit them for approval once I am done.
For the final approval, we need to establish where the barn will be placed on the property. As far as I understood, that information can be submitted later in the process.
I saved some of the old roof tiles from our house when we had the roof renewed a couple of years ago. I plan on reusing them for the the barn. I want to make it with a solid sub roof covered in tarred paper (which isn't paper anymore by the way).
The Danish code of good building practice concerning roof tiles made out of burned clay, describes the minimum pitch/slope of a roof to be 25 degrees. I found an excellent tool on the Internet, that helps designing a gambrel roof: Blocklayer.com
You can alter the calculator to suit the roof you are designing. I found out that a 40 degree sweep angle made the top part have exactly the 25 degrees of pitch that I was looking for.
I started milling the wood before going back to sea, so I have already made the wood for the lower frame of the barn. That will be made by some 7"x 7" lumber. I plan on making the rest of the timber frame out of 6 x 6, that way I can hopefully handle it myself with out having to use a crane. I do suspect that some ingenuity will be required, but that is part of the fun.
The project will also need some windows and a door etc. which is all stuff that I hope to be able to make during the winter.
Saturday, October 17, 2015
The sewage system. (rant)
I have had a period with very little interest in the blog. Mostly because I haven't been doing any small scale woodworking and also because we have had to do a major rebuild of our sewage system.
This sewage business has really annoyed me. We had a perfectly well functioning old system with a septic tank, but some years ago one of our worthless governments decided that it was too popular to live in the countryside in Denmark, and something had to be done to prevent people from wanting to live there. Therefore they decided to impose a law requiring people to rebuild their sewage systems. There doesn't seem to be a uniform plan in the different communes (kind of like small counties). So some places people have not been forced to rebuild, and other placed like my place, people have. But for some reason it is not all people that have been forced to rebuild their systems. my neighbour for example have not been told to change his system, though it is the exact same system as our old one. And the cleaned water goes to the same recipient as ours. I don't want to be an informer and rat on him, because the last thing I want our otherwise pathetic society to transform into is a rat community.
The long story short is that we have had to get the garden dug up, and some new equipment installed, all at a total cost of approx. dkk 100.000,- (around US$ 15.000).
I have to tell y'all, that I could easily find a project or two that I would rather put my money in than this shit system. Dealing with this has drained me of a lot of my energy and left precious little desire for woodworking and even less for blogging.
I have often seen that Denmark has been declared the best place to live on the earth, and the Danes are supposed to be the happiest people around, I have never heard of anyone at all being interviewed about their happiness etc, so I tend to think that it is pure BS, based on statistics on how many hospital beds etc. are available and so on.
Lately, I have been seriously considering emigrating to a more civilized part of the World. Anywhere but this ridiculous excuse of a country.
So far the following places are on my list: (In alphabetical order)
- Australia, because there is supposedly lots of space, and the climate is way better.
- Canada, because there is supposedly lots of space, and the level of civilization seems to be high, and I believe it is sort of a welfare society as well. I have to confess that I have looked a lot into the immigration process already. I think my first choice would be Northwest territories, Around 40.000 people in a place the size of Spain means plenty of room for a small forest for me, and perhaps even a place to fish and hunt.
-England, because of the level of civilization, and they have a better climate.
-Germany, because of the level of civilization, some very nice and friendly people mixed with a beautiful language and a better climate (in the southern part at least).
-USA, because of the much more liberal laws and there is really nice people and lots of space. I would probably opt for Oregon, Montana or Alaska. The climate is also better.
Anyway, the rest of the family isn't quite convinced that it is time to move on yet, so it seems that I am stuck here.
The new sewage system itself is something called a planted filtration unit. It is an excavation filled with gravel with some special plants planted on top of it. There is an aeration system in the bottom of it that will supposedly enhance the bacteria efficiency.
It is not a particular advanced thing to make, but do to our legislation, things like this has to be made by an authorized person.
The old system meant that for every cubic meter of water that we used, we had to pay dkk 5.32 (80 cent).
With this new filtration unit this price has graciously been lowered to dkk 1.1 (17 cent).
BUT then there is a new requirement to have the system serviced once per year with a sample of the water being taken and sent to the commune for verification of the state of the filtration unit. cost: dkk 2000 (300 $)
There is also a small compressor that uses electrical power of around dkk 400 (65 $)
So all in all the system is a lot more expensive to us. See if you can guess which Dane is not very
happy.
The good news is that the basic porch is complete, I still need to make a few trimmings to it though.
There will be a 14 feet wide stair on the front part of it, going down to the lawn, and I need to make some sort of railing system to make it look more completed.

There used to be an OK lawn here.

The filtration system.

The new porch

The south part of the porch.

This is much more fun than messing with sewage systems.
.Wednesday, August 26, 2015
What did you do in your summer vacation?
Remember the first days of school after a summer vacation? Those days you always talked about what you had actually been doing with all your friends.
Well, for one thing, I haven't been blogging.
I have been busy completing the porch, and since the weather was really nice, It never appealed to me to fire up the computer in the evening and blog about the progress.
And all of a sudden the holiday was over, and I am back on the ship, without any pictures to prove that I actually did do some work while I was at home.
I have still not decided if there should be some sort of hand rail on the porch. SWMBO prefers to keep it without a hand rail, but I am not so sure. For a start, I haven't added one.
I still need to make the front steps of the porch, but that requires me to saw some wood on the saw mill first.
I often feel that my projects take longer than they should, but I suppose it is because I start out with a bunch of logs as raw material. Milling takes some time, and so does running the boards through a planer.
And right now I am completely out of 1x5" boards that I need to use for the sides of the porch, and I also need to make some material for the steps as well, but that will have to wait until I come home again.
Apart from the work on the porch, I had a good time with the family, we went fishing and also went on a small trip to London.
Our oldest child Laura had been signed up for a boarding school. Those are pretty popular in Denmark for the 9th and 10th grade.
We sent her off, and that felt like a huge parental step sending your child "away". She'll be back next year for her secondary education, but I am confident that she'll grow during this year.
Now I need to consider what my next on board project should be.
No matter what you did in your summer, I hope you had a great time and have recharged your internal batteries.
Sunday, July 19, 2015
Treasure chest with curved lid part 8, assembly
After I had glued up the lid, I cut the ends of so they were level with the sides. Then I started rounding over the outside of the lid using a plane.
This was when I realized yet another drawback of this design. Work holding for such a shape is difficult to say the least. It reminded me of trying to hold a fresh seed from a water melon. Not the most efficient shape if you want to retain full control over the situation.
I took a break from the free hand planing, and decided to glue up the lower part of the chest. This went conspicuously smooth. Even the diagonal measurements were spot on.
More planing and I was satisfied with the shape of the lid. I sanded the surface with some grit 60 to make it a bit more smooth.
I planed the lower part of the chest to remove any protruding pins or tails. My solution with the floating bottom that has a lip made it impossible for me to plane the lowest part of the chest. So I had to use a chisel, and later I will follow up with some sandpaper.
The lock was mounted after making a mortise. I had to bend the upper plate just a bit, since the upper edge of the front board is not square to the front, another disadvantage of making slanted sides.
I more or less try to follow the advice given in "The joiner and cabinet maker" from Lost Art Press, when it comes to mounting a lock. The most important thing is to keep everything centered around the pin for the key. Since all locks I have ever been able to find are full mortise locks, my biggest challenge is to not break through the sides of the board. If I succeed in making the mortise, the rest usually goes pretty smooth.
Next task was to fit a striking plate in the lid. I marked out the position from the lock, and I even remembered to make the mortise below the striking plate wider that the square hole itself so the lock would actually work.
The hinges were mounted their own width from the ends, which is pretty common.
I started mounting them on the lid, because I could use the lower case for holding the lid while I performed the job. This was for once in this project a nice work holding solution.
Since the lid did indeed end up being 1/4" too narrow, I decided to mount the hinges so this would be visible on the back of the chest. That way the front will look as nice as possible. I thought about removing about 1/8 from the front and the back, but discarded that idea, because it would make the lock visible from the front. Further more I was afraid that it would lead to that the mortise for the striking plate could penetrate the front of the lid effectively ruining the project.
I still need to make some feet and an escutcheon for the chest, and I am considering making some lifts for it as well.

View from the front.

Work holding of the lid.

An escutcheon will add to the look.

Interior of the chest.
Tuesday, July 14, 2015
Treasure chest with curved lid part 7, the lid
After the glue had dried I decided that it didn't look right if I'd led the inside stay as it was with flat boards forming the surface.
I adjusted the scrub iron in the plane, so it was able to take a bit of a cut even when only the sides of the plane were riding on high spots. It was far from ideal, but I managed to get the inside to form some sort of a curve instead.
There were a few places I wasn't able to reach, so I took the iron out of the plane and used it as a scraper. Again it is not an efficient trick that will make your friends gaze in awe, but it helped me git a bit closer to a decent shape.
The surface looked like crap after my exploits with the scrub plane and the scraping experiments, but I found some 60 grit sand paper in the deck workshop, and then I just started sanding away.
After quite some time I was satisfied with the way things were looking, and I was ready to move on to attaching the ends.
Originally my plan was to make the ends straight down, but for some reason I decided that it would probably be too easy, and that I should challenge myself a bit more.
Therefore I decided to make slanted ends.
I immediately sawed the ends of the lid so they were slanting. Then I "squared" things up the best I could using the smoothing iron in the plane.
I am getting used to making angled dovetail joints on flat boards, so I guessed that this wouldn't be
much different.
Guess I was wrong.
It really is a lot more difficult to make dovetails that will connect a semicircular flat board at an angle to a less than perfect half cylinder shaped object.
At first I marked out the tails on the end boards and cut them, I even made sure to take into account that the cut had to be deeper on one side than the other. It looked fine until I tried to put them on the lid itself for marking out the pins.
Even I could see that there were no way I would ever be able to make some pins that would allow that tail board to go on. The tails had to have different angles depending on if they were placed on the side part of the ends or on the top part of the ends. I realized that this slanted end challenge was going to be a lot more difficult than I had imagined.
I spent some time trying to figure out how I was supposed to mark out the dovetails, and ended up making the pins first.
I could use a compass to step them of, but since the reference side was curved I didn't have a system for marking out the angle of the pin. My solution was to cut a small dovetail marker that looked like a triangle, and then I placed it so it looked fair to me. At least I knew that the slopes would be the same.
Marking the depth of the tail was done using my marking gauge. Next came the problem concerning how to mark out the direction of what would be the sides of the pins. Normally I use a small square in form of a piece of cardboard. But a square is best if it has got some sort of reference edge that you can measure from.
I tried various ideas before settling on simply eye balling the lines. For that I used the back of the panel saw that we have on board. I positioned it at the pin markings and tried to make it follow the length of the lid as well as I could.
Once all the markings had been taken care of, I sawed and chiseled out the waste between the pins.
Normally I like to undercut my waste area, but I figured that it would end up showing when I get to the point where I can plane the outside of the lid to the final shape.
So the waste area was finally cleaned up using a coarse file (we haven't got any rasps out here).
I made a couple of new end boards instead of the ones with the faulty tails on them, and after a lot of fiddling I managed to mark out the tails and cut them too.
This involved some guessing regarding where to stop the cut on one side, and then just hoping that it was the correct place when I placed the chisel to remove the waste.
I dry tested the end boards, and they seemed nice and tight. When I tried to gently remove them to be able to add some glue, both top pieces broke off.
I simply glued the pieces back on and then trimmed the pins for those areas a bit more.
Finally I glued on the ends. And I pretty much immediately regretted not undercutting between the pins because there were gaps on the outside of the chest. I am afraid that these gaps will be more visible than any undercutting I could have dished up with.

The end with faulty dovetails.

Marking out for the slanted cut.

Sawing, the line from the bucket wasn't completely straight after all.

The glued up lid.
Thursday, July 9, 2015
Treasure chest with curved lid part 6, the lid
The lid is going to be almost semicircular from the front going to the back. Length wise it will be straight.
I measured the curved distance ( I know you can calculate it as well, but I don't remember how to since it is only a fraction of a circle).
I got the distance to be 16" (41 cm) more or less, so I made 6 boards with a width of 2.75" (7 cm). Each board was intentionally cut about 4" too long.
Using my scrub iron in the plane, I planed a bevel on each side of all the boards. I just eyeballed the angle.
The boards for the sides of the lid each got a bevel that was twice the angle of the inner ones. In hindsight it would have been smarter to wait with these two bevels, but I know that for the next time I am going to make such a lid.
I flattened what was going to be the inside of each board, and then I laid out all of the boards and numbered them. I had added an arrow showing the direction of the grain, so I didn't make it more difficult for myself than I had to.
Each pair of bevelled edges were then jointed together. Pretty much like how you do with any glue joint. The only difference is that here I had to turn one board the opposite direction, to get the bevels to match up. A few swipes with the smoothing iron in the plane, and the seam seemed tight enough.
When all the joints were completed, I again lined the pieces up. I added some blue masking tape to hold the pieces, and then carefully folded the lid. I placed the assembly on the scribed arc, to see if it looked fine.
It turned out that I had been a little too aggressive on the bevels, so I was about an inch short.
I made a seventh stick about an inch wide to rectify the width of the assembly.
This stick was made with out any bevels (at least that is what I tried to, but I didn't check it with a square).
The now seven pieces were lined up, taped and flipped over.
Now the bevels were open so I could add some hide glue to both sides of each joint. I used a small brush to get a nice layer of glue all over the surface.
Once all the glue was applied, I gently lifted the two sides of the lid and when the shape was obtained, I put the assembly upright on the work table.
I adjusted the individual boards so the inside edges of the joints lined up the best I could. I then added some more masking tape to help close the inside seams by putting some tension on the opening of the lid.
After the glue had started to set, I carried the piece out to a nice and warm spot so the glue can dry.
I then measured the width of the assembly and found that I am still about 1/2" short..
It doesn't matter much, because one of the joints of the centre stick is not very tight on the outside.
The plan for tomorrow is to remove the centre stick, and glue in another one which is maybe 3/4" wider. That would give me a bit of surplus wood that I can plane away to make the lid fit nicely.


I started by drawing an arc that would correspond to my plans for the lid.
On a board I marked a distance of 11" near one edge and a center between those. I then placed one leg of the compass something like 1.5" below the center and adjusted the other leg to touch the points 11" from each other.
Then I scribed the piece of a circle using that setting.
I measured the curved distance ( I know you can calculate it as well, but I don't remember how to since it is only a fraction of a circle).
I got the distance to be 16" (41 cm) more or less, so I made 6 boards with a width of 2.75" (7 cm). Each board was intentionally cut about 4" too long.
Using my scrub iron in the plane, I planed a bevel on each side of all the boards. I just eyeballed the angle.
The boards for the sides of the lid each got a bevel that was twice the angle of the inner ones. In hindsight it would have been smarter to wait with these two bevels, but I know that for the next time I am going to make such a lid.
I flattened what was going to be the inside of each board, and then I laid out all of the boards and numbered them. I had added an arrow showing the direction of the grain, so I didn't make it more difficult for myself than I had to.
Each pair of bevelled edges were then jointed together. Pretty much like how you do with any glue joint. The only difference is that here I had to turn one board the opposite direction, to get the bevels to match up. A few swipes with the smoothing iron in the plane, and the seam seemed tight enough.
When all the joints were completed, I again lined the pieces up. I added some blue masking tape to hold the pieces, and then carefully folded the lid. I placed the assembly on the scribed arc, to see if it looked fine.
It turned out that I had been a little too aggressive on the bevels, so I was about an inch short.
I made a seventh stick about an inch wide to rectify the width of the assembly.
This stick was made with out any bevels (at least that is what I tried to, but I didn't check it with a square).
The now seven pieces were lined up, taped and flipped over.
Now the bevels were open so I could add some hide glue to both sides of each joint. I used a small brush to get a nice layer of glue all over the surface.
Once all the glue was applied, I gently lifted the two sides of the lid and when the shape was obtained, I put the assembly upright on the work table.
I adjusted the individual boards so the inside edges of the joints lined up the best I could. I then added some more masking tape to help close the inside seams by putting some tension on the opening of the lid.
After the glue had started to set, I carried the piece out to a nice and warm spot so the glue can dry.
I then measured the width of the assembly and found that I am still about 1/2" short..
It doesn't matter much, because one of the joints of the centre stick is not very tight on the outside.
The plan for tomorrow is to remove the centre stick, and glue in another one which is maybe 3/4" wider. That would give me a bit of surplus wood that I can plane away to make the lid fit nicely.

The scribed arc that represents the ideal shape of the lid.

Initial testing of the bevels.

Flattened on the inside

Jointing the bevels

Ready for the first test.

Checking the shape of the assembly.

About an inch too narrow.

Now there are seven pieces in the lid.

Glued up, view from the inside.

Glued up, view from the outside.
Subscribe to:
Posts (Atom)