Thursday, March 30, 2017

A steam punk passive speaker for Lauras Iphone

A weekend this home period where Laura was home, I asked her if she wanted to build something in the shop, because it would be a really nice father/daughter thing to do.
She thought that it would be fun too, so we started discussing what we should build.

I suggested building a passive speaker for her Iphone, and she was a bit curious about what that was. After showing her some made out of wood we tried to search Youtube to see if there were other passive speakers - and get some more inspiration.
One speaker was made out of an old hunting horn, and it looked kind of cool. It would also go perfect with the bookcases due to all the brass hardware on those.

Luckily for Laura, I had once bought a hunting horn in Poland, back in 1988 - so that model was within reach.

We immediately headed into the shop and found a piece of elm and got going.
Laura took some photos during the build, so all the photos are courtesy of her.

The idea of a passive speaker is to make some sort of channel that the sound can travel through, and then end out in something that will amplify the sound. In our case the bell mouth of an old hunting horn.

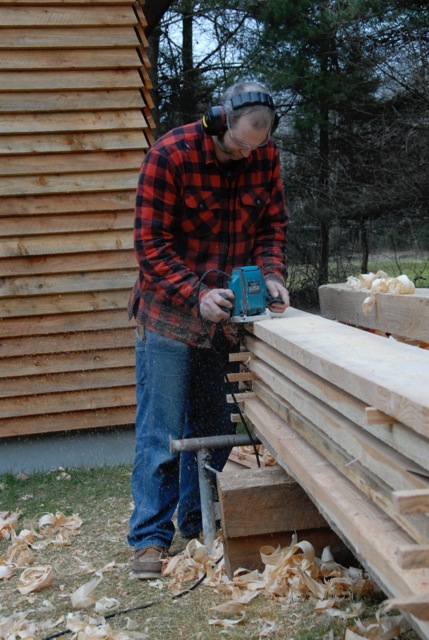
I started by squaring up a thick piece of massive elm, and then split it horizontally.

A long slot was made using the mortising machine, and a through hole was made at the exact location of the speaker on the phone itself.

A large hole was drilled in the centre of the top board, and on the underside of  this board, the large hole and the small speaker hole were connected with a channel, I think it was approx. 5/16" deep.

The two boards were then glued back together and while the glue dried we started working on the brass part.

Since the horn was soft soldered together, it took only a little heating with a propane torch to loosen the joint. After separating the bell mouth from the rest of the horn, I used a pipe cutter to cut of a length of the curved pipe that we would also use.

The curved piece was soldered back on in a 180 degrees twisted position, so the horn would end flowing in a bit of an S shape.
Some sort of disc or flared part was needed to be able to mount the brass part onto the wooden base.
I did't have any sheet brass lying around, and I thought about firing up the metal lathe and turn something. But I wanted to check if I had something stashed away first.
After a bit of searching, I found an old candle stand that I think was part of a mystery box I bought at an auction at some point. There were two holders for candles on it, and each one of them had a round "catch the molten paraffin before it reaches the table" thing. (I am sorry, but I don't know the correct English term for this part of a candle holder).
These drip catchers had some Art Nouveau ornamentation on the underside. And since we were going to solder them to the horn part upside down, this ornamentation would be visible once the speaker was done.
We drilled holes for three mounting screws and countersunk those. The centre hole was enlarged so the brass tube could slip on, and then I soldered it together.

The parts were washed and I lightly brushed the ornamented part with a brass brush to clean it up a bit.
Then we screwed the horn part onto the elm base and we were ready for the first test of the speaker.

I found some of the green felt that was left over from the travelling bookcase project, and it was glued to the underside of the base. Next morning when the glue had dried, I trimmed the surplus felt so it looked nice.

All in all this was a fairly quick project. I think it took a little less than 3 hours in total, including a bit of tea drinking during the process and searching for parts etc.
The sound quality isn't overly impressive, if you are testing it out on modern music. But for classical pieces such as "We'll meet again" with Vera Lynn, it is downright great.
Making projects with children is always high up on my favourite list, because they build memories as well as objects.


Steam punk passive speaker.


Firing up the band saw and looking if the small piece of string will hold the window from falling down.

The split base (and an auger that we didn't use)

Soldering on the flared bottom.


Testing.


Wednesday, March 29, 2017

A small barn for the summer house 11, windows installed.

In the previous week, I went to the summerhouse for completing the floor. I had gotten the hang of it, and I really wanted to proceed with installing the windows as soon as the last board was nailed down.

When I brought the windows with me, I had only one floor board left to install. I had made some wooden shims to be used for the window installation, and I looked forward to doing it.
After completing the floor and celebrating this with a cup of tea, I discovered that I had left all the shims at home..
So no window installations that day after all.

I test fitted a window, and could see that I needed some slightly thinner shims, so I made those when I got home, and put them in the car straight away. I also made three boards with and angled cut on one side to mount over the window frames once these were installed.

The installation itself went really smooth. The outside of the window frame is installed flush with the outside of the exterior cladding of the barn. 
Some boards were then installed as trim, and on the very top is the board with the angled cut, now functioning like a very small overhang roof.

Since I haven't installed the floor for the attic yet, I didn't install the windows for the gable. My plan is to push the floor boards through the hole before installing a window, and thus avoiding to scratch the painted frame. A floor will also give me something to stand on while I install the window, making it a safer operation than balancing on a ladder or tip toeing on the rafters.

Gustav and I worked a few hours out there Saturday and Sunday too. Gustav downed a couple of trees with a chainsaw, and I cleared up a lot of the debris left behind from the floor installation, and swept the floor inside.

I also started on installing the corners and the trim for covering where the cladding meets the underside of the roof. 

There is still a lot that needs to be done before the barn is complete, but I am enjoying every minute of the project. In no particular order are: A new door including a frame. A floor for the attic, a staircase for the attic, insulate the walls. Install boards for the walls and ceiling. Install the remaining windows. Finish the outside trim. Paint the barn. Install the roof tiles. Etc.


Window installed and left corner covered.

The completed corner.

View through the door.

Thursday, March 16, 2017

A small barn for the summer house 10, laying the floor.

After I had painted the windows, I have been busy trying to get some work done on the floor of the small barn. My goal is to get the windows installed and thereby freeing some space in the workshop that will then be used for making some obstacle holders for horse jumping. But that is a bit into the future.
I sawed some 1/2" thick boards on the saw mill that I installed between the joists. These boards are only there to hold the insulation, so they won't carry a lot of weight.
The insulation was added (6"), and a plastic membrane was mounted on top. I am not quite sure that it is needed since there will not be much human activity in the barn to breathe out humidity, and besides it also shields the insulation a bit while I am working on the floor itself.

The floor boards are 1 3/4" thick and are joined by means of a loose tongue.
I have finally gotten around to using my Veritas BU jointer that I bought some years ago at a great price. I use it to joint the edges of the boards before I make the groove for the tongue.

The upper corner is planed off with two swipes of the block plane, so it is just a tiny bevel that will keep splintering to a minimum.

The groove is made with an electric router. A year ago I finally had it with my old router and forked out some real cash and got myself a more professional Makita router. That thing is so much better than the old one, it is easier to hold, it can actually retain the cutter in the desired position and it does a quick job of making a groove.

Due to the width of the boards I am installing them with nails through the top instead of using hidden nails or screws.
I would have liked to use headless nails like I used for the porch, but those are not available in 5.5" so that is why I am using regular nails. They look a bit crude, but it is a barn after all.
They are mounted 5/4" form the sides of each board, and if the board is very wide I also put a nail in the middle as well. To keep the heads aligned, I am using a piece of string to mark out the position.

Olav stopped by today and gave me a hand, and also took some pictures. So all the pictures of today are by the courtesy of Olav.

Hammering.

Hammering. 

Floor boards on the right, Merlin half way hidden.

Veritas BU jointer with fence, now in use!

The board is clamped to a 5x5 to be able to stand on an edge.
 
Beveling the edges of the groove. 

Larch floor board prior to grooving.

Cross cutting. 

Grooving with the Makita.

A router is noisy and dusty but fast.

Merlin is supervising the project.

A finished board with grooves.

Monday, March 6, 2017

A small barn for the summer house 9, painting the windows.

After preparing all the individual pieces for the windows, they were assembled. I used a plane for adjusting the size to a pleasing reveal all around each one of them.
The flat parts of each window were also smoothed with a plane, to ease any small differences from the manufacturing.

I consulted Olav for some advice, and he suggested that the traditional way to go would be to coat the rabbet for the glass twice with shellac prior to painting and adding glaziers putty. The reason behind this approach should be that the shellac keeps the putty "soft" longer, because it prevents the linseed oil from migrating from the chalk and into the wood. 

While I am not be someone who dives into testing new stuff, I am normally ready to try out something old and tested straight away. So I took Olavs advice and used up the remaining shellac mixture I had left over from the travelling bookcases.
While I was at it, I also coated all the knots with shellac.

The hardware for the windows look good in my opinion, but it is the most traditional way to cover it in paint as well, that actually made painting a bit easier, since I shouldn't try to avoid getting paint anywhere.
For the painting itself I have strapped a frame to the workbench and mounted the windows on it. That way I didn't have to invent any work holding for the painted windows. The outside of each frame will not be painted since it will be hidden inside the wall. So it seems to be a fairly efficient way of doing it.

The biggest obstacle was Bertha who found it incredible interesting that I was mowing a small paint brush up and down, so she came close to have a look. I managed to get her ushered away with only a few white parts on her coat of fur.

Complete window.

one large and two small windows painted.

Inside corner with shellac applied.