Showing posts with label Review. Show all posts

Tuesday, May 3, 2016

Portable tool chest, review after 1 year of travelling

It is a little more that a year ago since I finished the green tool chest that I bring with me on the ship.

I have brought it back and forth in my bag/suitcase every time I signed on and signed off.
So I feel that I am able to give an honest review of this type of tool chest if anyone feel the need to make a small chest to accompany them on their travels.

My tool chest measures 16" x 9.5" x 8.25" (length x width x height), so it will not fit very large tool inside.
The corner reinforcements were made out of some old sheet metal that we had lying around. They have succeeded in keeping the chest free from damage despite it being thrown around by baggage handlers in various airports. In addition to that, I also think they look good.

The bottom is the weakest link in the tool chest. I wanted a clean look of the outside of the chest, so the bottom was simply nailed on inside a rebate. I never added any nails from the outside, but so far I have only noticed one or two nails starting to creep out, but a light tap of a hammer brought them back in. So unless i load it with lead ingots, I suppose it will be fine.

I really like the two tills that sit in the top of the chest. The smaller one was originally intended for a pencil, but it has been filled with hinges, screws, nails and locks instead.
The larger till is sufficiently large to accommodate my three chisels plus stuff like my oil stone and the marking gauge.

The shooting board doesn't see much use, but that is because I have taken a fancy in making stuff with sloping corners and other shapes. But when I need a shooting board it is nice to have. 

The lower part of the chest which is the main room has got just enough space for my plane and the two irons for it. A mallet, a small dozuki, a grooving plane and a moving filister plane. Until a week ago there was also a small jar of glue that had survived almost two years of travelling before finally giving up.

I have discussed the tools inside previously, and the only addition since then is a moving filister.

As it can be seen, there are no lifts on the chest. I really don't think they are necessary given the small size of the chest itself. It is so easy to just wrap an arm around the chest and carry it around. I think that while lifts can look fine they would distract from the clean look on this chest. they would also add some weight which is not a good thing for airline travel. 
Totally I think the chest including contents weighs something like 26 Lbs.

For a travelling tool chest that needs to handle all the tools you really need, you would probably have to make it a wee bit larger. That would be to accommodate a larger saw and a hammer. Those tools I normally borrow from the ships workshop, so I don't really need to bring them myself.

A solution to the saw could be a frame saw that can be taken apart, and having one crosscut blade and one ripping blade.

I haven't been stopped by custom officers yet and had to explain the tool chest to them, but I suppose it should be OK.
If you travel between countries that have strict regulations concerning bringing items made out of wood across the border, it might be best to tick off that box on the declaration board and avoid getting into trouble for forgetting it. 

The little I know about wood products crossing borders, is that they tend to be mostly concerned if the bark is still on the wood. Or if the wood is attacked by insects.
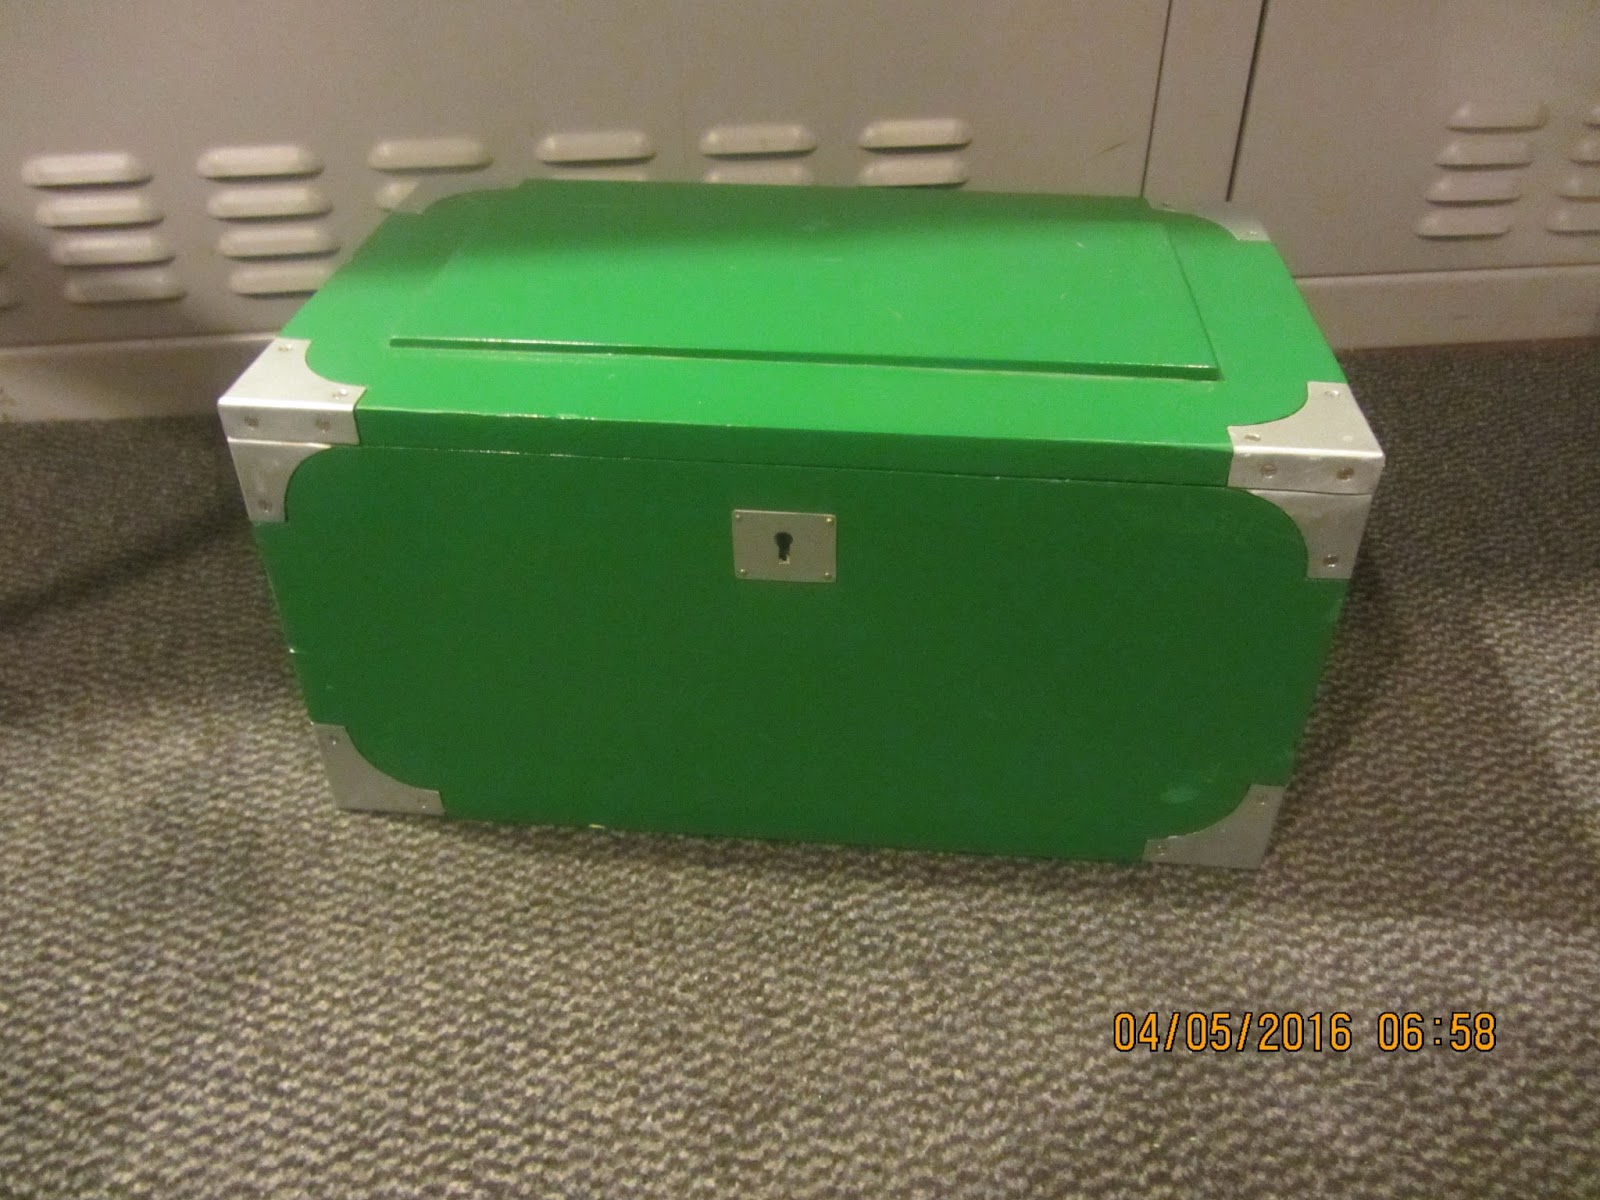
Green travelling tool chest.

Lid open.

Thursday, April 28, 2016

Bagage irregularity report.

I signed on the ship yesterday, and as usual I brought my homemade green tool chest with me.

Since I have traveled with the chest for a bit more than a year now, I had intended writing a kind of review based on my experiences with the chest.

But thanks to SAS (Scandinavian Airlines System), the review is a bit different than what I had intended.

Upon arriving in Bergen I discovered that I was unable to pull out the handle for using the wheels on my bag. That made my alarm bells start ringing.

Today I tried to grab a clean T-shirt from my bag, and it was stuck to the tool chest. At first I thought that it had just caught on one of the corner guards. But when I looked  closer it was also stuck to another T-shirt. I examined the corner thoroughly and it dawned upon me that they were not simply attached to the chest - they were glued to it!

I unlocked the chest and tried to raise the lid - impossible.
So the sad fact is that the bagage handlers of the SAS have mistreated the bag in such a way that the small glass of white glue I had inside have been broken, and due to the bag being thrown around, the glued hadn't just stayed at the bottom of the chest, but had managed to seep along the side to the top, gluing everything on its way.

I brought the chest to the engine control room, and I have succeeded in opening the lid and removing the large till. But the rest is still stuck.

I have filed a report to the SAS, but I doubt that I will get anything out of that. So I will try to see if I can pry the parts from each other.

The chest now with the lid able to open.

The glued up corner of the chest.

This is the corner where the glue has seeped out.


Tuesday, January 19, 2016

Campaign hardware from Toplicht, a product review.

After reading "Campaign furniture", I have decided that I would like to make a set of travelling book cases.

Due to the Danish import regulations, it is immensely cheaper if I could source some hardware from Europe.
I managed to find some chest locks from Rutlands in England, that were reasonably priced.
They also carried brass corners, but those were kind of expensive.

A good friend of mine once suggested Toplicht as a possible source for some specialty hinges.
I sent for their catalogue, and I have also browsed their web page. The result: They really do stock most of what you could imagine.

I ordered the following items:

Brass corners at a price of just below 6 Euro a piece it is a stark contrast to the prices demanded elsewhere. The corners are cast brass with a thickness of approx 1/16". If you order more than 5 there is a discount.

Brass drawer pulls These look very much like the later type pulls shown on page 10 in "Campaign furniture". They seem to be a little bit thicker than 1/16. These are only 9.90 Euro a piece, if you order a single piece. Like the corners, these pulls also come with a discount if you order more than five.

Brass hinges These hinges are 5/64" thick and seem to be of a good quality. They are 13.90 Euro a piece, so they are a lot more expensive than the usual hinges I buy at the lumber yard, but the quality level is also quite different.
To get a discount on the hinges, you will have to buy at least ten.

The shop was really fast, I ordered the stuff Friday and I got it today. All the items were wrapped in newspaper for protection. Not that it matters much with brass hardware, but it gives a fine impression of the store, that they make sure everything is securely wrapped.

I ordered the locks Friday as well, but those haven't arrived yet, so therefore there is no review on those.

So if you need campaign hardware, I recommend Toplicht.de as a supplier. They have loads of interesting pulls and specialty hinges etc. and the prices seem very reasonable, actually downright cheap for some of the items (please note that I am in no way connected or affiliated with Toplicht).
.
Brass corner, 2" x 3/4"

Brass pull, 2.75" x 1 5/8"

Sunday, December 27, 2015

Campaign furniture, a book review.

Given that the weather on the Norwegian west coast has been bad ever since I signed on the ship, there really hasn't been any possibilities of starting a project.

I did however bring with me a copy of Campaign furniture by Chris Schwartz.

The book is written in a clear and informative language, and there are loads of historical informations to be found.

The projects found in the book strikes me as very well chosen. Based on that they can be used in a normal household today.
I am pretty sure that CS also knows how to make a campaign bed, but that would probably be more of a curiosity to most people, and not something that a lot of people would actually make.
The projects do not appear to be listed according to their difficulty, but more based on how popular that type of project was originally.

In the beginning of the book a lot of general information on campaign furniture is given, changes in styles through the years. General information on hardware and wood species etc.
I personally like the small quotes from older books, such as a guide to India travelers and small original ads for companies that supplied campaign furniture 150 years ago. These small distractions engage my sense of curiosity and imagination.

There is also a whole lot of general information on joinery techniques, and techniques for installing hardware, with all the small but important information provided. Especially when it come to the descriptions on how to install hardware, the book is very thorough. This is in my opinion a very noble approach, as the hardware installation is often a "make or break" operation on a piece of furniture.
The reader is taken step by step through the installation of half mortise locks and corner guards etc. with clear pictures and instructions.
In my opinion the best example of the thoroughness of those descriptions is that CS explains that typically a corner guard will have a very slight radius on the inside corners. And next he describes how to deal with this.
That is information I haven't seen anywhere else. Actually the book can be recommended just based on the instructions for installing hardware.

Regarding the projects themselves, the instructions are equally clear and informative. Each build is described in a logical sequence, and operations that might be difficult are explained in detail regarding what can be done to ensure a success.
There are no descriptions of the exact hardware needed for each project, which is kind of liberating. I guess this is done to allow the builder to use whatever hardware is obtainable in that persons part of the World.

As usual with books from Lost Art Press, the book itself oozes of quality. Nice binding, thick paper, good looking photos and drawings etc.
I would recommend the book to anyone remotely interested in items of campaign style, and also to those who are looking for some detailed instructions in how to mount hardware.

If you should you purchase the book, or the electronic version or both depends on how you like to read. But the book itself is a handy size and of such a quality that it is a joy to read it. So I would just go with the hardbound book. But then again, I am pretty conservative when it comes to things like that.

Tuesday, February 17, 2015

New tool chest for the sea 10, the interior and thoughts regarding the build.

The interior of the chest:
11 cm (4.5") above the bottom of the chest there are two small strips of wood running the entire length.
These strips hold the shooting board, so it acts a a divider between the lower part of the chest where I keep the planes, and the upper part where I have two tills.
To facilitate removal of the shooting board, I drilled a couple of 30 mm (1.25") holes in it. That way I can poke my fingers through the holes and lift it out of the chest.

Above the shooting board rests two shallow tills.
The height of the tills corresponds to the distance between the shooting board and the dust seal of the lid, when the lid is closed. I think that if I pace a thin piece of cardboard, I could probably turn the chest upside down without anything falling out of the tills.
The large till was designed to hold chisels and the marking gauge etc, and the smaller till holds my hardware stock.

The space inside the dust seal is just right for my sand paper. I also have a dvd (The joiner and cabinetmaker) in that space. 

I need to find some plane socks for the grooving plane and for the moving fillister. As for now, they are just wrapped in some rags.
But a proper bag or sock would look better I think.


Thoughts about the build:
I wanted to prepare all the stock prior to starting the actual joinery on this project. It is the least fun part of a project in my opinion, but I am glad I stuck with that plan. 
Having all the boards ready at the beginning made my work so much more efficient compared to those builds where I have made each new board up as I went along.
I wanted to avoid glueing up panels, so my design is also based on the width of boards I had on board. But that is my standard practise, so I knew that would work.

The corner reinforcements were easy to make, and they look a lot better than I had anticipated. I would have preferred if they were made out of brass, but galvanized steel plate is also OK. The only drawback was that we didn't have any acid pickle otherwise I could have soldered the corners.

The lid stays were a fine idea, but they looked wrong and got in the way of the intended tills, but removing them added a couple of extra holes to the inside. I'll just have to live with that.

The lock is of the full mortise type. While it looks nice from the inside and the outside it is not a perfect lock when the stock is thin. This is because the mortise leaves a fairly thin wall for mounting the escutcheon. The keyhole was positioned near the side of the lock, so two of the small brass nails held OK since they were outside the mortise. The other two were cut to a length of 1/8", so go figure if they have a lot of holding power!
To help with the fastening of the escutcheon, I added a small dab of paint on the back of it, and also on the two short nails. 
Still my guess is that the escutcheon will be the first part to fail on this chest.

The tills were made using some stock I had prepared for drawer bottoms for the "Gerstner inspired tool chest". The stock is about 1/4", so it is fairly delicate. For bottoms I just nailed on the old plywood bottom from the original tool chest. That way I could recycle and save myself some work.

My old suede plane iron protectors were not fit for the job any more. The irons had cut their way out of the suede, so the sharp edge was in danger of getting nicks and other wise be dulled.
I still had some 1/4" stock left over from making the tills, so I made two plane iron protectors that are a lot more sturdy than the earlier duct taped suede models. 

I guess the colour is a matter of taste, but the layer ended up being a bit fat. I sincerely think that I could have made a better job using a brush, but in hindsight everything is 20-20. 
I also made the mistake of not painting the upper part of the sides and ends of the chest, as well as the underside of the lid.
My fear was that the paint would cause the lid to stick, but instead I got a light coloured streak all around the chest where the colour of the wood can be seen through the gap between the chest and the lid.
Maybe I'll paint this area black, or wait till I am back on the ship again, and then give it some green.


All in all it was a fine project without any real difficulties. 
But the true test of the tool chest will be to see how it fares over the next year. 

Thanks for following and commenting the build as it went along.


Top layer of the chest showing the 2 tills. 
The sandpaper is inside the dust seal.

Large till removed, note the lifting holes in the 
shooting board which is placed upside down.

Lower layer of the chest. Shooting board next to the chest.
 
Lower layer with the old cardboard box from the 
Stanley 248 grooving plane removed. The mallet 
had to be disassembled to fit in the chest. 

The new iron protectors.


Tuesday, December 9, 2014

Maritime woodworking tools.

The title may be a bit misleading, because it is not about tools used to build maritime stuff, rather than tools I have used the past year for hobby woodworking on a ship.

As some of you may remember, I made a tool chest for the sea last year. During the last year I have built a couple of projects using the tool kit, so I feel that I can give an honest review of it.

The projects I have built have all been limited in size to something that could be transported as luggage on an air plane. The following is a list of the projects I have made on board. Some of them I finished at home, because I don't like to leave a project on board when I go home.

Seaborne chest
Cabinet with many drawers
A carved name sign
Fairy tale princess bed
Tumblehome sea chest.
The recent carved sign for Aslan Fenix
A Gerstner inspired tool chest.

We are only signed on for 4 weeks at the time, and things really have to go smooth for me to be able to finish a project in that time. sometimes we are prevented by the weather or fatigue, so woodworking out here for me is something I do to relax and get my mind to slow down. The process out here really is more important than the result.

The tool set I bring with me is stored in a home made tool chest. Due to the fact that it needs to go in my suitcase on the air plane, this chest had to be light and not too big.
I made it out of 5/16" thick larch that was dovetailed together. The top and bottom are made from 6mm birch plywood.
The chest has been damaged by luggage handlers throwing my bag around, but it still holds up. I have re glued it a couple of places earlier, and I can see that it is time for me to do it again.
I guess that I should have glued in some triangular reinforcements in all corners.

These are the tools of the ship that I use for my woodworking:

Hammer.
Multi purpose wood saw (Fuchsschwanz), doubles as a straight edge for marking lines.
Try square.
Clamp.
Hack saw which I normally use as a dovetail saw.
Measuring tape or folding rule.

Once in a while I use a drilling machine, but that is not very often, but those are on board as well.

My own tool set can be seen on one of the pictures below, and consists of:

3 chisels, 1/4", 1/2" & 1"
A small dozuki saw
Mallet.
2 brushes for glue
A jar of white glue
Plane
Smoothing iron for the plane
Scrub iron for the plane
Grooving plane
Marking gauge
Sanding block
Home made router plane with an extra narrow iron.
Oil stone for polishing
Pencil
Linoleum carving chisels (the newest addition to the chest)
Sandpaper grade 80 and 150 (as far as I remember)
Shooting board which is incorporated in the lid of the tool chest

I also bring a bit of hardware, all of it is in the small size:
Brass screws
Brass nails
Finishing nails.
Brass hinges (3 pairs)
An inset lock
Galvanized hinges (1 pair)
Turned drawer pulls (the dark stuff in a bag, they are very small)
A piece of a bone.
Some small pieces of cardboard to use for dovetail gauges.
A bit of emery cloth.

The only thing I have sometimes felt that I was missing is a jointer plane. But that has mostly been an issue if I had to glue up some sort of panels. Jointing two edges is not what a smoothing plane is designed to do.
Apart from that it is a pretty powerful tool kit when combined with the few items I need from the ship.
You can theoretically get by with only one clamp for work holding, but having more is advantageous in case you need to glue up something.

The tool I use the least is the 1" chisel, but I still like to use it for paring and if I make large dovetails.

The tool that makes the biggest difference is the scrub plane, or in my case the scrub iron for the smoothing plane. Being able to quickly process stock makes a huge difference.

Second on the list of tools that make a difference is the grooving plane. Because this enables you to make a wide variety of things: Tongue and groove boards, Grooves and dados, I even used it when I made a raised panel. The great thing with the grooving plane compared to a real plough plane is that at least the Stanley No 248 is so small that it will easily fit in a small tool set like this. I only have 1 iron for it (5/32"), but if I make multiple passes that doesn't pose a problem.

My conclusion is that the set is working pretty good for the type of projects that I do while on the water. But the tool chest itself should probably have been a bit sturdier made in the first place.


Damaged lid.

Lower chest cracked along the groove for the bottom.

Tools of the ship.

The line up of my own tools.

The shooting board.

Hardware assortment.

The tools neatly tucked in the chest.


Saturday, October 11, 2014

Das Zimmermannsbuch.

I purchased this book from Dictum about 2 years ago upon a recommendation from Peter Lanz.
The book is written in German which makes it a bit harder (for me at least) to read compared to an English text.
The illustrations of the book are spectacular, and there is a wealth of information regarding how buildings were made around the turn of the 19th century.
It is not you typical timberframing book, since the architecture which is covered is more Jugend or Art Noveau style than most other books I have seen.
Sadly a lot of the information in the book is obsolete, based not on how things are supposed to be done, but based more on how we choose not to decorate most buildings of today. There are several suggestions and instructions for towers to be placed on roofs for decoration purposes. I don't think a house with that kind of decoration have been built in Denmark for the last 75 years.

The book covers projects from both ends of the scale, e.g. construction of a small stand for a market and in the "slightly" larger end an example of a circus building made out of wood.

There are a lot of tables in the book concerning e.g. dimensioning of rafters and joists.

Every time I have read in the book, I am kind of saddened by the loss of decorative elements on most architecture today. But I am afraid the costs would be very high if something similar was to be made today.

The book is not one that is read cover to cover, but more used like a handbook or for inspiration. It can also be read as a document of an architectural period which is still visible in many old towns in central Europe.
I would recommend it just for the fantastic illustrations alone, but I have used it as a handbook as well during a project of constructing some stairs.


Dies ist meine erste Versuch um ein Bisschen Deutsch zu schreiben, Wenn es nicht ganz korrekt Hochdeutsch ist, dann möchte ich gern entschuldigen, aber meine letzte Lektion in Deutsch in die Schule war 1989.

Ich habe dieser Buch vor Zwei Jahren von Dictum gekauft. Es wurde mir empfohlen bei Peter Lanz

Die Abbildungen in der Buch sind ganz spektakulär und es gibt eine riese Menge von Information über wie Gebäude konstruiert war rund Jahr 1900.
Es ist nicht eine typische moderner Buch über Holzkonstruktionen weil das beschriebene Architektur mehr Jugend Stil ist, im Vergleichung mit andere Bücher die ich gelesen habe.

Leider ist ein große Teil von die Information in das Buch überflüssig, basiert auf wie man Heute wählt Gebäude nicht zu dekorieren. Es gibt mehrere Vorschlage und Instruktionen über wie man zum Beispiel Dachreiter und Türme gemacht und installiert.
Ich zweifeln darauf das es solche dekorative Elementen in die letzte 75  Jahre in Dänemark gebaut ist.

Das Buch umhandelt Projekte von der ganze Scala. Von Sodawasserhäuschen bis Zirkusgebäude, alles aus Holz gemacht.

Jede mal ich diese Buch gelesen habe wird ich ein Bisschen traurig wegen der Mangel auf dekorative Elementen auf Gebäude heute. Aber ich glaube das die Kosten für solch ähnliches Arbeiten heute wurde sehr hoch.

Dieses Buch ist nicht ein die man von Anfang bis Schluss lest, sondern mehr als ein Handbuch für Inspiration benützen.
Es kann auch wie ein Dokument über ein Architektonisches Periode, heute noch in viele Städte in Central Europa deutlich sichtbar gelesen werden.

Ich möchte das Buch allein auf Basis die phantastische Illustrationen empfehlen, aber ich habe es auch als Handbuch benützt, bei Konstruktion einen Treppe.