Friday, December 9, 2016

Pennsylvanina spice chest 9, the secrets within

I have decided to wait with the drawers till I get back home. There is no need to rush the job and make some crappy drawers that I know will annoy me for many years.

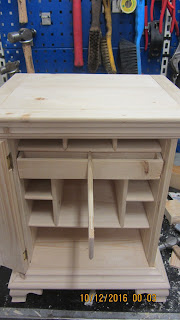
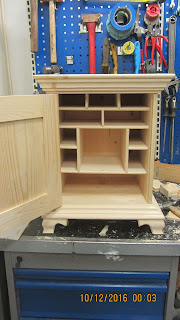
But I have completed the interior of the chest, with dividers and a couple of secret compartments.

I can't claim that I have invented those hiding places myself, as they seem to be fairly typical on those spice chests.
The crown moulding hides a secret compartment that is accessible from the back of the chest. You have to remove the lower drawers completely, and inside there is a sliding key that will let the back panel fall down revealing the secret drawer (which I haven't made yet).

The second divider, is loose and on the back there is a small drawer made up of some egg crate joinery. To prevent the divider from breaking, only the front has got the grain running vertically. The main part of the divider has horizontal grain.

My plane is to make a false bottom for the major center drawer too, but I'll have to see about that.

I guess all there is left to do out here is to wrap the piece in some bubble wrap and cardboard and hope for the best when it has to be loaded onto an airplane on its way home.


The inside of the spice chest.

Close up.


Divider with secret drawers.

Back slid down to reveal the secret compartment hidden by the crown moulding.

Tuesday, December 6, 2016

Pennsylvania spice chest 8, outside of cabinet completed.

Out here blogging takes longer time than building.
Not that I am such a slow writer, but just getting blogspot to open the page where I can actually write takes half an hour every once now and then.

But Brian Eve has sent me a tutorial on how to make my pictures smaller, so hopefully that should speed up the process of uploading pictures on the blog. Let's see about that. I remain skeptical until proven otherwise.

The crown moulding and the base moulding were difficult to mount. Mostly because I managed to make the box a little bit out of square, and on top of that I had to struggle with workholding for non flat pieces of moulding.
The front of the crown moulding was glued to the entire width of the case, and the two side pieces were just glued in the forward 2.5" more or less, and then got a few brads to secure them near the backside. Hopefully that will allow for a bit of wood movement.

The base moulding all attaches to a frame that was joined with mortise and tenons. So all the mouldings are simply glued to that frame. The frame is also where the legs are attached.

For the feet of the spice chest, I considered either turning some or making shaped feet. Spruce is not a super good wood for turning, plus I wanted to prove to myself that I could make shaped feet without a bandsaw or a jigsaw, so shaped feet it was.
The front legs were joined by gluing the miter. I didn't ad any reinforcements, cause they would also be glued to the sub frame anyway, besides there was no idea in pushing the difficulty of this to an extreme level.

The rear feet were left as a long block of wood (7.5"), so I could plane the shape for both feet at the same time.
I sketched the desired shape on the end of the feet, and used my moving fillister plane without the depth stop and the fence. The outside curve was a walk in the part to make, the inside curve took a bit longer and was cleaned up using a half round file with some coarse sandpaper wrapped around it.
When the shapes were planed on all the parts, I drilled a couple of holes to remove some of the clumsiness. For some strange reason, we have some incredible fine wood drills on board, approximately 1" and 1.25" in diameter. I used the 1"drill and the result was perfect.

After the drilling, I marked some angled lines that I sawed next to, and finally I eased the outside edges with a round file and a bit of sandpaper.

The feet were glued and screwed in place after I eyeballed their position.

Thanks to Brian Eve's trick, it only took 8 minutes to upload a picture :-)
Please note the very neutral and non disturbing background for my picture. I take a lot of pride in presenting my work so it looks the part. A key ingredient to this is to make sure that there is no clutter in the picture..


Outside completed.


Tuesday, November 29, 2016

Pennsylvania spice chest 7, making a door.

Yesterday I planed a base moulding, and the result was even better than the first one I made. The design was a bit different, with two coves, so a bit more sanding.
I also sanded the first moulding, because I figured that if I had to make a scratch stock, I woudl get all caught up in that and spend a lot of time on it. So instead I wrapped some sandpaper around a piece of an old bolt and sanded the internal rounding. It didn't take that long, so I am convinced that I have saved time.

Today I deemed the material for the door to be dry enough to work on. It wasn't soaking wet when I took it inside, just some water on the outside of the boards.

One of the boards from the pallet side was very clean and had only two very small knots that were placed in each end of the board, so that piece would make a perfect raised panel. 
Another board could give a couple of stiles, and finally there were two smaller boards that could each give a rail. 

I started by cutting the rails and styles a bit over length, and then rived them to 2"3/8 width. I then proceeded to plane them to the same thickness, and finally clamped them together and made them the exact same width by planing the edges all at once. 
After deciding the orientation of the individual pieces, I planed a groove for the panel in each of the pieces. Since my grooving plane only has a narrow cutter, I planed two grooves next to each other to end up with a groove close to 1/4".

I laid out the pieces on the carcase and took the measurements directly from there. there is less chance of messing up the size that way.
My idea was to use haunched tenons and stopped mortises.
So after marking out the inside length of the rails, I added roughly 3/4" to each end and sawed them to that length.
I used the groove for determining the thickness of the tenon, and made the haunched part a bit too long, so I could trim it once I had made the mortise.
A bit of sawing and paring, and the tenons were complete.

I marked out the location of the mortises by inserting the rails in the stiles. Once I had the mortises chiseled out to the correct depth, I tested the fit and trimmed the haunched part of the tenon to its final length.

When the frame was complete I dry assembled it and marked out the stock for the panel directly from it. I added a bit less than the depth of the groove to the marked area, and sawed the panel from the board.

The next task will be to make a raised panel.


Parts of the door.


Sunday, November 27, 2016

Pennsylvania spice chest 6, crown moulding.

Today I completed the dividers and glued them in. My plan was to tackle the door next, but I had forgot to take in the pallet side that I wanted to use for the raised panel, so it was a bit on the wet side to start working on.
I moved it to the engine room and I guess it will have dried out in a couple of days.

For the design to work properly, I need a piece of crown moulding and also a piece of base moulding.
If I had known that I was going to make a project that needed a moulding, I would perhaps have brought a moulding plane with me on board. But I didn't.

The perfect piece of wood for a moulding is clear and straight grained, so I looked through what wood we have on board and found a reasonable piece. 
I am going to need a total length of 40" of each type of moulding. That length is far more than what I can accommodate on the workbench. So I had to make up a new type of workholding that would enable me to plane the entire length in one operation.

I started by crosscutting the piece to length, and then I sketched the moulding profile on one end. I tried to make a moulding that didn't have a lot of internal curves. The outside curves I will be able to make with the smoothing plane.
Most of the moulding are rectangular sections that I made with the moving fillister plane. I have incorporated a single curved section where I'll probably have to make some sort of scratch stock or a scraper to make it look good.

The exercise went rather well, and the next step will be to make a rip cut to separate the moulding from the board, and then complete the rounded parts.

I had a couple of more pictures, but just uploading this single one took 2.5 hours spread over a couple of attempts.


Rough moulding made with moving fillister.
Notice the glued up carcase in the background.

Friday, November 25, 2016

Pennsylvania spice chest 5, triangular trenches

The other day after making all the grooves and dados etc. I actually also glued up the carcase.
Ever since I have begun making a dry assembly before actually applying any glue, my glue ups have been rather uneventful, actually the have gone reasonably smooth and according to plan with a minimum of fuzz.
I'll be the first to admit that I earlier on viewed this dry assembly idea as an unnecessary modern invention made to slow down any process. But it seems as there is some sort of merit to it.

The dividers will all be rounded on the front edge, and in order to easily make a nice smooth transition from the horizontal to the vertical dividers I decided to use a system of a triangular trench.

I saw a spice chest on the Internet, where the builder had employed this method, and it looked pretty easy. The idea is that instead of a regular flat bottomed dado you make a V shaped trench. Then on the corresponding divider you make a triangular edge. This edge will fit in the trench and cause a smooth transition of the rounded front. Technically it could be used in any type of front, but I figured that there was no need to get fancy and push my luck.

The method suggested in the Internet build was straight forward, but it requires a single jig. This jig is nothing more than a straight batten planed at a 45 degree angle. You then place this batten right next to the line where you would like your trench to start.
After a little bit of experimentation I found out that the best method was to start by chiseling vertically down the middle of the trench. Since I had laid out all my trench lines as center lines It was just a matter of following those.
I gave the chisel a good whack and buried about 1/8" or a little more in the wood.
When the center line had been chiseled, I supported the back of the chisel on the 45 degree batten. A tiny touch of the mallet ensured that the tip of the chisel was biting the wood followed by another whack game me close to desired depth.
When I was satisfied that I had more or less reached the required depth, I moved the batten to the other side of the trench and repeated the angled chiseling.

Making a triangular trench.

Thursday, November 24, 2016

Pennsylvania spice chest 4, grooves, dados and rabbets.

Before making the dados I decided to plow a groove for the back of the spice chest. I have placed the groove so it won't be visible from the outside of the chest.
Since my blade is kind of narrow, I plowed two grooves next to each other to get a width around 3/16".
With the grooves out of the way I turned my attention to the dados.

Having already marked up where the dividers should go, it was a matter of pulling myself together and start making them.

The best way I know of using only hand tools provided you haven't got a real dado plane is to place a straight batten next to your line and let that guide your saw to make a straight cut.

Once the saw cut is at the desired depth, you can remove the bulk of the waste with a chisel. Finally you can clean up the bottom of the dado with a router plane.

There isn't a whole lot more to say about making the dados, except that it all went pretty much like planned.

Back when I made the "cabinet with many drawers" I didn't know that it was a good idea to set the door in a rabbet to make a bit of a clearance to help sliding the drawers out.
But being almost two years wiser, I figured that this would be a fine project to test out that theory.  So I found my moving filister and set to work.
I had to stop the rabbet at the top of the panels, so I even had a chance to try it out with the blade mounted in the forward position. It worked pretty well on one of the sides, and not quite so well on the other , But that was due to the grain orientation. A bit of sanding helped on the surface, so I consider it a success.

Set up for handmade dados.

Tuesday, November 22, 2016

A new hope

In a galaxy far far away...

Well, not quite, but it is a cool intro.

When our dog died, at first I was a bit reluctant to getting a new dog. Ron Howes left a comment on my post where I mourned that passing of Fnug.
This comment suggested that I read "The last will and testament of Silverdene Emblem O'Neill"
A passage in this excellent text says that the dog has heard his mistress say that when he dies she will never have another dog because she loved this one so much. The dog goes on to say that just that would make him incredibly sad, because it would mean that he had been a poor example of a dog.

Initially I had the same feelings, I couldn't get another dog etc.
But the more I thought about this text, the more I reasoned that our dog would probably feel the same way. So I started searching for Newfoundland puppies for sale.
For some reason, there aren't many litters of Newfoundlands bred in Denmark anymore., I guess it is most likely due to the economic recession that is still not quite over.

A good thing about the Internet besides woodworking blogs is the possibility of searching for things in other countries. So I took advantage of this possibility and searched for puppies in Germany.

I found a perfect puppy  that was bred by a kennel called Canis Minor near Hannover, and I have arranged that I can come and pick her up when I return home from the ship.
We are all thrilled about it, and Asger our youngest, said the other day, that he was so happy, because he couldn't imagine celebrating Christmas without a dog.

I asked the breeder Werner, if I could use a picture from his homepage, and he immediately sent me two new ones of our puppy and replied that I was more than welcome to post them, so all that combined has led me to the title of this blog post.

Bena-Benita, 6 weeks old.


Standing.

Yawning.


Sunday, November 20, 2016

Pennsylvania spice chest 3, dovetailing

In order for me to establish exactly where my dividers will go, I needed to get the carcase put together.
If I knew that all my boards were flat and consistent in thickness I could have done it without assembling the case first. But since I had planed them all myself there was no point in denying it.

The idea was to use through dovetails for the bottom and half lap dovetails for the top. That way the top would look nice after attaching some crown moulding.

My preferred method is tails first, but out here I usually go pins first. However, due to the cupping of the panels, pins first would require a lot of shifting around and that would surely lead to crappy results.

So I did the tails first and made a set up that allowed me to transfer the cuts to the pin board.

In order to make it a bit easier on myself, I used the method of crossing the baseline for the half lap dovetails. And that really speeds up the process.

The dovetails went together on the first try, and they are nice and tight.

What is not so nice is the outside of the carcase.
I had made my baselines based on the thinnest part of the board, so I would have a box that was as square on the inside as I could get it, and then I would have the boards themselves to be a bit proud. At least that was the idea.
The boards weren't a little proud. They were peacock proud! approximately 1/8" in the worst spots.

I guess it is fair to say that I should have done a better job in the stock preparation.


Very proud panels (shitty stock preparation).

Proud a the half lap end too.

Dovetail chopping setup.

Tuesday, November 15, 2016

Pennsylvania spice chest 2, planing.

After all my re-sawing, I jointed the edges of the individual pieces and glues up some panels. When they were dry I discovered that all of the thick panels for the sides and the top  plus bottom had started to cup.
I guess I had kept the panels a bit too ling on top of the warm transformer. In an attempt to rectify it, I smeared some water over the cupping side and placed all the panels under a large battery (100 Lbs) to flatten them.
So far it looks like it is a bit of a success.

I planed the six thin panels that I have glued up, and they ended up reasonably flat and consistent.

Planing is one of the most difficult things to do in this small shop. The workbench is technically too high and it is also a bit short, but as long as take a small break once in a while I get by. It is hard to get my body weight over the plane, so it is not a textbook example on how to plane.

The good thing about it is that spruce smells nice when planed, and I learn to accept a surface that isn't 100 % perfect. And I also appreciate the fact that I have a joiner/planer at home that makes jobs like this easy and fast.

Even when all the boards aren't exactly the same, it is possible to accommodate it in a build. And especially if you use hand tools. E.g. if you need to make a bunch of dadoes for the dividers.
If you use a router with a bit, all your dividers need to be the exact same thickness or there will be problems with the dividers not fitting in, or fitting sloppy.
If on the other hand you are using hand tools, each dado can be custom made to the exact thickness of the divider, Even if the divider is thick in the front and thin in the back, you can just make a tapering dado. You just need to remember to mark out which piece will go where.

Today I planed the thicker panels that are going to be the top, bottom and sides for the carcase itself.
When I glued those up I wanted to make each side a bookmatched pair. So I just flipped them over and forgot that by doing so I would alternate the growth rings.
So where the thin dividers planed effortlessly, the thick panels didn't..
I had to go as close to the middle ofthe panel as I could - and then turn it around and plane from the other side to avoid tear out. The surfaces are less than perfect, but they are reasonably flat. I guess I'll have to try to sand my way out of this once I am done.

New low-point in picture uploading, 35 minutes for one lousy picture.

Planing set up, notice the limited space to start the plane.


Saturday, November 12, 2016

Pennsylvania spice chest 1, resawing.

Our ship has been temporarily laid up till the market situation improves. I have been tasked to stay on board together with one regular seaman and the engineer cadet.
We are placed in the outer part of the Trondheim Fjord in a tiny village, so it is very quiet here. We do our own cooking and make sure the maintenance is up to date, so all in all it is not far from normal except that the ship is steady.

This also means that I am able to do some woodworking in the evening once the chores of the day are done. So I should be able to make a decent project this time, and I have long had the idea of trying to make a Pennsylvania spice chest.
They don't require a lot of hardware and the size is appropriate for something that needs to be taken on an air plane as luggage. Furthermore it is basically just a fancy box with a hinged door and a couple of extras.

The least appealing part of this project is that I am going to be needing a lot of thin stock, so that sort of rules out the usual pallet sides. We do have some heavier stock out here that is originally intended to serve as sides for shelves to keep stuff from flying around when the ship is in heavy seas. For some reason we have a lot more of these pieces than we have shelves. So I decided to use some of that extra wood for this project. It is S4S 6 x 1.5" spruce of a fair quality, but the size means that I have to do a lot of resawing.

I plan to make the overall size of the chest itself something like 16" high by 12" wide and 11" deep plus some legs of a kind.
The designs I have looked at range from 1/2" to 3/4" stock for the sides and 1/4" for the dividers between the drawers.
My sides will probably end up 9/16"'ish, and I hope the dividers will end up something like 3/8". But I will just do as usual, and try to get the stock flat and reasonably uniform.
For the sides it will be enough to split the board in two, but for the dividers I will split each board in three.

By the way, the Internet connection made sure it took 1 hour to upload those three pictures!


Stock before resawing.

Resawing setup.

First piece split in two.

Tuesday, November 8, 2016

Traveling bookcases in elm 2, one bookcase completed.

This is not an example of me turning out a complete traveling bookcase in a matter of days.
I just never blogged much about the build because it was going to be a gift for Laura's birthday. I have shown the bookcases to her already, so it is safe to blog about them.

The shells for both sets were completed a couple of weeks ago, just prior to the DCBE.
I had prepared stock for the drawers and the shelves for one of the units, and with the new beautiful dovetail saw that Pedder gave me, my fingers practically itched to start dovetailing.
My plan was to line the drawers with green felt, this meant that I could safely cross the baseline on the half blind dovetails. Something that I normally never do. I didn't even do it for those on the carcase itself.
The dovetailing went easy, and I had made a template for marking out the place to make a recession for the flush mounted handles. This recession was made using a Forstner drill.
Basically I just followed the excellent instructions for mounting hardware that can be found in the book Campaign Furniture by Christopher Schwarz.

Before finishing I also made ready for installing the brass corners. I did all of the chiseling and routing, so it would just be a matter of putting the corner guards in place and then drill a couple of pilot holes before mounting the screws.

I applied two coats of "Superior" shellac, using an old piece of a T-shirt instead of a brush. I find that I can get a more even coat that way. After each coat I very lightly sanded the surface using some grit 320 sandpaper, just to remove any nibs from the surface.
After the shellac, I applied a coat of my home made paste wax from beeswax, orange oil and a bit of turpentine.

After the wax, I installed the flush drawer pulls and corner guards.

The two shells were brought inside, and I used some thinned hot hide glue to attach the felt.
Attaching the felt took a bit longer than I expected, but I wanted it to look good, so I took my time. I first glued on the piece covering the back and the top, then each side got their piece attached.
When the glue had dried, I trimmed the excess using a blade from a hobby knife which I had honed a bit extra. Felt is hard to cut if the blade isn't really sharp. The dados for the shelves were the last thing that I trimmed.

The final thing was to install the hinges and admire the first completed bookcase.
I have timed the build, but since the timing is for two bookcases, I haven't added it all up yet. So I'll wait with that till I complete the second unit. Hopefully that will be done before Christmas.

Traveling bookcase in elm, green felt lining.


Closed traveling bookcase next to Roorkee chair.


Opened traveling bookcase.

Using flash to show the green felt.

Felt lined drawers.

Half blind dovetails.

Brass corner guard.

Brass corner guard and half blind dovetails.


Sunday, November 6, 2016

DCBE 2016, Conclusion

After one week of a shop that feels a lot emptier and quieter, I have gathered some thoughts about the DCBE this year.

I am able to fit 5 people in my workshop, but in order to do so, I need to borrow yet another workbench from Olav, or I could make an extra one myself.
This time we had three workbenches for four people, but since there was always someone busy at the lathe it was fine that way.

We spent a lot more time than anticipated doing noisy stock preparation, but that was mostly due to our very ambitious goals of making a lot of chairs.
Once the turning had also stopped, the workshop was fairly quiet save for the pounding on the copper rivets.
Compared to the last DCBE, where we made Welsh stick chairs, there was a lot more machine work involved this time. But I think the results are well worth it.
We skipped lunch some days, but the daily intake of cake and tea or coffee plus beer made up for that. Having the supper supplied by a catering company was a great success. It meant that there was one thing less to concentrate on, and instead of making supper, Mette baked rolls for breakfast every day, and kept a steady supply of cakes coming our way.

Hosting an event like this is no trouble at all with such nice attendees. Pedder and Brian brought beer and Alex brought some softdrinks called Almdudler that our kids really liked,
Asger proclaimed at the end of the DCBE, that he had not been sick since he started drinking Almdudler. When we said that he had just had them for 6 days, he quickly responded that he knew that, and he had felt great all those days, so he suggested that we should continue like that. But we are back to drinking milk again for the everyday meals, and the soft drinks are reserved for Friday evening.

Everyone also had some gifts for me, and something for Mette as well, so I feel almost ashamed that I could only supply a meagre selection of wood and some beds to sleep in.
Alex and Pedder brought some nice homemade marmalade and a type of pickles, wine and some syrup.

For me, Alex brought the most beautiful set of dowel plates that I have ever seen. They are made especially for him by the company BLUM in his hometown that produces hinges and other sort of brackets.
The company has their own training department for machinists, and they made a small production run of those dowel plates. Each plate is precision milled with a sharp entry side and tapering exit side of the holes for the dowels. The plates are 2.25" x 10" and a bit over ½" thick. I guess they are made out of tool steel.
These two plates cover the hole sizes from 11 mm to 20 mm in diameter (7/16" - 13/16")
Alex told me that the company will also make a plate with holes ranging from 6 to 10 mm, but they hadn't made it yet.
Given that I really like timberframing, a dowel plate with such large holes is really useful for me.
I think that I might make a recess in my workbench for them, and then I just need to make a bunch of dowels.

Pedder  gave me an absolutely magnificent dovetail saw.
The saws from Two Lawyers Tools don't just look good. They are incredible to use as well.
Mine has a rosewood handle and a heavy brass back. There is a very slight hang of the saw, and the saw feels just like an extension of my arm. I have used it for cutting some small dovetails in the drawers for the travelling bookcases, and it is just perfect. I can highly recommend their saws if you find yourself in the market for a custom made backsaw.

Brian had brought some old turning gouges and a new blade for my Ryoba saw.
So all in all it felt a lot like Christmas eve to me.

If you are considering organising an event like this, I suggest that you do it. It is a special experience to work together in a smallish shop, and learn from each other as you go along. This time we had the benefit of Brian actually being an expert in Roorkees, having made quite a few of them, but when we made the Welsh stick chairs, none of us had tried it before, That too was a fun experience.
My best advice is to have some of the food organised, and it is better to start with a small group of people, and then perhaps invite more if you find there is room for it.

Thanks to everyone reading and commenting on the posts from Danish Chairbuilding Extracaganza 2016 on this blog and on Toolerable and on Old Ladies.
I better start thinking about what to build for DCBE 2018.
The best looking dowel plates I have ever seen!

These plates from BLUM are amazing.


My new Sunday saw from Two Lawyers Tools.

A bit of progress on the travelling bookcases. Lining the drawers with felt.


Saturday, October 29, 2016

DCBE 2016, Roubo campaign stool.

The day before yesterday, I started a Roubo style campaign folding stool in elm and canvas, and that is one of the quickest projects that I have ever done.
Technically it doesn't count as a chair, but we agreed that it was OK to make it during the event despite that.

I silver soldered a tri-arm bolt from some of the 8 mm lag bolts that we used for the arm rests on the Roorkees. I think that it took me around 5 minutes in total to make such a bolt.
First I cut some lag bolts to a correct length so the legs would rotate on the part without a thread.
Next the ends were filed so they had a 120 degree angle on the end, and I placed them on a piece of heat resistant brick. The brick I used is actually a spare vermiculite stone for our wood burning stove, but it won't damage the stone to do a bit of use before one day replacing one of the stones inside the stove.

The legs for the Roubo campaign stool are pie shaped. It is relatively easy to make those on a table saw. Just remember that they shouldn't be 120 degrees, but more something like 115 degrees. Otherwise the chair won't be able to open up the way it should. After sawing them out to something like a diamond shape, I drew a circle with a compass, and worked to this line with a scrub plane and a smoother. Finally I sanded it to a very round shape.
The holes were drilled with the help of a piece of wood with a V shaped notch in it to hold the leg in position.
I applied two coats of shellac and followed by some homemade paste wax made out of beeswax, orange oil and a bit of turpentine.

I didn't have anymore leather of the same colour as that on my Roorkee, so I tried to use some canvas instead. I am not quite decided if I like it or not.
The good thing about it is that it is lightweight, and it doesn't look too heavy like some of the leather versions I have seen. It also folds really easy, which I doubt that a leather version would do. But the colour would look better with leather.


Roubo folding campaign stool.

Diamon shaped legs.

Don't aim for 120 degrees like this!

This is how they should look.

Opened legs with a 115'ish degree angle.

Lag bolts cut to length.


The completed bolt before trimming the excess thread off.
Placed on top of the legs (still at 120 degrees).


Wednesday, October 26, 2016

DCBE 2016, Leather work

Doing leather work is fun, it is fairly easy if you have sharp tools and do it the correct way. I guess it is kind of like woodworking in that respect. Like woodwork it can be done quickly, but if you want it to look perfect it will also take time. Brian has bought all those small special tools for working leather such as an "edge nicer", a belt cutter, an edge polisher and lots more.

We made a set of templates for the various parts and I got started on my leather work for my chair.

Alex and Brian are making more chair parts, because they also want to make a chair in elm that has octagonal stretchers.

Olav arrived in the afternoon, and since he didn't have a project started yet, he just helped out everywhere a helping hand was needed. His dog Merlin helped by barking if he felt that no work was being done. Just a single WOOOF and he would look at you and you knew that it was you he meant. I guess he was trained to deal with chairbuilders or apprentices :-)

Besides the working and nerding (tool nerding) we are eating evenly distributed meals throughout the day and once in a while we take a beer. So in short we are having a great time.

Leatherwork.

Brian taking pictures of Gustav and vice versa.

Working on the back of the chair.

Pre-shaping the taper of and octagonal stretcher.

Alex reaming out a tapered hole using a brace.

Small scraps of leather.

Chair parts.

Selfie by the in-house photographer.

Beer and propane, two types of bottled fuel.

Olav, Alex, Jonas and Brian.
Pedder left tuesday evening, so we couldn't get him on this group picture.

Monday, October 24, 2016

DCBE 2016, stock preparation.

Yesterday was the first day of the Danish Chairbuilding Extravaganza 2016.
Pedder, Alex and Brian all got here and we set of to work.

We started seeking out the wood that we wanted to use, and we found some slabs from my parents' old sycamore tree that would make some nice material for a couple of Roorkee chairs.

Pedder is going to build a shop stool, and he chose some sycamore as well.

There isn't much to say regarding stock preparation except that machines do help a bit. Today my parents will come for a visit, and my dad will bring along some surplus tools that will hopefully be able to find a nice new home.

We decided to concentrate on building chairs this time and not fooling so much around like last time with axes and wedges etc. And we also decided that instead of making the supper ourselves, we would get it from one of the local caterers. That makes it a lot easier when having a bunch of hungry guys around.
We chose to use the company of one of my old friends. If you ever find yourself in need for some tasty quality food (and you are in this region), I highly recommend you to give Merethe a call. The food and the service is outstanding.
And by the way, she even speaks fluently Dutch! She used to work at the Danish Seaman's church in Rotterdam for 8 years as far as I remember.

Stock for legs for some Roorkees.

Stock pile up.

Brian's side chair.


Everyone in the workshop.

Pedders toolchest. Those saws are beyond beautiful!

Jointing.