Looking at my possibilities of settings etc. that BlogSpot allows me to use on the blog, one is called "Adsense". They boldly state that you can make money by writing your blog. As far as I can understand by the description, you sell space on your blog for companies to use for advertising. You can choose types of ads that you don't want, e.g. "get rich quick" and "cheap medicine".
I suppose that other blog hosts such ad Wordpress etc. have got a similar system.
But trawling through different woodworking blogs, I can't remember having seen any other blog having those ads.
If the owner of the blog sells a product, e.g. an old tool, a piece of furniture etc. there is usually a link on the side to their own product.
So it made me wonder about a common understanding, that people like to read about the topic of the blog only and having to be distracted by flashing ads for new aluminium rims or dirt cheap gardening equipment or dating offers from exotic countries.
Do you know of any woodworking blogs with those automatic ads?
Would you like to see ads on the various blogs that you read?
Personally I like pages without ads.
That was one of the reasons I really liked the old Woodworking Magazine, all black and white and no ads.
So what are your thoughts on the subject? Are ads OK, should we all put ads on our blogs and donate the money to some charity work (e.g. reforestation or a museum), or should we put ads and keep the money so we could spend it on classes, tools and wood, or should we just leave it as it is now, with practically no ads on peoples own blogs?
Tuesday, July 2, 2013
Monday, July 1, 2013
An unusual powertool for woodworking
Sccchhh.
The door of silence is finished.
Sadly the door and the frame are so heavy that I had to use a power tool to be able to get the assembly out of the barn.
Due to the roofing project of our house the carpenter has left his tractor mounted forklift for us to use, so I could move the door fairly easy.
This is actually the first woodworking project I have ever made that was so heavy and bulky and couldn't be made light enough by taking it apart that I had to use a tractor to move it.
The lower part of the frame is intended to be buried in the ground, hence the plates to protect it from tipping over.
Anja the artist called me the other day and said that another door had been vandalised, so she had found a new place for this door at an exhibition if it was OK with me.
So I have to make some sort of stand for the door so it does not need to be buried in the ground.
Anyway it has been a fun project.

An unusual power tool for woodworking.
The door is being placed up against the wall of the barn for the final finishing touches.

The finished door of silence.
Thursday, June 27, 2013
The door of Silence
As I have described in my previous post, I have started making a new door of Silence.
Yesterday I made the stiffener for the door. It is made out of 2x5" larch, and the ends are mortised and drawbored into the diagonal part as can be seen in the picture below.
The door itself is made out of 1½x6" larch and the individual boards have received a rabbet on two corners so the door will be shiplapped.
A lock from an old door was mortised into the edge board so the door can be opened and closed as it should.
The shiplapped boards are nailed into place, and the nails are clenched.
I have made a tutorial regarding clenching, so people who would like to try it can have an idea of how it is done. Please bear in mind that these nails are rather big (3/16 x 5.25" or 4.6 x 130mm).
The adjustable wrench used in the process is an 18" just to give you an idea of the size.
I have not placed the head of the nails on a metal surface since I don't have one large enough for the door. But using the adjustable wrench allows the clenching to be made without problems. I first tried to bend the tip of a nail using a pipe wrench, but it was not a success.
Finally the door was cut to size and the fit in the frame was tested. Hopefully I can install the hinges tomorrow.

The mortise and tenon of the stiffener for the door.

A heavy piece of metal is placed next to the nail.

The nail is bent 90 degrees using a hammer.

The nail is bent even further to approximately 80 degrees.
The nail is driven into the wood by hitting the bend.

The finished clenched nail.

The door test fitted in the frame.
Sunday, June 23, 2013
Vandalism
A local artist was asked to decorate 7 doors for a project called "Pilgrim Mors".
The idea is that each door symbolises one of the 7 pilgrim words:
Slowliness
Freedom
Simplicity
No worries (= bekymringsløshed in Danish)
Silence
Unity
Spirituality
The door representing "Silence" was placed in a park in the main city of our island (population approximately 10.000).
Apparently it was a bit too provocative to someone that a door representing such a dangerous thing as silence was placed in the public space - so somebody vandalised it completely. You can see the result of it here: Broken silence (the site is in Danish)
I happen to know the artist, and I felt bad that her work of art was destroyed after being on display for about a month or so. The doors were all old doors that had been salvaged and given to her. SO they were mostly made for interior use and they were never meant to be vandalism proof.
As you can see, whoever did the job made sure it was done thoroughly.
I talked to Anja (the artist) and explained that I would like to build her a new door that would be a little more sturdy than the old one, so it would require an even bigger effort to destroy it if the vandals should want to try it again. She liked the suggestion, so I have started making a door as an ad hoc project.
The frame is being made by 6x6" larch that is assembled with drawbored tenons. The door itself is going to be made out of 1½" massive larch mounted upon 2x5" stiffeners. The hinges are some old hinges from an interior door in my barn.
I like the idea to be able to contribute to that art and the freedom of expressing oneself is not intimidated to silence by means of simple acts of vandalism.

The upper part of the frame ready for assembly.

The assembled frame. (It needed to be pulled ½"into square).
Friday, June 21, 2013
Shaker bench, the roof and an aircraft fighter
As described in a previous post, I have been trying to make a Shaker inspired bench for a friend of the family who helped train our pony to enter a trailer.
Since the roofing project has moved into the tiling phase, it has left me with a little spare time e.g. for projects like this.
The bench is inspired from a book by John G Shea describing a meeting house bench which as far as I remember is from the Hancock Shakers.
It will be used outside on a riding court, so I decided that I would try to avoid metal in the building.
The lower parts of the legs have been added to give stability on a soft ground to avoid it tipping over. In addition to this, it can serve as a help for smaller children to mount their horses. So it is important that it is a stable bench.
The lower legs are mortised and drawbored. The top of the legs are also mortised into the top. These have received some wedges to secure them.
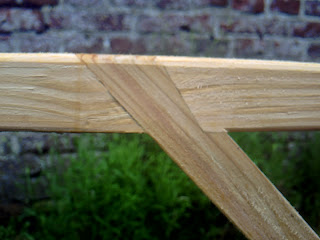
The braces are what first caught my eye on the bench. They add greatly to the stability. I can't remember the correct English term for how they are mounted. So I hope the pictures will give an idea if anyone would want to build something similar.
I even added the Roman numerals below the seat as my sign of a well finished project.
The bricklayers have started to lay the tiles on the roof, and the progress is steady. This means that my role has been greatly reduced compared to when the carpenters were active with the sub roof. I have stacked the tiles on the roof so they could lay them, and generally tried to help wherever I could.
Today they had to tile around a Velux window, so they didn't need very many tiles. Therefore I was able to finish the bench instead. Actually it was a lot more pleasant compared to carrying tiles.
Tonight Asger (7) asked if we could make some more soldering.
He felt he was ready for the next logical step after a ship.. An aircraft fighter!
So in honour of Snakey and other people related to fighter aircrafts I have added the pictures of the finished plane.
Luckily for me, Asger didn't have any specific model in mind, so I cut out some wings, a tail and a cockpit and found a nose cone. I believe I have seen a plane once with a tail like this, but I don't know the make or model of it?


Since the roofing project has moved into the tiling phase, it has left me with a little spare time e.g. for projects like this.
The bench is inspired from a book by John G Shea describing a meeting house bench which as far as I remember is from the Hancock Shakers.
It will be used outside on a riding court, so I decided that I would try to avoid metal in the building.
The lower parts of the legs have been added to give stability on a soft ground to avoid it tipping over. In addition to this, it can serve as a help for smaller children to mount their horses. So it is important that it is a stable bench.
The lower legs are mortised and drawbored. The top of the legs are also mortised into the top. These have received some wedges to secure them.
The braces are what first caught my eye on the bench. They add greatly to the stability. I can't remember the correct English term for how they are mounted. So I hope the pictures will give an idea if anyone would want to build something similar.
I even added the Roman numerals below the seat as my sign of a well finished project.
The bricklayers have started to lay the tiles on the roof, and the progress is steady. This means that my role has been greatly reduced compared to when the carpenters were active with the sub roof. I have stacked the tiles on the roof so they could lay them, and generally tried to help wherever I could.
Today they had to tile around a Velux window, so they didn't need very many tiles. Therefore I was able to finish the bench instead. Actually it was a lot more pleasant compared to carrying tiles.
Tonight Asger (7) asked if we could make some more soldering.
He felt he was ready for the next logical step after a ship.. An aircraft fighter!
So in honour of Snakey and other people related to fighter aircrafts I have added the pictures of the finished plane.
Luckily for me, Asger didn't have any specific model in mind, so I cut out some wings, a tail and a cockpit and found a nose cone. I believe I have seen a plane once with a tail like this, but I don't know the make or model of it?

The finished bench.

The legs mortised into the seat showing the wedges.

The leg braces "dovetailed" into the seat.
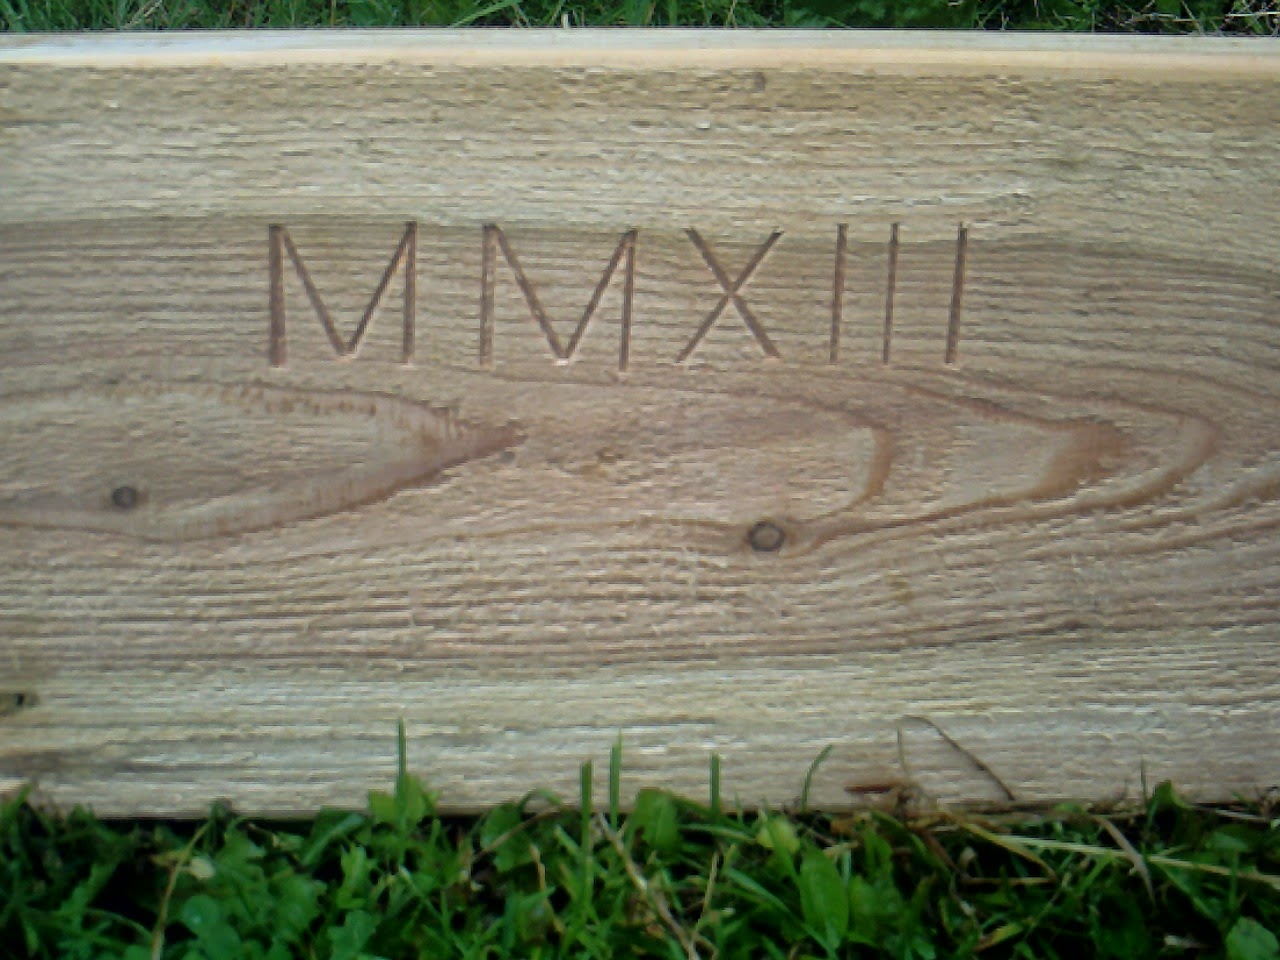
2013 (a productive year so far)

The mortises of the lower part of a leg.

The easy side of the house is halfway now.

Asgers aircraft fighter flying East.

An flying back West.
Tuesday, June 18, 2013
Messing up the bed room and working with sheet metal
Due to the installation of new Velux windows in the roof, the interior walls of the various rooms also needs to be remodelled.
We have added 10cm of insulation by raising the roof (up to 30 cm), and it is not possible to reuse the old trimming because of the increased thickness of the wall.
This has resulted in that all the rooms upstairs look really bad. I guess that this is one of the projects that moves ahead in the cue to keep SWMBO happy. But until the real roof is finished there isn't much point in starting on them.
I have been so busy with the roof that I feel I have neglected the children a little when it comes to taking them to the workshop.
We have had some new gutters installed and a new "skotrende" (the piece of Zink between two intersecting roofs). There are some small scraps of the Zink left over, and I believe it was time for the boys to learn how to solder sheet metal.
The good thing about Zink is that it is very easy to solder, and they think it is cool to make something out of metal.
I offered that Asger could make a small ship which he did. It is watertight and has proven its seaworthiness in the bath tub.
Gustav wasn't satisfied with being offered to make a ship - he wanted something a bit more spectacular i.e. a tank. That required a bit more soldering, but the end result is quite O


 K.
K.
We have added 10cm of insulation by raising the roof (up to 30 cm), and it is not possible to reuse the old trimming because of the increased thickness of the wall.
This has resulted in that all the rooms upstairs look really bad. I guess that this is one of the projects that moves ahead in the cue to keep SWMBO happy. But until the real roof is finished there isn't much point in starting on them.
I have been so busy with the roof that I feel I have neglected the children a little when it comes to taking them to the workshop.
We have had some new gutters installed and a new "skotrende" (the piece of Zink between two intersecting roofs). There are some small scraps of the Zink left over, and I believe it was time for the boys to learn how to solder sheet metal.
The good thing about Zink is that it is very easy to solder, and they think it is cool to make something out of metal.
I offered that Asger could make a small ship which he did. It is watertight and has proven its seaworthiness in the bath tub.
Gustav wasn't satisfied with being offered to make a ship - he wanted something a bit more spectacular i.e. a tank. That required a bit more soldering, but the end result is quite O
Lack of trim around the window.
1window is still covered with the sub roof and awaiting installation.
Making the turret.
The finished turret.
The finished tank.
The finished ship with some nice looking soldering.
Tuesday, June 11, 2013
Progress on the roof and a new lathe
I have been really occupied during the last couple of weeks due to the project about getting a new roof on our house. This has left me with no time to do hobby woodworking, and very little time for the blog. Some days I have been working until 10:30 PM so I could be a little ahead of the carpenters when they arrived the next morning. Luckily the weather has been good all along. We had one day with a shower two weeks ago, but apart from that it has been dry. This is a huge advantage in such a project.
We have finished adding the sub roof (not sure if it is the correct term) and have added the laths on the front side roof of the house.
During the construction of the sub room, I even had use of the old circular sawmill to make some timber for repair purposes.
I have tried to salvage as many of the original tiles as possible. I believe they date from when the house was built in 1924, and they are too good to be thrown away. Off course some of them broke and some were already cut to fit the chamfered part of the gable (valm in Danish).
Nevertheless, I think there is around 3000 pieces left, so I should be able to make a nice little shed at the summer house once I get to that project.
This constant working on the house has sadly left my workshop in a very messy condition. gave Last evening I tried to do a little tidying up and just removing the chips from the planer and the various small pieces of wood helped a lot. I plan to continue tonight as well.
My neighbour whom I gave my old workbench once told me that he had always dreamt of trying to do some wood turning. I gave him a set of turning gouges and skews etc. that I had once picked up for a song. It is some no-name Chinese tools, but OK to find out if he liked it.
The problem was that he needed a lathe. I knew that my father had once purchased a fine lathe at an auction, and I don't think that he has ever used it. So I called him and explained the case and asked if he wanted to sell it. He agreed, and I bought his lathe and sold my lathe to my neighbour for the same amount of money (very cheap).
So now I have a new lathe. The advantage to this lathe compared to my old on is that there are some more accessories to this one. E.g. a four jaw chuck and a copy attachment. Apart form that the two are almost identical.
The new lathe is a bit lower that my old lathe. So I guess that it was designed for school use. I will have to teach my children how to use it once the rood is finished.

The roof with new laths on the front side

The messy workshop

The new lathe before attaching the stand
Subscribe to:
Comments (Atom)