While I was at home last period, I took my drawings down to the planning department at the town hall.
I had scrutinized the requirements laid out in the plan for that specific area, but I was still a bit uncertain about the outcome.
I talked to the same person that I had previously discussed the case with, and I showed her my drawings.
After looking at the drawings a bit she said that it was fine, but she still needed one drawing, that would show where the shed was going to be placed on the lot. If I made a drawing that would do that, I could just submit the application online and start building.
She even commented that my drawings were of a higher quality than they usually saw. That made me glad, because I had honestly considered if it was of little use to make such elaborate drawings, if a simpler sketch would do. But maybe that helped showing that I was serious about the build. Anyway, I just have to decide where to build the shed, and then make a drawing that will show it.
With this major "obstacle" seeming ly out of the way, I have given quite a lot of thought to the raising process.
The overall plan is to build in some steps.
As a start I am going to make the lower frame complete with all the required joints, including the joists.
Once those parts are ready, they will be taken to the summer house.
Next I am going to dig some holes for all the concrete posts that will be cast.
The lower frame will then be assembled in position over the holes and leveled out at the intended height.
Then I am going to mount the casting brackets on the frame and pour the concrete. That should ensure a level topside of the lower frame.
Once that part of the project is out of the way, I can proceed with making the rest of the joints while the concrete will have ample time to set,
The next major step will be to assemble the bents and try to raise them. I am going to use chain blocks and poles etc.
Once the first bent is raised, it can be used for raising the following bents.
In my imagination the upper plates and the rafters will merely be a walk in the part. I am afraid that reality might look a bit different once I get to that actual part of the build.
But sitting out here and doing the raising by doing sketches of the individual steps using pen and paper makes it look easy, and that is a lot more comfortable than imagining all the steps that could go wrong. I'll probably discover those when I get to them.
Wednesday, March 9, 2016

Sunday, March 6, 2016
J. Siegley smoothing plane No 3
Even though my birthday is some time in the future, my older brother has already purchased a gift for me.
I have to admit that I helped him in the direction of the present, but that doesn't detract a bit.
I had spotted an old plane on a classified page in Denmark. It just said: Plane, J. Siegley and there was a picture of the plane and the accompanying box.
The vendor lives in the same neighborhood as my older brother, so I asked if he could pick it up for me. He readily agreed and offered that I could get for my birthday, which was fine with me.
Today my brother got hold of the plane, and sent me some pictures of it. Based on the Stanley size system, it is a No 3.
I have tried to search the Internet for information on the Siegley planes, but there is not quite as much information as I had hoped for, so if anyone reading this could provide any information, it will be greatly appreciated.
As far as I read, the Siegley company was purchased by Stanley in 1905. From 1905 to 1920 Stanley manufactured the Siegley planes alongside their own.
But I think this plane is older than the Stanley era due to the fact that it only says J.Siegley on the blade. There is no mention of Stanley anywhere on the plane.
There is no lateral adjustment feature on the plane.
On Stanley planes they were introduced in 1885 (according to the unsurpassed wisdom found at Patrick Leach's blood and gore page) but I don't know if Siegley never had a lateral adjustment until they were purchased by Stanley?
My older brother took that plane apart and took some pictures of it. It was well oiled and doesn't seem to be rusty. the fact that someone made a designated box for it makes me believe that whomever the owner was, he took care of this plane.
The rear tote is a bit loose, but I guess it can be tightened up.
My guess is that it would make a fine restoration project to carry out on board..


I have to admit that I helped him in the direction of the present, but that doesn't detract a bit.
I had spotted an old plane on a classified page in Denmark. It just said: Plane, J. Siegley and there was a picture of the plane and the accompanying box.
The vendor lives in the same neighborhood as my older brother, so I asked if he could pick it up for me. He readily agreed and offered that I could get for my birthday, which was fine with me.
Today my brother got hold of the plane, and sent me some pictures of it. Based on the Stanley size system, it is a No 3.
I have tried to search the Internet for information on the Siegley planes, but there is not quite as much information as I had hoped for, so if anyone reading this could provide any information, it will be greatly appreciated.
As far as I read, the Siegley company was purchased by Stanley in 1905. From 1905 to 1920 Stanley manufactured the Siegley planes alongside their own.
But I think this plane is older than the Stanley era due to the fact that it only says J.Siegley on the blade. There is no mention of Stanley anywhere on the plane.
There is no lateral adjustment feature on the plane.
On Stanley planes they were introduced in 1885 (according to the unsurpassed wisdom found at Patrick Leach's blood and gore page) but I don't know if Siegley never had a lateral adjustment until they were purchased by Stanley?
My older brother took that plane apart and took some pictures of it. It was well oiled and doesn't seem to be rusty. the fact that someone made a designated box for it makes me believe that whomever the owner was, he took care of this plane.
The rear tote is a bit loose, but I guess it can be tightened up.
My guess is that it would make a fine restoration project to carry out on board..

J. Siegley plane No3

J. Siegley blade

No lateral adjustment on this plane.

Plane transport box
Sunday, February 14, 2016
Shoe shine box, preliminary thoughts.
I hope that the weather will permit me to build something this time, and inspired by Bill from the Confused woodworker, I plan on making a shoe shine box.
At present our gear for shining shoes are kept in a plastic crate, and frankly I ought to be able to make something like a small box for that purpose.
I plan on making a box approximately 8" x 14" and a height of 8". Because it has to be able to fit into the same cabinet as the existing plastic crate.
While a lid looks nice, it also limits the usable volume by preventing stuff to stick up from the box, so I have decided to not add a lid. Instead I am considering adding a drawer or two at the bottom of the box. Those would be for extra laces that are technically not for shoe shining, but they still reside in the same box at our house.
I'll probably make some sort of a vertical division, so it will be possible to separate the shoe polish and leather grease etc. from the brushes and rags.
The construction will be dovetailed corners, perhaps full blind dovetails, and the bottom will most likely be a floating panel.
I better start doing some sketches.
At present our gear for shining shoes are kept in a plastic crate, and frankly I ought to be able to make something like a small box for that purpose.
I plan on making a box approximately 8" x 14" and a height of 8". Because it has to be able to fit into the same cabinet as the existing plastic crate.
While a lid looks nice, it also limits the usable volume by preventing stuff to stick up from the box, so I have decided to not add a lid. Instead I am considering adding a drawer or two at the bottom of the box. Those would be for extra laces that are technically not for shoe shining, but they still reside in the same box at our house.
I'll probably make some sort of a vertical division, so it will be possible to separate the shoe polish and leather grease etc. from the brushes and rags.
The construction will be dovetailed corners, perhaps full blind dovetails, and the bottom will most likely be a floating panel.
I better start doing some sketches.
Tuesday, January 19, 2016
Campaign hardware from Toplicht, a product review.
After reading "Campaign furniture", I have decided that I would like to make a set of travelling book cases.
Due to the Danish import regulations, it is immensely cheaper if I could source some hardware from Europe.
I managed to find some chest locks from Rutlands in England, that were reasonably priced.
They also carried brass corners, but those were kind of expensive.
A good friend of mine once suggested Toplicht as a possible source for some specialty hinges.
I sent for their catalogue, and I have also browsed their web page. The result: They really do stock most of what you could imagine.
I ordered the following items:
Brass corners at a price of just below 6 Euro a piece it is a stark contrast to the prices demanded elsewhere. The corners are cast brass with a thickness of approx 1/16". If you order more than 5 there is a discount.
Brass drawer pulls These look very much like the later type pulls shown on page 10 in "Campaign furniture". They seem to be a little bit thicker than 1/16. These are only 9.90 Euro a piece, if you order a single piece. Like the corners, these pulls also come with a discount if you order more than five.
Brass hinges These hinges are 5/64" thick and seem to be of a good quality. They are 13.90 Euro a piece, so they are a lot more expensive than the usual hinges I buy at the lumber yard, but the quality level is also quite different.
To get a discount on the hinges, you will have to buy at least ten.
The shop was really fast, I ordered the stuff Friday and I got it today. All the items were wrapped in newspaper for protection. Not that it matters much with brass hardware, but it gives a fine impression of the store, that they make sure everything is securely wrapped.
I ordered the locks Friday as well, but those haven't arrived yet, so therefore there is no review on those.
So if you need campaign hardware, I recommend Toplicht.de as a supplier. They have loads of interesting pulls and specialty hinges etc. and the prices seem very reasonable, actually downright cheap for some of the items (please note that I am in no way connected or affiliated with Toplicht).
.


Due to the Danish import regulations, it is immensely cheaper if I could source some hardware from Europe.
I managed to find some chest locks from Rutlands in England, that were reasonably priced.
They also carried brass corners, but those were kind of expensive.
A good friend of mine once suggested Toplicht as a possible source for some specialty hinges.
I sent for their catalogue, and I have also browsed their web page. The result: They really do stock most of what you could imagine.
I ordered the following items:
Brass corners at a price of just below 6 Euro a piece it is a stark contrast to the prices demanded elsewhere. The corners are cast brass with a thickness of approx 1/16". If you order more than 5 there is a discount.
Brass drawer pulls These look very much like the later type pulls shown on page 10 in "Campaign furniture". They seem to be a little bit thicker than 1/16. These are only 9.90 Euro a piece, if you order a single piece. Like the corners, these pulls also come with a discount if you order more than five.
Brass hinges These hinges are 5/64" thick and seem to be of a good quality. They are 13.90 Euro a piece, so they are a lot more expensive than the usual hinges I buy at the lumber yard, but the quality level is also quite different.
To get a discount on the hinges, you will have to buy at least ten.
The shop was really fast, I ordered the stuff Friday and I got it today. All the items were wrapped in newspaper for protection. Not that it matters much with brass hardware, but it gives a fine impression of the store, that they make sure everything is securely wrapped.
I ordered the locks Friday as well, but those haven't arrived yet, so therefore there is no review on those.
So if you need campaign hardware, I recommend Toplicht.de as a supplier. They have loads of interesting pulls and specialty hinges etc. and the prices seem very reasonable, actually downright cheap for some of the items (please note that I am in no way connected or affiliated with Toplicht).
.

Brass corner, 2" x 3/4"

Brass pull, 2.75" x 1 5/8"
Sunday, January 3, 2016
A small barn for the summer house 2, drawings and considerations
After a lot of sketches, I have finally made some drawings that should suffice to show to the local planing department.
More drawings will be needed before final approval though, namely one that will show the position and orientation of the building on the property, a drawing of the remaining two sides of the barn, and a drawing that will show the way the frame is built up, I think that normally a cut through drawing is used, but that wouldn't make much sense for a timber frame building in my opinion, so I might make drawings for each section of the building, that way I can use it as a construction drawing at the same time.
The view from the side looks strange to me, but I think it is because the drawing does not take into account that the roof has got slopes. I ned to make an isometric sketch as well, that should help a bit on the look of it all.
There is still the possibility that the planning department may have some issues with a window placed in the attic. because local codes prohibits two levels in a summer house. But since it will only be used for storage, I don't know how they will decide.
Part of the challenge is that the roof type I am planning to use is around 6" thick, coupled with a set of 6" rafters, the inside head room is quickly reduced.
Below the gable/end view of the barn, I have sketched the roof build up.
For those not fluent in Danish (or those who have problems reading my handwriting), the layers are (from the bottom):
- Tongue and groove boards, 22 mm
- Tarred paper
- Distance board 25 mm (1")
- Laths 1.75" x 3"
- Roof tiles made out of clay
The roof tiles are the old ones from our house that I kept when we installed a new roof a couple of years ago.
Maybe the other side of the barn will receive two windows, but I wanted to make sure that there was going to be some places where I could hang garden tools and maybe place a shelf.
I plan to make 4 posts in the frame for the side, so in theory I could have three windows evenly distributed.
I also have to ask my wife what she thinks, but it will be easy to add a window or two to the drawing before going to the planning department.

End view.

Side view
Sunday, December 27, 2015
Campaign furniture, a book review.
Given that the weather on the Norwegian west coast has been bad ever since I signed on the ship, there really hasn't been any possibilities of starting a project.
I did however bring with me a copy of Campaign furniture by Chris Schwartz.
The book is written in a clear and informative language, and there are loads of historical informations to be found.
The projects found in the book strikes me as very well chosen. Based on that they can be used in a normal household today.
I am pretty sure that CS also knows how to make a campaign bed, but that would probably be more of a curiosity to most people, and not something that a lot of people would actually make.
The projects do not appear to be listed according to their difficulty, but more based on how popular that type of project was originally.
In the beginning of the book a lot of general information on campaign furniture is given, changes in styles through the years. General information on hardware and wood species etc.
I personally like the small quotes from older books, such as a guide to India travelers and small original ads for companies that supplied campaign furniture 150 years ago. These small distractions engage my sense of curiosity and imagination.
There is also a whole lot of general information on joinery techniques, and techniques for installing hardware, with all the small but important information provided. Especially when it come to the descriptions on how to install hardware, the book is very thorough. This is in my opinion a very noble approach, as the hardware installation is often a "make or break" operation on a piece of furniture.
The reader is taken step by step through the installation of half mortise locks and corner guards etc. with clear pictures and instructions.
In my opinion the best example of the thoroughness of those descriptions is that CS explains that typically a corner guard will have a very slight radius on the inside corners. And next he describes how to deal with this.
That is information I haven't seen anywhere else. Actually the book can be recommended just based on the instructions for installing hardware.
Regarding the projects themselves, the instructions are equally clear and informative. Each build is described in a logical sequence, and operations that might be difficult are explained in detail regarding what can be done to ensure a success.
There are no descriptions of the exact hardware needed for each project, which is kind of liberating. I guess this is done to allow the builder to use whatever hardware is obtainable in that persons part of the World.
As usual with books from Lost Art Press, the book itself oozes of quality. Nice binding, thick paper, good looking photos and drawings etc.
I would recommend the book to anyone remotely interested in items of campaign style, and also to those who are looking for some detailed instructions in how to mount hardware.
If you should you purchase the book, or the electronic version or both depends on how you like to read. But the book itself is a handy size and of such a quality that it is a joy to read it. So I would just go with the hardbound book. But then again, I am pretty conservative when it comes to things like that.
I did however bring with me a copy of Campaign furniture by Chris Schwartz.
The book is written in a clear and informative language, and there are loads of historical informations to be found.
The projects found in the book strikes me as very well chosen. Based on that they can be used in a normal household today.
I am pretty sure that CS also knows how to make a campaign bed, but that would probably be more of a curiosity to most people, and not something that a lot of people would actually make.
The projects do not appear to be listed according to their difficulty, but more based on how popular that type of project was originally.
In the beginning of the book a lot of general information on campaign furniture is given, changes in styles through the years. General information on hardware and wood species etc.
I personally like the small quotes from older books, such as a guide to India travelers and small original ads for companies that supplied campaign furniture 150 years ago. These small distractions engage my sense of curiosity and imagination.
There is also a whole lot of general information on joinery techniques, and techniques for installing hardware, with all the small but important information provided. Especially when it come to the descriptions on how to install hardware, the book is very thorough. This is in my opinion a very noble approach, as the hardware installation is often a "make or break" operation on a piece of furniture.
The reader is taken step by step through the installation of half mortise locks and corner guards etc. with clear pictures and instructions.
In my opinion the best example of the thoroughness of those descriptions is that CS explains that typically a corner guard will have a very slight radius on the inside corners. And next he describes how to deal with this.
That is information I haven't seen anywhere else. Actually the book can be recommended just based on the instructions for installing hardware.
Regarding the projects themselves, the instructions are equally clear and informative. Each build is described in a logical sequence, and operations that might be difficult are explained in detail regarding what can be done to ensure a success.
There are no descriptions of the exact hardware needed for each project, which is kind of liberating. I guess this is done to allow the builder to use whatever hardware is obtainable in that persons part of the World.
As usual with books from Lost Art Press, the book itself oozes of quality. Nice binding, thick paper, good looking photos and drawings etc.
I would recommend the book to anyone remotely interested in items of campaign style, and also to those who are looking for some detailed instructions in how to mount hardware.
If you should you purchase the book, or the electronic version or both depends on how you like to read. But the book itself is a handy size and of such a quality that it is a joy to read it. So I would just go with the hardbound book. But then again, I am pretty conservative when it comes to things like that.
Wednesday, December 16, 2015
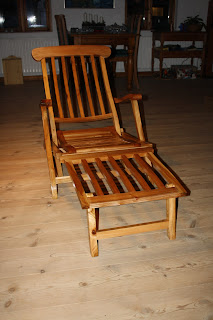
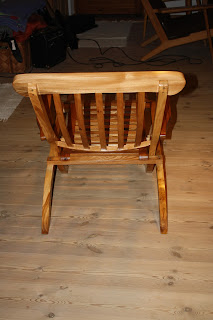
Titanic deck chair
For once I have made a project which does not involve pallet wood. And furthermore isn't it a box of any kind.
My wife has wished for a deck chair for a couple of years, but I haven't found the time to build her one until now.
The plans for this chair can be found at Popular Woodworking, they were issued in 2012, 100 years after the sinking of the RMS Titanic.
I made my chair out of elm which originally comes from trees belonging to my neighbor. They were among the first boards that I ever milled, so they have air dried for some 8 or 9 years now.
The construction of the chair went along OK, but with a few screw ups along the way, some were my own fault, and some were due to the cut list and plans.
It is not a quick project, but that should come as no surprise with 43 individual parts, of which 26 of them have to be shaped on the band saw.
As a finish I applied two coats of oil based marine varnish.
Since I will sign on the ship tomorrow, I won't be home for Christmas this year. I have therefore already given the chair to my wife, so now it is OK to blog about it, even though it is a present.
That is also the reason why I didn't blog about the build itself.

My wife has wished for a deck chair for a couple of years, but I haven't found the time to build her one until now.
The plans for this chair can be found at Popular Woodworking, they were issued in 2012, 100 years after the sinking of the RMS Titanic.
I made my chair out of elm which originally comes from trees belonging to my neighbor. They were among the first boards that I ever milled, so they have air dried for some 8 or 9 years now.
The construction of the chair went along OK, but with a few screw ups along the way, some were my own fault, and some were due to the cut list and plans.
It is not a quick project, but that should come as no surprise with 43 individual parts, of which 26 of them have to be shaped on the band saw.
As a finish I applied two coats of oil based marine varnish.
Since I will sign on the ship tomorrow, I won't be home for Christmas this year. I have therefore already given the chair to my wife, so now it is OK to blog about it, even though it is a present.
That is also the reason why I didn't blog about the build itself.

Titanic deck chair made of elm.


Subscribe to:
Posts (Atom)