Saturday, July 18, 2020

Making a small ovolo infill plane, 2 dovetails.

Yesterday evening I first removed the remaining waste between the pins. Then I transferred the pins to the sides where the tails were going to be.
Those were sawed out on the edges and a drill removed most of the material. After that a file was used to remove the rest of the waste down to the baseline.
After a little adjustment, the pieces went together as they should.

I used a file for flaring out the backside of the pins, in order to make the "double dovetails". And that was pretty easy. I didn't make a huge flaring, but just enough so that the dovetails will be locked once I peen them together.

When I made the infill smoother a couple of years ago, I made the aft part of the sides with a couple of swooping lines. Or at least that was the thought behind the design. I decided to see if I could make this plane look as though it had some relationship to the bigger plane, by making the same design feature.
It didn't work out at all!
First the drill started wandering off because my design placed two holes too near each other. I thought that I could fix it with a file and still make it look good.
After a bit of filing it became clear that I could not make two small swoops that looked good.
I found a bigger diameter round file and decided on one swoop instead.
The edges turned out pretty well and I was happy until I removed the sides from the vise.
Instead of the elegant shape that I had envisioned, I now stared at the silhouette of a pickup-truck with an extended cab.

To get on from that point, I marked out for the mouth of the plane, and drilled a series of holes where the mouth will be. The holes were then cleaned up with a file. It is a lot easier to drill and file in just the sole on its own, instead of doing it when the sides are connected pickup shaped or not.

I didn't want to start peening the parts together because it was getting a bit late, and I didn't want to disturb anyone, and I also didn't want to risk messing things up.
After working a bit more with the material, I am beginning to think that it might be bronze rather than brass. First it doesn't smell like brass and second it machines differently too. Brass will make a lot of small chippings when drilled, but this makes nice long shavings when drilled. (there is probably a correct word for that too).

The next part will be to work a bit more on the mouth, peen the parts together and start making the wooden infills.


Pickup shaped infill plane.


Proud pins and tails.

I had glued the sides together before filing them.


Thursday, July 16, 2020

Making a small ovolo infill plane

Since I have returned to the blogosphere, I have been thinking about something new to blog about.
The projects that I have made the last year have been completed without any photographic evidence, so I might as well start something new to make out here.

We are currently in dry dry dock, and I haven't brought my tool set with me.
I could go out and use the tools in the carpenters shop, but where would the fun be in that?

Instead I have decided to try and make a small infill plane. We happen to have some sheet brass on board, and That should be a "heckuva" lot easier to work compared to my last infill plane which was made out of regular mild steel.

As I predicted when I completed the last infill plane, I haven't used it a single time since I made it. But that is because I have a nice Stanley Bedrock #4 that I use as my everyday plane at home.
I haven't got a functioning ovolo plane though, so merging an infill plane with a moulding plane should be a fun little experiment.

I drew a rough sketch which sort of gave me the overall measurements of the plane. It will hopefully end up being sort of 4.75" long and 1" wide. The height of the sides will be around 1.5"

First I marked the outline of the sides and the bottom on the sheet of brass, and then I used a hacksaw to saw them out. The sides were held together in the vice and filed to the same overall size.
The bottom just had one side filed smooth.

Using the smooth side of the bottom, I marked the two baselines for the dovetails, Doing it that way should in theory result in that any deviations in width will be on one side only, and I won't end up with a wedge shaped plane.

The brass is 4 mm thick which is pretty close to 5/32". in order to make sure that there will be enough material to peen, the pins will be 1/4" long.

I marked out for a half pin on each end of the bottom, and two full pins in between them. A bit of sawing followed by some drilling removed most of the waste. I started filing one end, but decided to stop for the evening instead of stretching it too far.
It feels good to be back at making something like that again!


Starting to file the waste away.

Dry mock up of the plane to be.

Monday, July 13, 2020

Chimney cupboard for a friend

One of my old friends has started a guesthouse at his place where people sleep in old circus wagons.

The wagons are actual old circus wagons that have been stripped and rebuilt. Kind of like a tiny house.

I visited him while he was working on a wagon and one of his challenges was that he didn't want the inside to simply look like a caravan or an Ikea catalogue. 
Some stuff he does get from Ikea such as beds etc. but he would like to add something that was purposely built for that place. 
So we agreed that I should make a chimney cupboard for the bedroom of the wagon.

I couldn't make it quite as tall as normally, since the rounded ceiling started a little less than 6' up from the floor. 
It also had to fit in a corner, so I had to keep that in mind when making the top and the base.

The tractor driving the saw mill suffered from a damaged priming pump form about 7 months ago, and though I have bought the spare parts, I haven't taken the time to actually fix it yet. So instead of using some home milled larch, I bought some wood at the lumber yard. It is nice to be reminded once in a while how expensive that is, just so I am able to appreciate my own home milled lumber a bit more. 
The boards for the case itself were of a worse quality than I had expected, I had tried to be picky when choosing the wood, but it was filled with knots and I was a bit disappointed about it. 
For the back panel I had chosen some T&G roofing boards. And they on the other hand were of an amazing quality! Not a single knot in any of the boards, and clear straight grain. It was roughly the same price, so I guess I should have used that for the rest of the case as well, But I know that for next time.

I am leaning on the plans from Bob Rozaiesky from Popular Woodworking, and though it can be made as a full hand tool build, I use some machines like a thickness planer to speed up the process a bit.

Again I must conclude that it is a really nice project. The finished cabinet has an appealing look and despite its small footprint there is a lot of useful storage inside. 


Solid wood construction

Both doors can open up!

Five shelves inside.

Newf and gambrel stamp.

Sunday, July 12, 2020

Building a Mini Max hydroplane

Readers with a good memory might be able to remember that two years ago Gustav, Asger and I constructed a Mini Max hydroplane in the summer. 
The plan was always to make another one, so each of the boys had their own. 

And last year we completed the second one. 

The construction is really simple, but the boat just looks nice and is a fun project to build. 
Asger decided on the paint scheme for this one and he was determined that it should just be a blazing orange on the top and white inside and on the bottom. 
I had purchased an outboard motor from one of my friends, and we decided to try and make a steering wheel for it so it felt a bit more like a racing boat.

Near our summerhouse, there is an old shop that has been under the same ownership since 1970. They carry basically everything. Form tape recorders (though not modern anymore) to regular dairy products and household items.
The shop is well worth visiting just to see the enormous amounts of weird old stuff for sale. 

Prime examples are: blades for scythes size No 4, made in the Soviet Union, 
400 or so pairs of old rubber boots that are frequently treated with a bit of silicone oil to prevent them from cracking while still in the store. 
And the list goes on!

The orange paint that the boat is painted with is bought at that store. It is an old can since there is no MAL code on it (mandatory from some time in the 1980'ies in Denmark I think)
The colour agent is lead chromate which also sort of fell out of favour a couple of years ago. But that sort of stuff is still available on the shelves of this shop.

We will try to get it stored at the summer house, since it is a lot nearer to the water. Then there is a chance of it to see more action.
 
Gustav testing the steering mechanism.

Asger painting the hull.

Completed paint job.


Saturday, July 11, 2020

A year suddenly went by.

A couple of years ago I wrote a blog entry about the sudden disappearance of blogs.
I guess that mine is pretty close to fall into that category by now.

What is interesting to see (for me at least) is that my blogging is so closely connected to my job.
Back when I was employed in the offshore supply industry, I had a decent Internet connection, long uneventful night watches that allowed me to do stuff in the workshop and there was very little social interaction on board the ship save for meal times.

When I started on Statsraad Lehmkuhl, it became clear how different a job place this really is.
The Internet connection is crappy when we are sailing. 
There are no night watches. And there is an incredible social life on this vessel. 
So instead of having to sort of occupy my own mind I suddenly found myself in a group of people where playing either board games cards in the evening was the norm. 
A supply boat can often feel like a ghost ship, people will gather for the meals, and after 15 minutes people will wander off to their own cabins and watch TV or computer by themselves.
Out here that isn't really an option. There is a TV in the aft mess room and a projector in the fore mess room.
No TV signals while at sea, but it is possible to watch a DVD. This isn't done very often though, since most people will gather in the aft mess and have a cup of tea/coffee, and play cards or sit and read a book or just talk to one another.

So I found that I didn't have the urge to build something on board anymore.
And I have generally always had a hard time pulling myself together to blog while at home. One week took the next and those weeks became months etc.

Now I'll have to see of I can make good of my intentions to blog from home once in a while.
It will probably be a difficult starting time when I go home in 10 days, since it is high summer and holiday season etc.

But lets see how it goes.

Tuesday, June 11, 2019

Statsraad Lehmkuhl details 3, the Boston Teapot Trophy

The Boston Teapot Trophy is a trophy that is awarded to the sail ship that covers the greatest distance over the course of 124 hours.
Why they have chosen that time frame I have no idea of, but as it happens, Statsraad Lehmkuhl has won the trophy 8 times.

Our ship is the current holder of the trophy, and due to that, the actual trophy is sitting on a shelf in the CEO's office.

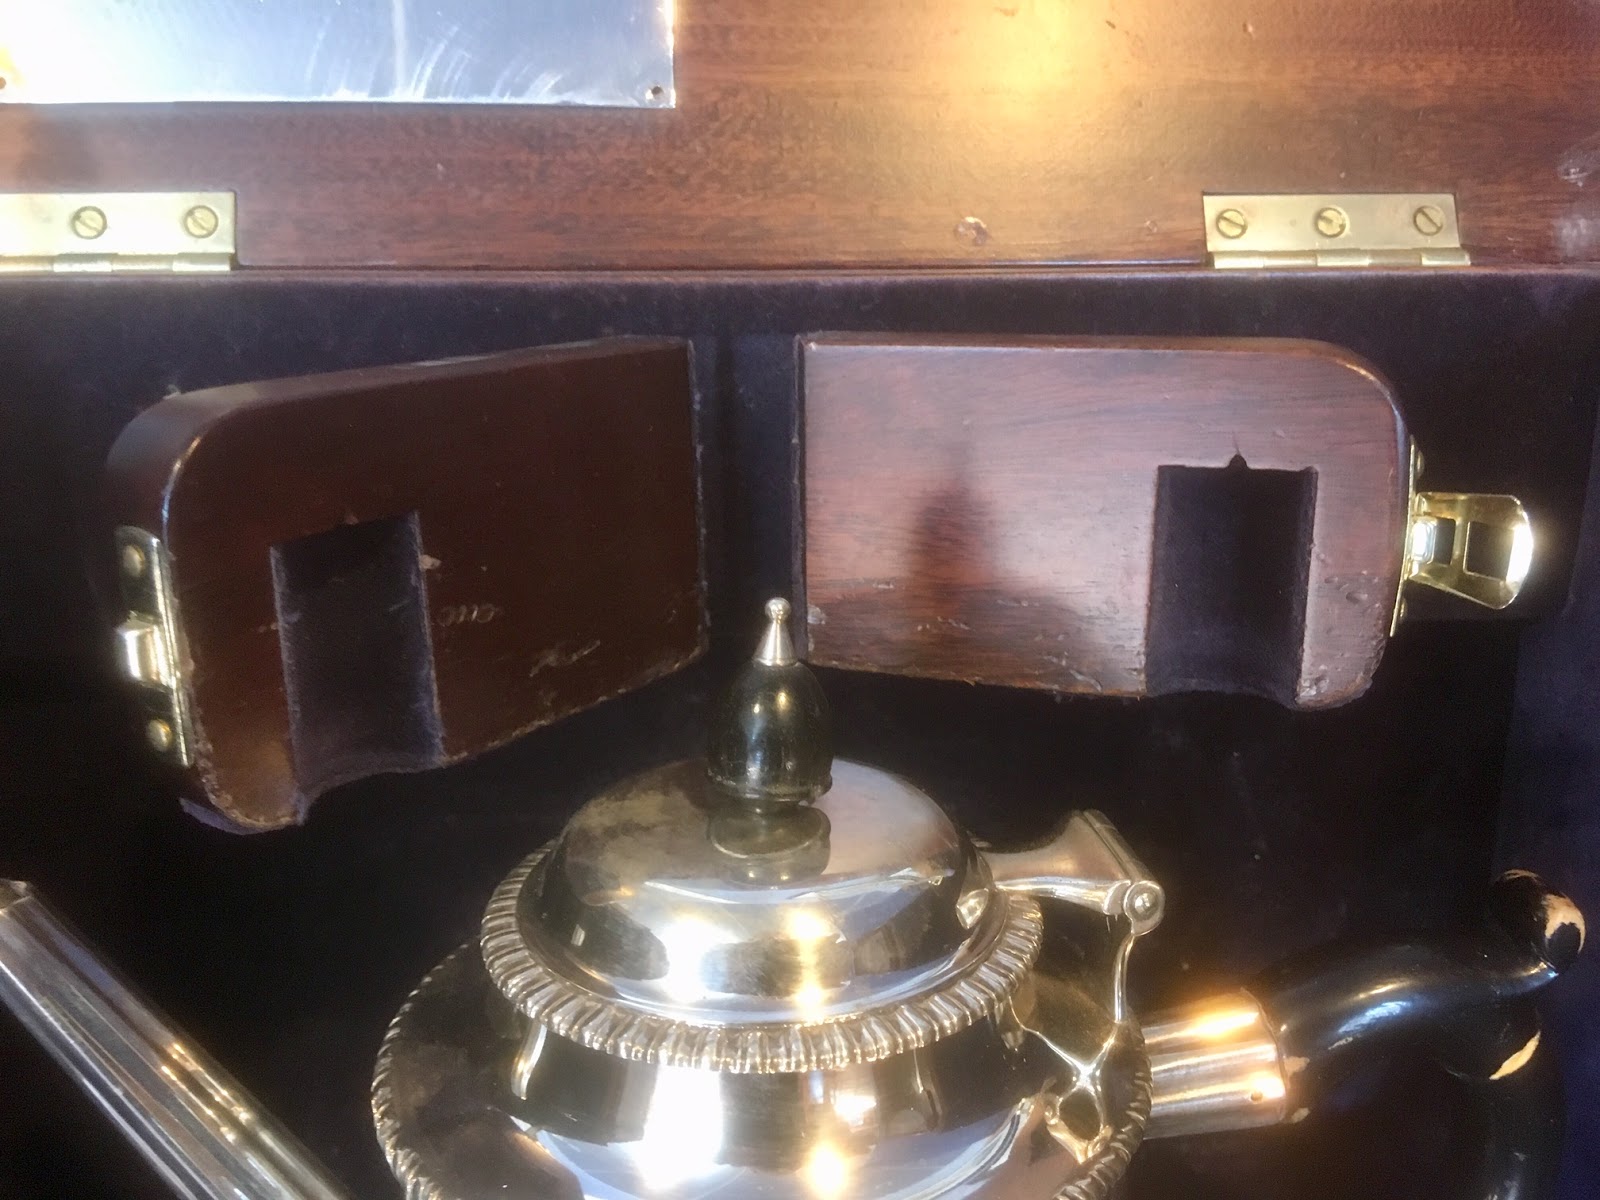
The trophy itself is a copy of a teapot which was made by Paul Revere (yes, that Paul Revere!). Whenever we hold a meeting in the CEO's room, I find myself drawn to the box that holds the trophy.

Today after the meeting, I quickly snapped a few pictures of the box. I tried a little bit to remove the teapot, but I couldn't see a proper way of doing it, so I stopped before breaking something. While writing this, I got to think of that I think the correct way is to lift out the upper part (the teapot itself), and then remove the base.
I tried to pull a bit at the middle shelf surrounding the teapot.

Technically the trophy isn't part of the ship, but this is my blog, so I decide that it is OK anyway.
According to a link I found, the Trophy was established in 1964

You will be able to find some pictures of the teapot itself in the first link, but here are a couple of other pictures of some details of the box.

I can't see how the box itself is constructed, I mean if it is with secondary wood and veneered shell -or solid wood with blind dovetails. But the overall size of the box is something like 16" x 16" and 8" deep and inside it is lined with some dark blue velvet.
Neither of the screws are clocked which I find a bit strange, after all I am certain that the box was made by someone professional.
The original silver plate on the right hand door has nice engravings, whereas the new silver plate inside the lid has got some not so nice machine type engravings. This is to be expected,as engraving is not something that any goldsmith can do anymore as far as I have understood.
The bracket holding the top of the teapot in place is clearly made with a Forstner bit. I think that is the one detail that look the most out of place to me. Using a Forstner bit is OK to remove the material, but it wouldn't have taken much to take a spade bit of a similar size and ground it to a round shape. Then carefully rounded the bottom of the hole.

Now all this may sound as I am ungrateful for the Trophy which is not the case. Instead I would say that I find it intriguing that after having built stuff myself - I am able to see that not everything that was made 50-60 years ago was better than what could be built today.
Maybe the cabinetmaker tasked with the job had to work on a tight budget because the teapot itself had cost more than anticipated, so a bit had to be saved on the box. Or maybe it was someone who had never heard of clocking screws? We will probably never know.


Silver plate on top of the box.

The closed box.

Hinge stay, new silver plate visible inside the lid.

Description of the inspiration for the trophy. 

Teapot lid holding bracket closed.

Let's just use a Forstner drill, no one will ever notice..

Sunday, June 2, 2019

A small barn for the summer house 17, laying tiles on the roof.

Though it might not seem that way, I do occasionally still work on the small barn at our summer house.
I have completed the interior cladding of the walls, and also completed painting the outside.

Last year I wanted to install the tiles on the roof, but I never took the time to do so, instead I built some nice hydroplanes with the boys, and I think that was a great idea.
The month of April this year was fantastic regarding the weather. So I jumped at it and started cleaning mortar of the old tiles from the house. I have been saving all those tiles since 2013, when we installed a new roof at home.

The tiles are as old as our house which means that they were made in 1924. They are of a much better quality than most of the tiles available today since they are burned harder than today's tiles.
A drawback is that they do not comply with any of the available fixation systems. Back then they were secured from the inside of the attic using some heavy gauge iron wire similar to what was used for fencing the fields.
That would still work if I had an accessible attic. But since I have decided to make a sub roof with tarred paper, the tiles are not accessible from the back.

Instead I resorted to drilling a small hole in the top of each tile, and then I fixed them with a screw directly to the lath. That will ensure that they don't blow off in the event of heavy winds.

Laying the tiles was more arduous than really difficult, and I finally found out what the correct spacing should be, so I know that when I start on the second side of the roof.

When I go to the summer house, I usually do so in the morning after tending the horses. Mette and Asger (the only child at home at the moment) have both left for work and school at that time, so after letting the horses out, I put the leash on Bertha and lifts her into the passenger front seat of the green Volvo Valp.
We then drive down to the small shop in the village and I get out and buy a package of sausages or some pork, a loaf of bread and maybe some milk.
As soon as we get to the summer house, I put the groceries in the refrigerator, and then lifts out Bertha and we go for our regular morning walk. It is maybe one and a half mile, so it isn't that long, but there's plenty of deer tracks for Bertha to examine and there's also a canal which she will swim in regardless of the temperature.

Back at the summer house I'll start working and around noon I'll light a fire in an old type grill. I then roast sausages or pork and Bertha and I helps each other eating it while I sip a cold beer.

Around 3 I'll pack up and head home so there's someone to greet Mette and Asger when the workday/school day is over.

It might not sound like a big deal, but to me those days are reinvigorating. The only problems Bertha and I face in the summer house are that the local squirrel population are decidedly unsportsmanlike. They will occasionally appear and then clear off into the treetops - Now that is hard for a Newfoundland dog to understand and accept.

Putting tiles on the roof.

This is the sort of thing that will lower my blood pressure.


Bertha is patiently waiting for the food to get ready.