Sunday, January 26, 2014

Using the Roubo horse based stain.

I figured that the new shop stool would be a perfect project for the Roubo horse based stain.

The stain was applied using a brush, and the wood absorbed it rather quickly. As a matter of fact, part of the legs and the stretcers dried while I went to the house to get the camera. Tomorrow I will give it a second and perhaps a third coat.


Saturday, January 25, 2014

Shop stool - the result

To speed up the process, I tested a copy attachment that I have for my wood lathe. And it works like a dream. It can also be used for making cylindrical parts, and since the build has to be finished in one day, and we started at 8 AM pacific time i.e. 5 PM local time, I needed the job to be carried out in a hurry so I could still hit the hay before midnight.

Asger helped with the turning of the legs, he was not completely happy, since he didn't think it would make him a better turner using such a jig.. (he will be 8 in one week, and he wants to learn how to turn now, so patience is not the strongest card..)

After the turning, I drilled some holes. It took a little time to convince myself that it was probably going to be OK, eventhough I had to eyeball the angle.
The stretchers also received their holes, and then al that was left was the glue up.

Tomorrow I will saw of the protruding part of the legs and that is all that remains to finish of the stool.

Due to some incredible luck, the stool does not rock, so I don't have to cut anything of the legs to make it steady.
The height of the stool is 21" which is actually what I was aiming at. So all in all a success.

As for the looks; I managed to make the top rather clumsy and heavy looking, but I think few people will notice, because the boring plain IKEA looking cylindrical legs will catch the attention of the beholder.

It is almost midnight, so I will call it a day :-)
The shop stool.

Asger using the copy attachment.

The turned legs and stretchers.

Holes are drilled, ready for the glue up.

Shop stool part 1

The design of my shop stool is a Windsor shop stool lke the one that Michael Dunbar once wrote about in Popular Woodworking.

I haven't decided on the design of the legs yet, but I think they will be a more simple design than the double bobbin that was shown in the article. 

First I looked for a suitable piece of wood for the seat. In spite of all the wood that I have lying around, I couldn't find a suitable piece. Therefore I ended up using a chain saw to rip a piece of half a trunk of elm that I had in the barn. The piece measured approximately 16 x 16 x 4". 
The back side was flattened using a scrub plane, and then I leveled it out with a smoothing plane. 

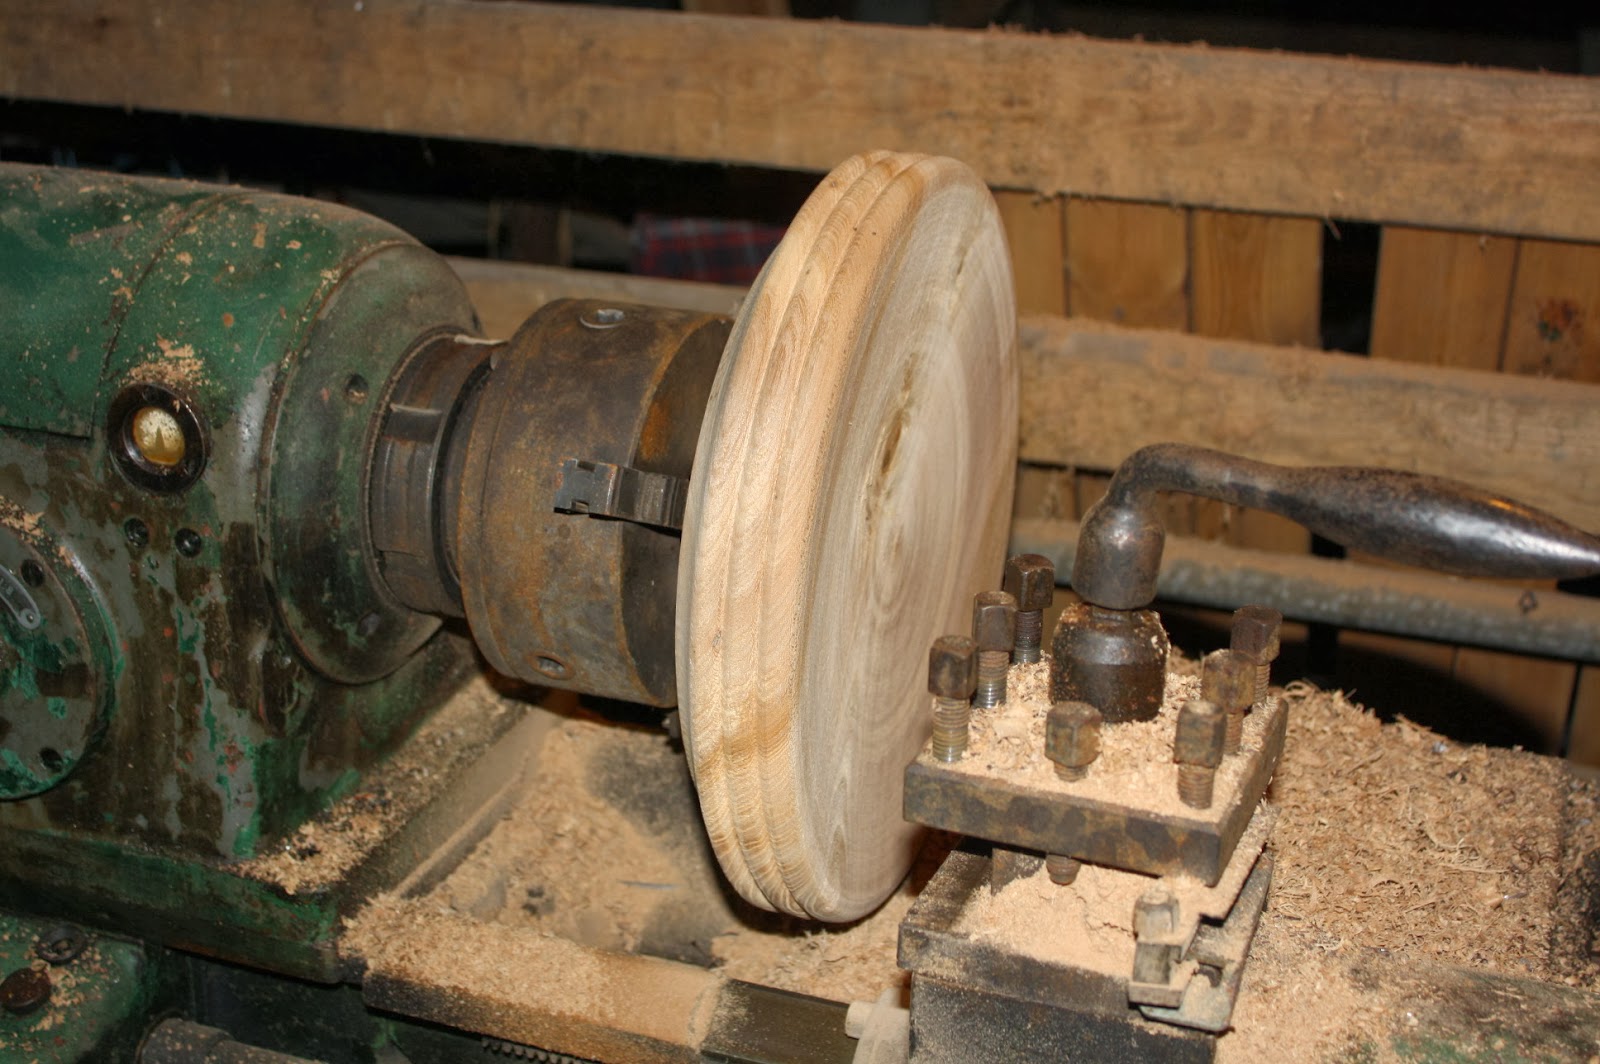
My normal wood lathe has got a maximum capacity of around 12", so I decided to use my old metal lathe that has got a significantly larger capacity. 
I mounted the blank on a face plate designed for the woos lathe, and clamped it in the 3 jaw chuck of the metal lathe.
At first I used the automatic feed for redusing the thickness down to approx. 2.5". I then turned the depression in the seat manually still using the metal working bit. Next the outside was turned. 
A metal working bit doesn't leave a particularly nice surface, and I also needed to turn a small bevel like thing on the lower side of the seat, so I had to device a way to make a normal tool rest.
I was able to mount a long clamp in the tool holder, and then I could use the bar of the clamp as a tool rest. That enabled me to finish the turning using normal wood turning tools.

I need to get some supper, and then the build will continue.

Happy SSBO day to everyone out there.

The blank and the chain saw. 
Ready for traversing with the scrub plane

Flat enough for the next step.

Close up of the cutting action on the lathe.

My trusty old MAS SN 20 metal lathe.

The finished seat.

Friday, January 24, 2014

Getting ready for the SSBO

Things have been very quiet on this blog for a while. Normally when I come home after a stretch of work at sea, I have som many things to do with the family, that blogging is being down prioritized.

This time I have also had to finish a commision of 3 tables and 4 benches for a friend. I had to get those out of the way to generate some space in the workshop.

I have also purchased a new machine that I had to pick up, the drive took a couple of hourse each way, so last Friday was pretty much done for by this adventure. The machine is surprisingly not for woodworking.
It is a trencher (Kettengraber in German). A nice old Case TL 200. Off course it needed a little work, but today I was able to test it. And gosh it is effective.

With those projects out of the way, I managed to clean and organize the workshop today so it is ready for the Shop Stool Build Off tomorrow.

SWMBO and our daughter will drive to Aalborg (the closest major city), to look for a dress for my daughter to wear at her confirmation in May, so I am left at home together with the boys. I pretty much plan to have them helping with the project, but you never know if they suddenly arrange a visit to a friend for playing.

I have more or less decided on the design of the stool, but I also have a design in my head that I would like to try sometime. I am not quite sure if it will work, so I don't want to risk making it for the SSBO.

OK, time to get to bed, it is half an hour past midnight, and I need to get some sleep before the build.


Thursday, January 23, 2014

Sloyd with 5th grade

Gustavs teacher had invited me to attend the sloyd class together with the 5th grade. I was very excited to be able to go, and very curious as to what they were making.

For the moment they are working with natural wood, and all the pupils are making a feed tray for the birds of the garden.

The base of the feed tray is a piece of larch complete with the bark still attached. Those pieces are approximately 5 cm (2") thick.

They had started on those some time ago, so they were all pretty far in the process when I paid them a visit.

The staves are small pieces of willow and the wickerwork is also willow. 

I was asked if I could help with making the holes that were to be used for mounting the tray in a tree in the garden. 
Each pupil would mark out the position of three holes and I should check that they were evenly distanced before we would start the drilling. 
Instead of me doing the drilling, I found a brace and a 10 mm bit (3/8"), and instructed the children in how to do it.
I helped by pressing down on the brace and they did the turning. 

The teacher had ordered some natural twine to use for the hanging system, but sadly it had not yet been delivered. 
The teacher told the children, that if they had their feed tray finished, and just missing the twine, they could make a table tannis bat using a scroll saw. That way they were all kept occupied.

I was amazed at how well the class were behaving. In the beginning of the lesson the teacher had some information on how to proceed with the project. She asked the pupils to sit down, each person on his/her own workbench. And much to my surprise - all the children quietly and quickly found a workbench, sat down and kept quiet. I am not quite sure my class behaved that well all those years ago..


Friday, January 10, 2014

Small hanging cabinet with drawers part 8

The lock that I have brought with me for the door, is the type that needs to be mortised into the stile.
I decided to make the centre of the key in the middle of the door. The other option I had in mind was to position the locking mechanism in the middle. I figured that most of the time, the door is going to be closed, so the keyhole position came in first.

The brass plate of the lock is about 3 mm (1/8") narrower than the stile, so I had to be careful not to burst through the sides for the shallow mortise for the plate. The mortise for the mechanism itself was not so critical, but I still tried to focus so I wouldn't break anything.

I test fitted the lock, but I then removed it again since the screws that came with the lock are actually a little large for my taste, and they also feature a Philips head. I have some better matching brass screws at home, so I'll wait with the final installation. That will also give me a chance to apply a finish without having to worry about the lock.

I had brought with me a pressed key hole insert. But now I can see that it is intended for a somewhat thicker piece of wood. My plan is to make an escutcheon out of either metal or bone, I am not sure which it is going to be.

After I removed the lock from the test fitting, I glued up the entire door.

While the glue dried, I planed and sanded the outside of the carcase a little, to remove any proud pins and tails. There is a little damage to one of the corners, so I am still a little biased about what I should do about it. Add a moulding, glue in a repair piece or soften it up and do nothing?
I'll leave that question for the time being.

After the glue had dried, I sawed of the horns and fitted the door in the opening.
The rails needed to have a little material removed, since the door was about 2 mm (3/32") too high. I did this on the shooting board, working from both sides so I wouldn't have any spelching on the far corner.

At last I sanded the door to remove my pencil marks, and the next thing will be to install the hinges.

The test fit of the door

One of the damages on the carcase, (front lower left corner)

Nice tight joint.

Wednesday, January 8, 2014

Small hanging cabinet with drawers part 7 (the door)

I planed the rails and stiles so they were of a uniform thickness. They were then ripped to the correct width and the edges were cleaned up.

The grooves for the insert panel were made using my trusty Stanley 248 grooving plane. I planed them closer to one side, so the insert panel won't protrude too much.

For marking the positions of the rails and the stiles, I used a trick I have seen in "the essential woodworker" I simply placed the pieces in the door opening and marked the intersections right from there. I kept the pieces tight to the sides of the carcase, so I am pretty sure that the door is either a tight fit, or a trifle too large. But it is will be easy to take a swipe with a plane and make it fit.

I am not very good at making mortises and tenons. But normally my problems are related to when I make through mortises. For this small door I reasoned that I didn't have to make through mortises - it will look better with a stopped mortise, and the strength will be more than adequate.

I don't have a real mortising chisel in my sea tool set, but it is not a problem to make a mortise using a normal chisel, you just have to go a little easy on the levering action so you don't break your chisel.

To minimize the potential gaps at the shoulders, I tried to use the trick of first making a small groove for the saw, using a knife and a chisel. This can really help, and since I don't have a shoulder plane, with me, it is essential that the shoulder should fit tight straight from the saw.

Once the frame had been finished, I turned to attention to the raised panel.

The material for the panel is originally a stacking side for a Euro pallet. It is 19 cm wide, and I only needed a piece which was 16, so I didn't have to glue up a panel. This is a huge advantage in my opinion.
The panel was ripped to width, had its thickness reduced by planing and then it was squared up on the shooting board.
To raise the panel, I first made 3 series of grooves next to each other, so I ended up with some nice wide grooves parallel to all edges of the panel.
I then used the smoothing plane to create a bevel. The end of the bevel had been marked with a marking gauge.
Next I used the grooving plane on the thin edge of the bevel, to make it flat so it could enter the grooves in the frame.
Finally the panel was sanded and everything dry assembled.

I tested the width of the door on the carcase, and it is perfect. I need to reduce the height a little bit, but all in all I am happy with the result.


The wide grooves in the panel.

The first bevel, note the "fence"

The dry assembled door. Notice the "horns"