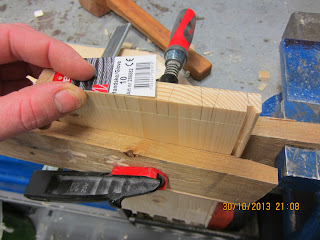
I have developed some work holding methods that are working well on a ship. They would also work well in a garage with a work table and a mechanics vice. Basically I get by using the vice and 3 pieces of wood and 1 clamp.
I try to never clamp the wood for the project directly in the mechanics vice, as the jaws easily mar the surface.
For dovetailing lay out and sawing. A piece of wood is held in the mechanics vice, and the piece to be dovetailed is held on to the fixed piece by means of a clamp and an extra small piece of wood to protect the surface from the clamp.
For chopping out the waste between the pins or tails. The piece to be worked on is positioned on top of a wide board. A small piece of wood is placed a bit away from the end, and a longer piece of wood is placed on top of the small piece and on top of the piece to be held. A clamp is used to press the longer piece of wood down. The same principle as in a leg vice, just horizontal.
When I need a planing stop, I use the wide board as a base, and position the small piece with one end on the wide board, and the other end on the work table. Then I just clamp it down and it holds the wide board and acts as a planing stop at the same time.
When I plane the grooves, I turned the long piece of wood so it was with the broad side up in the vice, and clamped the pieces to be planed on top. Again I used the small piece and a clamp.
I will be the first to admit that working on a proper workbench is easier. But lack of a good workbench shouldn't necessarily keep anyone from doing a little bit of woodwork.
Dovetailing setup
Chopping setup
My dovetail marker.


Jonas, I enjoy your woodworking at work, if only I could convince my cubical mates... Your adjustable bevel dovetail marker is brilliant In my mind.
ReplyDeleteThanks.
DeleteBeing able to go home and do woodworking and being with your family is a better choice, provided it is a choice of course.
The dovetail marker is actually working better than I imagined. I'll maybe even consider making another one with a different angle as well.
Brgds
Jonas
I'm impressed with your dovetail marker! That must have been expensive :). Even more so I am impressed that you have gone the pins first route, which is how I like to saw dovetails. Admittedly, tails first has some advantage, such as easier board symmetry, but I believe they are harder to mark. Pins first always seemed "right" to me. In any event, it seems that your wizard's wand is getting quite a workout. It's all looking very impressive.
ReplyDeleteBill
Hi Bill.
DeleteNow I have started the slippery slope of handmade tools, who knows what will be the next?
Regarding the pins first. That is how my father makes dovetails. In case we can't find anything else to disagree on, this is always an ace up the sleeve..
I can do both, but I think the tails first started when I made my drawers for the kitchen. I had never had any training in dovetails, so I just experimented and found out that tails first worked for me. Coming to think of it, I normally like the way of transferring the layout to the pin board. That I can clamp the pin board and lay the tail board on top and gravity will do its thing. But without proper work holding, pins first is easier provided to me.
Thanks
Jonas