I completed the door for the cabinet, and there was quite a lot of work involved. I have brought a copy of "The essential woodworker" with me, and Charles Hayward suggests that to ease the look of a panel type door, the inside edges should be broken by either planing a chamfer or by some sort of decoration.
After a bit of consideration, I opted for making a small beading on the inside of the frame. Before starting, I honed the blade for the Record No 50, and adjusted it for a fine cut. Despite one of the sides not being 100% with the grain, the beading came out a lot better than I had anticipated. Having a beading made the rest of the joinery a bit more complicated, but after some fiddling, the frame was ready.
Of all the panels that I had glued up in the start of this project, I had chosen the flattest and most uniform looking for the door panel. I could see that it was a bit too narrow, so I glued on a small piece left over from the drawer bottom. It was close in colour, and wide enough to give me the size I needed plus a bit extra.
I like raised panels on doors, and I have made one on board a ship some years ago. I wanted to replicate the method and it worked out just as well this time, despite the wood being a lot less cooperative compared to soft spruce.
The method I used was to initially plow grooves and dadoes along the edges of the panel, to define the raised center. These grooves/dadoes are probably a bit less than 1/8"- I never measured them.
I make the grooves so wide that my smoothing plane will be able to overlap the flat bottom of the grooves. So for my wooden plane that means a width of 3/8".
The next step is to clamp a batten along the grooves/dadoes for the smoother to register to. Then it is just a matter of holding the plane at an angle and remove some material.
Once all the planing is done I lightly sanded the raised panel to remove a few marks. Mainly on the ends where I had traversed with the plane.
In an uneventful glue up, the panel was mounted inside the frame, and later the horns were removed from the stiles.
Metal plate position:
I have been giving quite some thought to the idea about the metal plate from the pilot ladder.
-My first idea was to put it somewhere hidden on the inside. Other people (including my daughter) suggested that it should be mounted boldly on the front.
Now if I put the plate on the inside, it will hopefully end up looking like a nice cabinet, that maybe my dad, Olav and whomever I have of woodworking friends will notice and perhaps look at and comment on.
Most other people I know will likely see a small cabinet and never give it any further thought.
If I on the other hand put the shiny metal plate on the front, it will almost certainly attract attention from a lot more people. Who I imagine will go and look at the cabinet and read the label that seems to be out of place. That could likely lead to a series of questions about the cabinet, and that could be interesting.
It isn't complying with Shaker tradition, to boast of something that you made yourself, but it might be an eye opener to some people, that it is still possible to make things with your own hands that looks OK, and that all upcycling doesn't have to involve white paint and some rough boards.
As a experiment, I placed the door and the drawer in place in the carcase, and mounted the small metal plate with some tape, to get an idea of how it could be mounted.
If you have an opinion on the matter regarding if the plate should be mounted as a sort of peoples fishing lure (to attract attention) or not, I would like to read it in a comment.
I would also like your opinion on how the plate should be positioned if you think that it should be displayed prominently.

Cabinet with no metal plate

Plate mounted horizontally on door.

Plate mounted vertically on door (similar to raised panel)
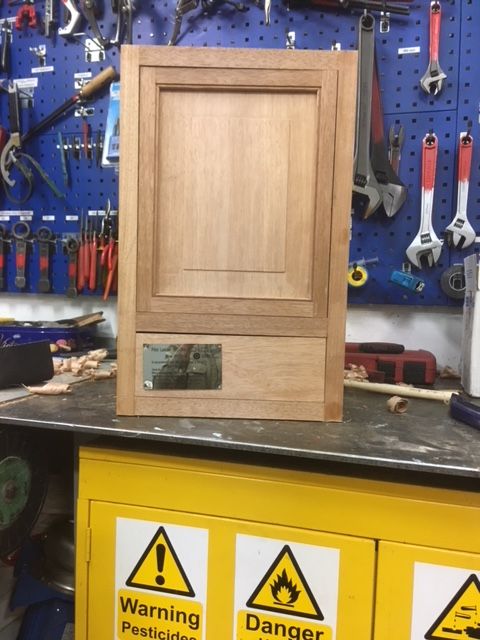
Plate mounted on drawer.
(technically it could go in the center of
the drawer, but that would require
two pulls instead of one center pull)

Grooving /dadoeing the raised panel.

Position of plane to make the raised panel sides.

Glue up of door.
I vote for the drawer with one knob
ReplyDeleteHi Ralph.
DeleteThanks for commenting. Your vote is noted :-)
Brgds
Jonas
Love the beading and raised panel, very nice look. I'd still go "nameplate on the inside", but that's a great point about drawing interest. Another point is what will it cause your wife to say? :)
ReplyDeleteHi Jeff
DeleteThanks for the nice comment.
I agree that it would give a cleaner look with the plate on the inside. However, I talked to my daughter (who as strange as it sounds actually read the blog), and she told me that she thought that front/center would be really cool. So it was kind of a way to see if any more than her felt that way.
I have no idea about what my wife would say about it, but given that it might end up in the small barn at the summer house, I think she doesn't mind.
Brgds
Jonas
I vote for on the door, horizontally so it can be read easily.
ReplyDeleteAnd 1 knob only on the drawer. Maybe shaped like a rung of the ladder sticking out as a handle?
Bob, jean and Rudy getting ready for the grand kids
Hi Bob
DeleteThanks for commenting.
I think that I want to make both knobs looking the same, and a rung like model might look out of the place for the door :-)
Have a nice day with the grand kids :-)
Brgds
Jonas