Sunday, September 28, 2014

Stanley Bedrock 604, part 2

The majority of people who commented on my choice of wood for the patch cast their vote in favour of oak.
As some of you might remember from my "Seaborne chest build" I cave in pretty easy when it comes to peer pressure (as long as it is sensible of course). So I am doing the same thing here and going the oak way.

My plan was to use a file to make the damaged area resemble an indent with a square profile with two sides. This would make it easy to make a piece of wood that could be glued really tight into the spot and later be trimmed to the outer shape.

I also considered using a half round file for making a semicircular indent, but I think the square route is safer. 

Normally I would try to make a repair job blend in as much as possible, but for this particular job I have decided that it can stand out a bit colour wise.

Filing the area away took maybe 5 minutes, and I just filed the small block of oak so it fit on the two sides.
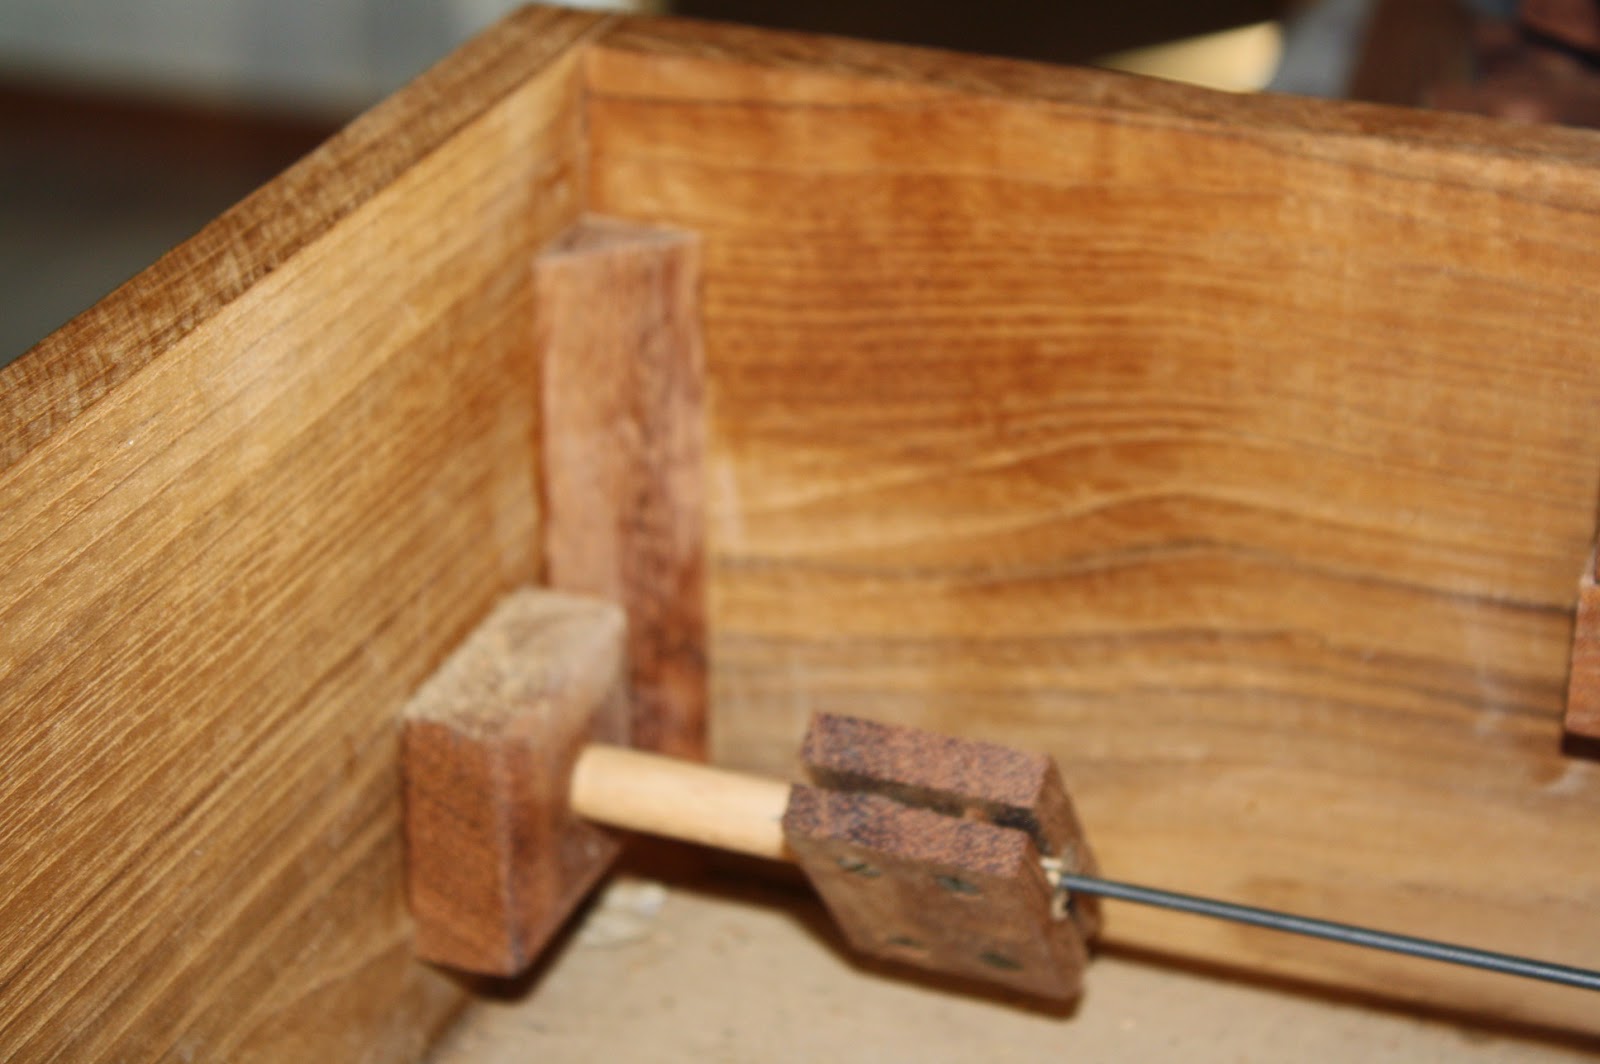
Before adding glue I made a test fit and a test of the clamp. Few things are as frustrating when it comes to woodworking, as when you are not able to make a clamp up because the clamp will slip or otherwise don't fit.

Glue was added to both parts and the clamp was attached.

Tomorrow it should be dry so I can start reshaping the upper part of the rear tote.
The filed away area.

Testing the fit of the block of oak.

Ready for applying glue.

The glue up.

Saturday, September 27, 2014

Stanley Bedrock 604

For my birthday this year, my dad gave me an old Stanley Bedrock No 604 that he had picked up at a thrift shop for about 10$.
It is highly unusual to find a Bedrock in Denmark, so I was very pleased with the news of him finding it, and actually I asked myself if he had any birthday gifts for me, because if not I would like the plane.
He and my mother did have somehing else for me too, but he was glad to give the plane to me, so I could fix it up.

The rear tote was broken, and the nut for the front knob is needs to be replaced, apart from that it is in OK condition given the age of it.

I brought it with me to the ship this time, because a plane restoration is a nice little job to do while at sea.

I started out by dating the plane by means of the Internet. I merely googled "Stanley Bedrock plane dating" and some suggestions came up that could provide the answer.
As far as I was able to conclude, it is a type 6 which was manufactured between 1912 - 1921.

My fingers itched so much for starting to fix the plane up, that I forgot to take some "before" pictures.
But what I did was to wash the parts in some soap water and then I cleaned them with "Metalbrite" which is a phosphorous acid based rust removing chemical often used onboard ships.
The japanning is not perfect, but it doesn't have to be, the plane is old so it shouldn't necessarily look brand new.

After cleaning the parts I have lapped the bottom of the frog to the bed using some valve lapping paste. It didn't need much work before I was satisfied. The bottom and the sides of the bed was cleaned up using some sandpaper on a flat surface, these too didn't need much work.

The rear tote which was broken had been glued before. I decided to flatten the broken parts completely and try to glue it up again. So far it looks good.
On the upper part of the tote, a chip has come off. I haven't got any rosewood out here to use for patching, but I think I have a piece of oak lying somewhere that can be used for making a small repair.
I have considered using spruce for the patch instead, because that way it will clearly stand out that the handle was repaired.
What do you suggest? Oak (if I can find it) or spruce for the repair job?

The glued up rear tote.

Oak or spruce / pine for the patch?


Friday, September 19, 2014

Modular marble machine

Four years ago I purchased the plans for a modular marble machine from woodgears.ca
I started building the machine, but I have been held up by various other projects along the way.
During the initial cleaning of the workshop before the Welsh stick chair extravaganza, I had to move the semi built machine. I decided that I should finish it before starting too many new projects, so we could have fun while the children still have an age where it is funny.

Originally my plan was to make it completely out of exotic wood, but in the end I used a few pieces of elm as well, since I had some left after the chair building extravaganza.

There are an incredible amount of small parts that need to be made, and precision is important to enable the units to fit together as intended.
It is not a hand tool only build, because of all the boring of holes at exact depths. Off course it will be possible to do it only by hand tools, but I opted for a router in a small router table for making the grooves in the runners.

What really caught my eye the first time I saw a video of the machine was the ingenuity of the marble pump. At the woodgears.ca homepage, there is a video showing how to build it. It is cool because it has very little practical use - and the idea of pumping marbles is close to defying reality.

The plans for the build are very thorough, and it comes with additional help information, so even though it looks like a daunting project, it can be made with just a little bit of determination. The hardest thing is to keep the project going, since there are so many small things that need to be made.
It does look overwhelming for a start, but just go ahead one page at the time, and you'll get to the end of it.

My only small complaint with the plans is that some of the measurements are a bit optimistic for woodworking. Most of these measurements are probably derived from calculations used by the program for making the plans, but 1.33 cm is hard to get dead straight on. But I guess that if you use your own sound judgement, you can easily overcome this.

The completed machine is a marvel to behold, and it serves absolutely no practical purpose.
-But it is fun to play with, addictive to watch, makes some nice plop plop sounds when the marbles are rolling and gather a lot of attention from people who sees it.
This weekend Asger (8) is having a friend coming over for playing, and I expect that they'll spend a lot of time playing and having fun with the machine, and that is actually good enough of a practical purpose for me.

Asger operating the marble machine.

Checking if the marbles are exiting correctly.

Another set up of the machine.

View from the crank side.

The inside corner. Instead of a spline, I opted for a triangular block that was cut to the correct height and glued in place.


An action video of the machine in function, please bear with the "jumping" focus. Asger is the camera man on this film :-)


Saturday, September 13, 2014

Horse mounting stool

My wife has acquired a new horse that is a bit taller than her old one. She asked me if I could make a stool that would make it easier for her to mount the horse. 

The requirements were that the stool should be fairly lightweight and very stable, approximately 1 foot high and the top should be 10 x 20 inches.

I decided for a canted design, with the same angle on the sides and the ends. The slope is 1:5 
The material is larch. the top and the stretchers were milled to 20 mm thickness (3/4"), the corners were initially square, but I made a rabbet to lighten the weight as much as possible.

After cutting the pieces to size it was down to making 16 mortises and 16 tenons. Despite being at a slight angle, it went pretty well. The tenons are 8 mm thick, and about an inch wide. The mortises are (not surprisingly) the same size. 

I drawbored all the joints which added a little extra time to the build.

The top was attached by means of buttons screwed on from the underside. These are seated in a groove that I cut in the top stretchers before assembling the base.

I made a hole in the top to facilitate handling of the stool.

Since the stool will be placed on the riding court most of the time, I didn't bother with a lot of sanding or planing. It will look scruffy in a very short time anyway. 
As an experiment I finished it with a blend of Tung oil and Camelia oil, approximately 2 parts Tung oil to 1 part of Camelia oil.

Since SWMBO wanted to ride her horse this afternoon, I said that she could use it even though the oil had not cured yet. She was able to mount the horse without any problems, so all in all a the project has been a success.

Stable and lightweight.


Fnug testing the taste of the oil finish.

The buttons and the grooves.

SWMBO and the new horse (Bernie)

Tuesday, September 2, 2014

Welsh stick chair build day 3, 4 & 5

Day 3 we pretty much all worked on our legs. Off course there were a lot of other things such as planing, sanding and discussing which way the things should look.
My parents paid us a visit and my father brought along some old tools, so we took some time deciding which ones we couldn't live without. We both ended up with some chisels and various other stuff.

My mother made sure we didn't loose any weight, so we had late morning coffee with rolls followed about an hour later by a large lunch. At 3 o'clock coffee was served including apple cake and cookies and some delicious Panna Cotta that Olavs wife made.
Around 6 we had a large supper with wine etc.
Brian joked about Danes being like Hobbits employing the 2nd breakfast and more small meals spread out over the day.

I managed to put on the legs of my bench in the evening, but that was about it.

Sunday I finally collected enough courage to drill some holes for the loop back. And much to my surprise I managed to get them both pretty even.
After test mounting in the loop back, the whole contraption suddenly looked like a bench instead of looking like a shaped plank with four sticks in it.

I marked the position for the centre spindle for the loop back, and used a divider to step out the position for the remaining spindles from that point. The spindles are placed 4" apart.
The two front spindles are a little further away from the loop back than 4 inches, but it still looks OK.
I used a level to transfer the location of the spindles to the back so I would ave something to aim for when drilling the holes.

After remounting the loop back I drilled some 16 mm (5/8") holes in the seat eye balling the angle in relation to the back. the 2 front most holes in each side had to be drilled without the back to make room for the drilling machine.
I used a cordless drill and a spade bit. I tried to go very slow at the bottom of the hole, because it is difficult to drill from both sides when the hole is at an angle. I managed to get by with just a little bit if tear out.

The back went on again and I flipped the bench over. Aiming through the holes in the seat I now drilled the holes in the loop back. This was done from the underside of the loop. These holes were 12 mm.
Again a few of the holes near the front needed to be drilled with the loop back taken off.

The holes in the back were tapered using Brian's tapered reamer, and the spindles were tapered as well.
All the spindles were made by planing some square 16 mm (5/8") stock octagonal and then further rounded by an plane finishing with some sandpaper.

I inserted the spindles from the underside of the seat and hammered them all the way till they seated in the loop back. I used liquid hide glue for this operation because the hot hide glue stiffened up a bit too quick. The spindles were finally secured with a wedge in each end.
I started fitting the centre spindle and then worked in pairs on each side of it, each time leaving an open spot between the spindles. I have no idea if it is the preferred way, but it worked for me. I figured that it would prevent me from accidentally dislocate one side of the back by accident.
Once all the spindles were mounted I sawed of the protruding part of the all the wedges.

The entire settee was sanded up to grit 180.

I finished the piece by rubbing in Camelia oil wit a black scotch brite pad. Then I wiped all the chair over with a clean rag to remove any excess oil and the eventual slurry made from the scotch brite.

I got some bees wax and orange oil from Brian, so I decided to try out making my own paste wax finish.
I never measured the amount of ingredients I mixed, but I think it is 4 tablespoons of wax,  1.5 tablespoon of orange oil and half a tablespoon of camelia oil. The batch was heated up until the wax melted and then stirred and left to harden up.
The result is a very pleasant smelling wax that has a nice consistence.

Today I waxed the settee and finally buffed it off.

All there is left is to decide where to put it in the house.
Paring the end of a leg, Jensen senior in the background.
  
Brian's Moxon vice. Note the nice flower on the seat. 

Brian drilling holes for the legs. 

The legs are mounted.

Windsor settee with a loop back.

OK result for my first windsor type furniture.

Nice gentle curves.

Ash legs and spindles, elm seat and loop back

Even the weather is nice.