Showing posts with label Shaker hanging cabinet. Show all posts

Wednesday, November 11, 2015

Shaker hanging cabinet, North Sea edition, completion

I started by trimming the back of the cabinet to the desired size, that meant also sawing out a curve on the top, and making a keyhole slot for the future hanging of the cabinet.

The back is attached using only nails. This is to allow for the inevitable wood movement. If I had glued on the back, since it is such a wide piece of wood, it would be like asking for trouble.

The door had managed to contract itself a bit during a couple of days, so I had to saw about 1/4" of the thin end of the battens before pushing them back in. So far they are able to keep the door flat.

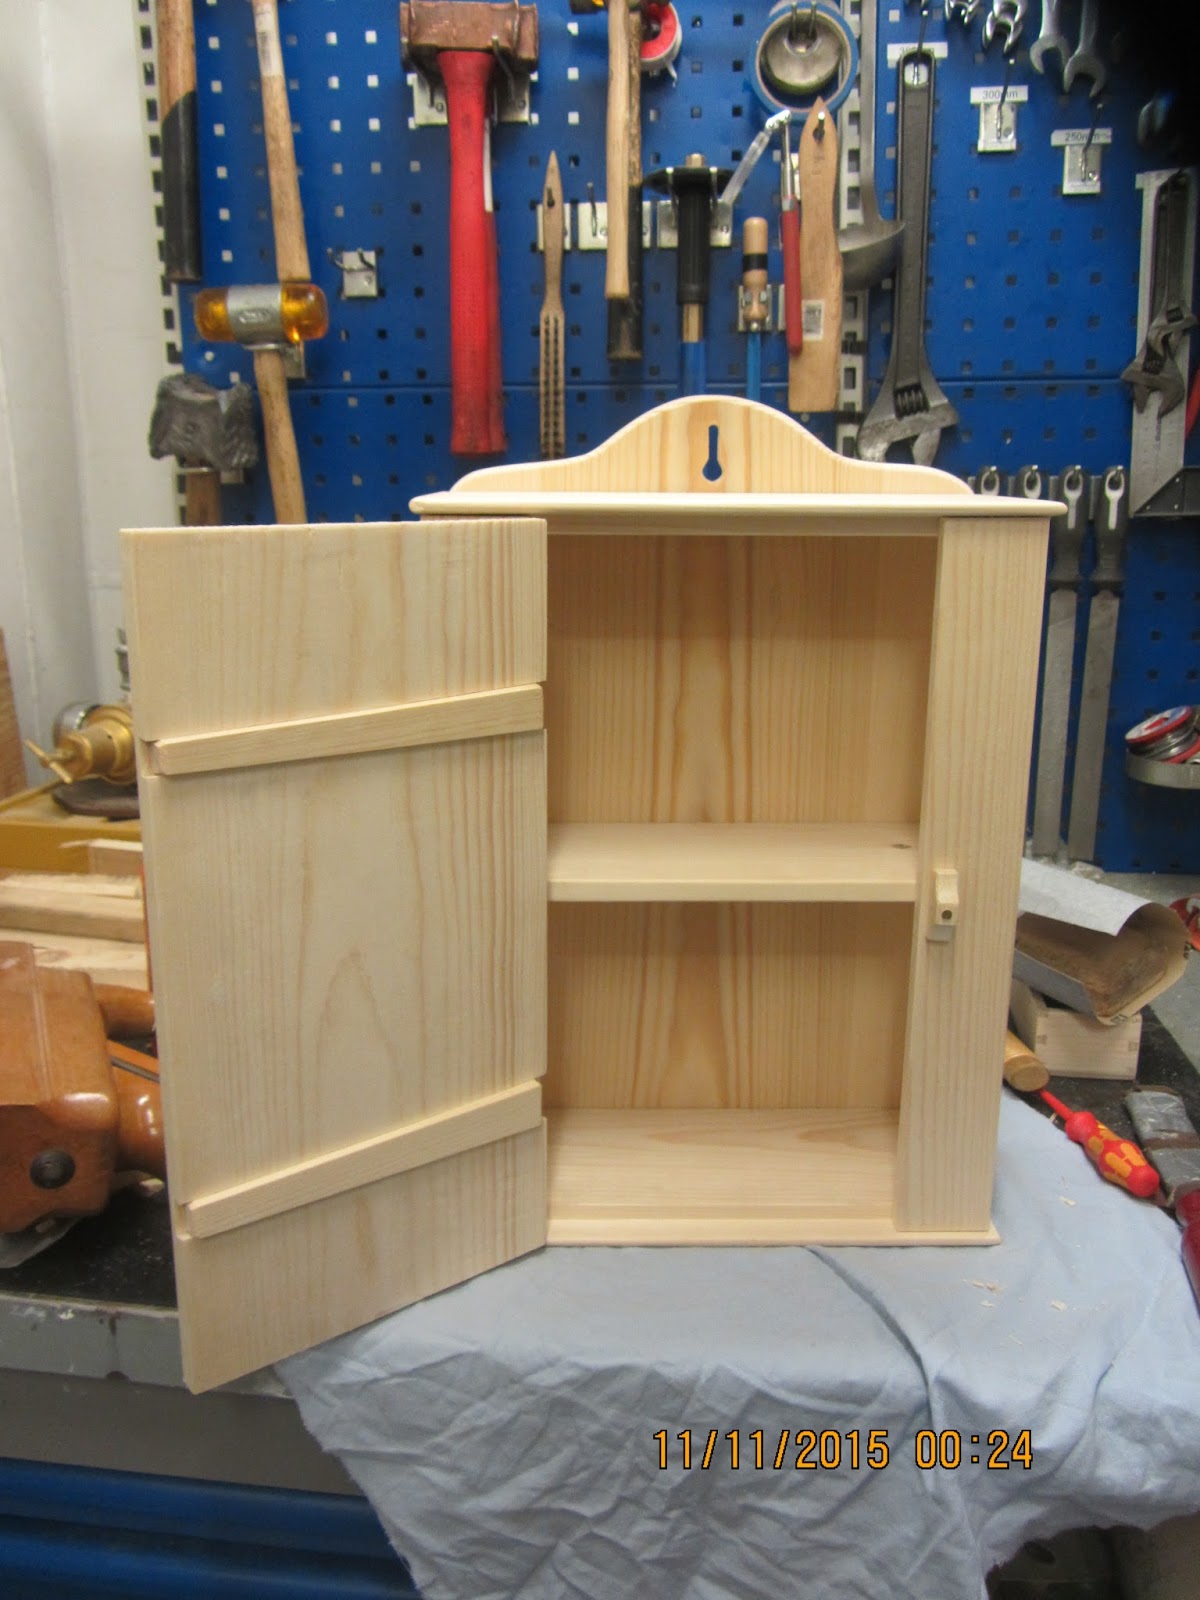
Next up was to make a small locking device. I tried to make it look like the ones I have made before, since I find it a pleasing design. It is just made from a bit of wood I had left over from the stiles.

My last cabinet of this type had a semicircular door knob, because that is what my youngest son thought would look the best. On this one I wanted to try something a bit different.
The inspiration is some drawer pulls that my father has made for my parents cottage in Sweden.
This one is just smaller.
Making it was basically a paring exercise with a chisel.
Before mounting it by simply by gluing it into a hole in the door, I sanded the front of the door, as the knob would have prevented me from going continuously with the grain during sanding.
After the glue had dried a bit, I cut off the protruding part on the inside and sanded the inside again.

I discovered that I didn't bring any screws that were long enough to satisfactorily mount the locking device with. So I drilled a small hole, and mounted it temporarily with one of my longest screws (something like 3/4") When I get home I'll find a nice round headed screw and mount that instead.

After planing a little bit on the side of the door to get an even reveal, I started mounting the hinges.
These were placed their own distance from the top and the bottom, and it went fairly smooth.
When I tested the door after mounting the hinges, there was a bit of binding just before it closed. A bit of investigation revealed that the door was a bit thicker in the middle than at the ends, but a few swipes with the smoothing plane corrected it.

All there is left to do out here is to mark the cabinet with Roman numerals and pack it for a safe trip home.
Once I get home I'll try to decide how to finish it.

Shaker hanging cabinet, North Sea edition. 

Shaker hanging cabinet, pallet wood build.

This batten is now too long.


Tuesday, November 3, 2015

Shaker hanging cabinet, North Sea edition, stiles and door.

Since I want the door to be as wide as possible, I found it to be the smartest move to finish the door first, and then adjust the width of the stiles to fit afterwards.

The door was planed to the same thickness as the stiles, and then I squared it up on the shooting board.

The original version of this little cabinet has battens that are nailed on to keep the door flat. Since I have taken the trouble to make blind dovetails for the case instead of using nails, I figured that i'd might as well attach battens using sliding dovetails.
At home I have a special plane for that purpose, but I didn't bring it with me, so I'll use a slightly different approach.
My idea came after chatting with Brian Eve over at Toolerable. He showed me a picture where he had done it this way, and I wanted to try it out myself. 

First I made a set of battens that tapered slightly in width. I planed the narrow sides of the battens at an angle.
I then used the battens themselves as sort of a template to guide my saw. 
A thing to remember is that it should be possible later on to tighten up on the battens if they become loose. So the taper on the door part needs to be a bit narrower than the battens.
After sawing out the sides for the door part of the sliding dovetails, I removed the waste with a chisel and followed up with my router plane.

I added a small chamfer to the end of the battens, to soften up their appearance before inserting them in the door and tapping them into place. This should also prevent any grain blow out if someone hits them harder with a hammer in the future.

With door at the correct width, I was able to establish the width of my two stiles. These were ripped to the correct width and the sides cleaned up with a plane.
I crosscut them what I believed was the correct length and followed up with the shooting board to make a fine fit. Somehow I managed to make them bot a bit short, but not enough to warrant making a new set.

When that was done I simply glued them into place. A few brads or nails would make it even stronger, but I doubt that strength is much needed with a cabinet of this size.

Marking up for the sliding dovetails.

Guiding the saw.

Testing the fit.

The finished door with battens in place.


Saturday, October 31, 2015

Shaker hanging cabinet, North Sea edition, blind dovetails.

This was my first attempt on making blind dovetails, but I figured that it couldn't be that hard, ad if I messed things up I could always reduce the size of the cabinet a bit and nail it together like the original version.

I know of two types of blind dovetails, one of them leaves a bit of end grain visible, and the other ends in a mitre.
The mitre model is probably more difficult, and it would be better for something like the corner of a fine chest. When I am going to try out that method, I think I would like to do it at home in my own workshop.

The end grain model (for a lack of a better word) on the other hand is perfect for this application since the end grain will be concealed due to the rabbet I made.

After a bit of thinking I decided that the best way to make them would be to start out with the pins. That way I could mark out the tails afterwards.
I chiseled out all the waste so I could stay within my layout lines. If this had been for e.g. a carcase for a campaign chest, overcutting the baseline wouldn't have posed a problem at all, but this will be very visible inside a small cabinet, so I wanted to make it look as nice as possible.

Once I had made all my pin boards, I marked out the tail boards directly from them.
I soon discovered that I had made a small mistake:
My pins were so small at the thin end, that I didn't have a chisel that would fit inside them to clean them up. It wouldn't have been a problem on regular through tails, but in this case it wasn't the smartest move.
My solution was to use a small screwdriver as a chisel, and it went surprisingly well. Probably because the wood is soft and the inside surfaces of the tails will never be seen anyway.

While I had the outer case dry assembled, I marked out the length of the shelf directly from the case.
The shelf was sawn of at the correct length and the ends were cleaned up using the shooting board.

Before glueing up the assembly, I rounded over the protrusions, and sanded the parts.
To protect the pieces I put a piece of cloth on the workbench before I started the glue up.


So far it looks just like half blind dovetails.

These are the blind tails.

My first assembly of a set of blind dovetails.

Shooting board in action.

Dry assembly.

Friday, October 30, 2015

Shaker hanging cabinet, North Sea edition, dadoes and rabbets.

With the sides trimmed to the correct thickness it was a small job ripping them and touching up the edges with the plane.
The narrow strips of wood from the ripping will eventually form the stiles of the front of the cabinet.

The sides themselves, need a dado for the shelf. I am just going to put in one single shelf in the middle of the cabinet, though you could also put in more shelves if you wanted to. I guess that two shelves would be the maximum practical number, to prevent the height between each shelf to become too low.
Technically there is nothing wrong with putting the shelf other places than in the middle, but since I don't know what I'll use the cabinet for, I'll go the conservative and safe route.

Since I don't have a dado plane, I usually make my dadoes by marking them up, and sawing to the desired depth. A fine crosscut saw is ideal for this job.
I normally clamp a piece of wood right next to where I am going to make the cut, to help guide the saw.
Once I have made the cuts, I remove the waste using a chisel and then I clean up the bottom of the dado with a router plane. If you have a real router plane i.e. a plane which is easier to adjust then my homemade router, It is easy to remove all the waste using such a plane. Just remember to gradually increase the depth of your cut. You'll be able to control the router plane better if you don't take a huge cut such as 1/4".

The top and bottom needs some rabbets. The design calls for approximately 1/4" of wood to protrude from the carcass as a decorative element.
Since I am going to try making blind dovetails, my rabbets on the sides will have to be 11/32" wide (9 mm) That way I can have 1/8" of wood left to cover my dovetail and still meet my design criteria of 1/4" protrusion.

The rabbets on the front will need to be 1/4" plus the thickness of the sides themselves (3/8") = 5/8" wide.
For all the rabbets I used my rabbet plane, but if you haven't got one of those, you could also make them the same way that I made my dadoes. But that would probably require a bit extra sanding eventually.

Sawing the sides of a dado.

Cleaning out the waste from a dado with a chisel.

The rabbets on the top and bottom boards.

Wednesday, October 28, 2015

Shaker hanging cabinet, North Sea edition, pallet sides.

Ralph commented on how all the pallets he encountered were made out of fairly narrow boards.
European standard pallets (Euro pallet) are made using something like 1x5" boards for the top and also the lower part.
The things to get hold of are not the pallets themselves, but rather the pallet sides if they are fitted.
These are hinged sides that are made out of some 7.5" wide boards of 3/4" thickness. Mind you that these sides are not intended as furniture wood, so there is sometimes a lot of cupping or twisting in them. It can be a bit hard to see beforehand, as the hinges are really stout and hold the relatively short boards flat.
We often receive spare parts on pallets with sides on them, and since we are not part of the return system, we don't deliver them back or reclaim money for them.
The general idea is that like a Euro pallet, you can trade them in, but it is not worth the trouble given our small throughput of these.

Today I got about an hours work in the workshop trying to dimension tome stock.
The bottom and the top will be almost the full thickness, since I plan on dovetailing the carcase together. There will be a rabbet to allow me to do some half blind dovetailing, or perhaps I will try to make blind dovetailing of some sort.

The sides and the front I planed to around 3/8" thickness. The plan is to rip the full width boards, and that way make one side and one front from the same board.

Both these two boards were fairly flat, so there wasn't much work in getting them to the desired thickness.

The back panel on the other hand has got a pretty significant cupping.
across a width of 15.5" there is almost 3/8" in the middle. I even tried to correct it a bit when I glued up the panel, but it will still take some work to get it flat. The goal for the back is something like 1/4", so I should be able to get it out of the glued up piece despite the far from flat condition.

One thing that is bugging me a bit about the use of pallet sides is that I have never been able to think up at a fine solution for using all those heavy hinges.
I just saw the off and throw them away.
They have stamped reinforcement in them, and they are wide and coarse, not exactly the classic qualities you want for small woodworking projects - but maybe one day I'll be able to think of something and I'll regret throwing out a great number of them along the way.


Pallet with sides mounted, + one loose side on top.

A hinge for a pallet side. 

My cupping back panel.

Monday, October 26, 2015

Shaker hanging cabinet, North Sea edition.

While I am still going to continue with my drawings for the small barn, I really need to build something again, to get myself out of the low productivity period that I seem to be having.

I have spent some time pondering what to build, and though I know that some time ago I made a lot of suggestions on the blog, and also received some from nice people commenting, I have chosen to do something completely different.

As you are probably all aware of, I have had a tendency to build chests out here. One form or another, which is technically OK, but I need to do something else. I can't keep on with the same projects over and over again.

Out here I have so far only built one small cabinet though: The hanging cabinet with many drawers. It was an interesting build, but I eventually finished the drawers at home. I.e. it was a bit of a large project to complete in a limited time. But the cabinet itself was interesting to build.
So suddenly I got inspired to build a North Sea version of a Shaker hanging cabinet.

The initial plan is to be inspired by the small Shaker cabinet from New Lebanon. I'll base the size on the availability of wood (pallet sides again).
I am not planning on doing anything really fancy, just more or less build it like I did together with the boys a couple of years ago: Shaker hanging cabinet.
To not completely forget how to dovetail, I think that I'll attach the bottom and the top using half blind dovetails. I suspect that the Shakers would have approved of that too.

First task as usual is to find some wood and get started.

It turned out that one frame of pallet sides should provide enough material for this cabinet. There is going to be a lot of planing, in order to reduce the thickness to something that will look acceptable.

Today I just sawed the pieces to rough length and glued together a back panel. The top and bottom were smoothed out and that was about that.

My next move is going to be to prepare the sides and the top and bottom so I can dovetail them together. I'll also need to make a shelf and cut a couple of dados for it.

But that will be another day. So far I am content with just having started a project again.

A future cabinet.


Sunday, April 14, 2013

Egg oil tempera

I finished the second Shaker hanging cabinet, and I decided that it could be used for an experiment regarding the finishing. The first cabinet received a coat of Danish oil, but I decided that it would make an interesting change to paint this cabinet instead.

My last try at making an egg oil tempera didn't start out too well:
http://blog.lostartpress.com/2011/11/08/anarchy-in-denmark/

But it was more than a year ago, so I was ready for trying one more time. This time I wanted to play safe, so I enrolled some family members to help, that way I had someone to blame, if anything went wrong.

Asger and Laura volunteered to mix the paint and Laura even volunteered to paint the cabinet.
Last time I added some white to the Bordeaux red, and that caused the unpleasant purple colour. So this year we agreed to only add the red colour and then to see what happened.

The recipe we used is: 1 egg, the equivalent volume of water, half the equivalent volume of boiled linseed oil, half the equivalent volume of turpentine.
According to the book in which I found the recipe, it is the preferred mixture for newly processed wood. There are 2 more recipes for wood that has been painted before.

We added some Bordeaux red colour to the batch, approximately 1 tablespoon. And it looked really good. Actually we added some of the batch to the colour, and made a paste, and then added the paste to the rest of the batch, to make sure there was not going to be any lumps in the paint.

I didn't have any real turpentine, so I used mineral spirit instead. I hope it will be OK, The boiled linseed oil is actually some ordinary oil that I have once tried to boil when I had a wood burning stove in the workshop. It might take a bit longer to dry than real boiled linseed oil.

Apparently it was very fun to paint, because Asger and Laura managed to produce 6 test boards while I finished installing the hinges.

They wanted to do some experimenting which ended up in roughly half the paint spilled onto the workbench I use for metal working. I think it will be pretty easy to remove once it is dry, if it isn't, it doesn't mater much anyway.

The good thing about an egg oil tempera is that it is easy to make, and flows really nice. It does not cover very well, but allows you to see through the paint afterwards. So it is not recommended if you are trying to hide knots or figured grain.

Laura painting

The spillage on the workbench.

The (identical) test boards

Tuesday, April 9, 2013

Shaker hanging cabinet

After a weekend with a lot of motocross and very little woodworking, we were ready to get back into the workshop yesterday. Unfortunately we couldn't reach an agreement as to if it was still necessary to wear a sweater while in the workshop, so then Asger decided to go on strike.

That left me with the chance to get on with the installation of the mulesaw, which has been at a standstill for a couple of months.

Anyway, today we reached an agreement, he agreed to wear a coverall, and that was a fine compromise.

We nailed on the back of the cabinet, and made the clenching of the nails to hold the battens in place. Asger really liked the idea of deliberately bending nails.

We made a small turning lock, and Asger decided that the pull should be a semi circular piece of wood.

Once everything was assembled and the door installed, the cabinet received a coat of Danish oil (which is not called Danish oil here in Denmark).

Once the cabinet was finished, and Asger burned his name on the back with a small burning marker, we headed on to the next project: Making another stall in the stable. (the post for tomorrow)

Asger sawing on the back of the cabinet


The proud craftsman with the finished product

Friday, April 5, 2013

Shaker hanging cabinet from New Lebanon

This little cabinet is one that I have been wanting to build for a long time. I have thought that it would make a good project to do with my children in the workshop. So today we started it. (Popular woodworking magazine feb. 2011 page 48)

The first thing was to prepare some wood. I chose larch since I still have about 1000 board feet in the barn + 30 logs outside that I stil haven't processed. It might not be a classic furniture wood, but it is cheap and plentifull in my workshop.

Gustav (10) helped me with the planer, at first he was at the outfeed table, but he would like to be on the infeed table, since it looked more interesting. So we switched places. Asger (7) was in charge of removing the chips that came out of the planer. Therfore we didn't run the dust collector, but stopped the planer every now and then to clear it.
All the chips were put in a large cardboard box, and taken to the stable, so they could be spread in the boxes for the horses.
By the way, is there a more correct English word than box for the compartment inside the stable, where a horse is kept? In Denmark it is called a boks (the same pronounciation as box).

Finally we were ready to start with the real woodworking as Asger put it.
He boldly stated, that sawing was not real woodworking, but to use a hammer and some nails, a block plane and some sandpaper was the true way to work wood. I tried to tell him that I believed that sawing was a somewhat noble and fairly integral part of woodworking as well, but he was not convinced.

They both sawed out the rabbet and the dados in the sides, and removed the wast with a router plane. Gustav tried to use a chisel as well, since he didn't want to wait idle for the router plane.
Sadly Gustav made a mistake for the dado for the shelf, so it was not the same height on both his sides. We didn't glue it together, so we will fix it by shortening the sides  some other day. He was preparing for riding lessons anyway, so he stopped for the day.

Asger whom I had helped a little more than Gustav, was thrilled when we were nailing the carcase together. He asked if The Schwarz had ever made such a cabinet? I had to show him that it was actually Chris Schwarz himself who had written the article. He immediately responded that he intended to make his cabinet better looking! Talk about having a high self confidence.

I hadn't prepared the wood for the door and the back, since I didn't expect the project to go this far on the first day. So later I glued up some boards to make those wider things. The sad thing is, that I used a perfect 8" board for the first narrow parts, because I thought that I had some more. I didn't! The next width available was only 7".

I would love to do some woodworking in this weekend, but Gustav is active in driving motocross. This absorbs an enormous amount of time and energy. The bike has to be maintained, training always involves a parent (me when I am not at sea), The Moto cross club expect and count on that parents willingly devote entire days for tending the track and participating as officials whenever a race is being held etc.
So yesterday I was summoned to be an official tomorrow (Saturday) from 07:30 to 17:30.
Yesterday and today I have been toiling with repairing the bike so it will be ready for some special training on Sunday held 2 hours drive away from our home..
That is the bulk of the weekend. The positive things about it is that we get to spend some quality time together Gustav and I, and I get a lot of semi fresh air with two stroke smoke and a lot of dust.

I hope that you will all have a nice weekend doing something that you will enjoy.

Asger collecting chips from the planer

Gustav and Asger are making dados

Asger sanding the roundings of the exterior bottom

Asgers cabinet at the end of the day

The fiercest competitor of idle hands