Monday, April 29, 2013

Display case for a model steam engine

I decided that it had to be possible to change the glass without destroying the frame, so the strips for the frame ended up being a bit more complex than if it would be assembled with the glass in place. I have some glass of 2 mm thickness and some of 3 mm. if the steam engine had been larger, I could have used the thicker glass, but I am afraid that it will look clumsy, so I have decided that the frame should be made for the 2 mm glass.
The idea is to keep the glass in place by means of a small angle shaped strip of wood that can be tacked into place by means of some small tacks or screws.
I doubt that I will ever need to change the glass, but it will give me great satisfaction to know that the possibility is there even for my successors if the glass should ever break.

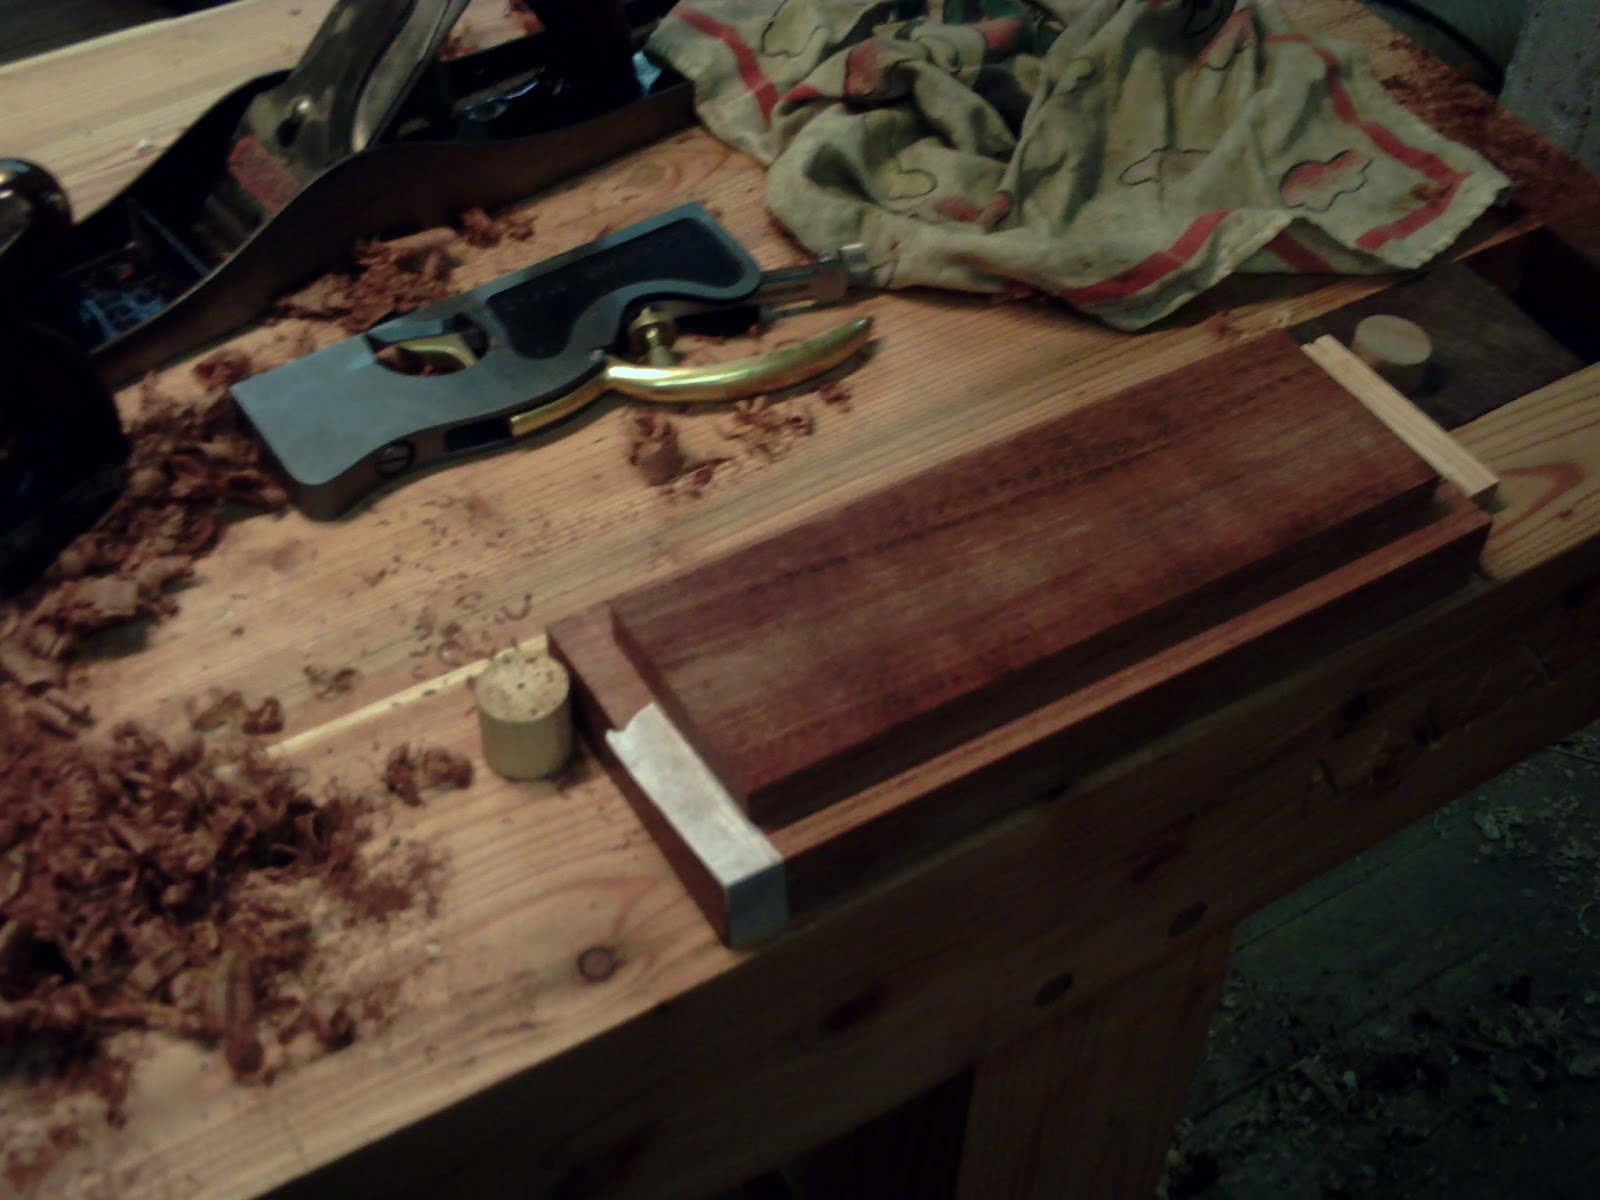
The frame for the glass is built up using a home made profile that looks kind of like a W.
At first I tried to make a concealed mitered dovetail - that didn't work out. Then I tried to make it like a concealed tenon joint. That didn't work either. So finally I sawed the pieces in 45 degrees, and glued it up using the most unreliable end grain to end grain constellation.
The things were held in place by masking tape which is not blue on this side of the Atlantic, but more like a light yellow or cream colour. Anyway it works the same way.

After several hours of drying time (6 hours) I glued up the posts of the frame. These hold the upper and lower part together and they add some normal long grain to the intersection. So my hope is, that it will help to keep it all together. After all, it is not the most stressed piece of furniture so I expect it to hold just fine.

Yesterday was my 40th birthday, and I got some really nice presents. I had ordered some of them myself, to help my wife, but it was still a pleasant thing to open them. A Veritas skewed rabbet plane, some wood wax from Dictum due to the excellent review from Brian: http://toolerable.blogspot.dk/2013/02/using-polissoir-and-meeting-snakeye.html
and a book: Das Zimmermannsbuch, a reprint of a carpenters book from 1895 (in German).
My father had bought a nice old Japanese plane and a 1200 grit water stone.

After the guests had left, I decided to try out the Japanese plane which was sharpened and ready to go. After a little fiddling, I produced some nice shavings. I wondered if it was possible to make them thinner, so I fiddled some more.. And suddenly I made the most fantastic ultra thin shavings. And the smell from the larch was incredible. So actually a really nice way of ending a birthday.

One of the frames showing the W shaped profile.

The post being inserted from the left to give an idea of the assembly method.

The complete glued up frame

The blade of the new (old) plane

The first shavings

Better looking shavings

Sunday, April 28, 2013

What the Romans did for us

Well, the Romans did a lot of different things that still has some influence on the society of today. Aqueducts, roads, the Latin language, and not the least: The Roman numbering system.

Whenever I finish a project, I like to mark it, to remember myself of when I made this particular piece of work.
For some reason I have become a fan of the Roman figures. Possibly because I have seen them being used on some old timber framing, and because they are fairly easy to make using a chisel and a mallet. At least for the next 77 years, after which you are going to need a hollow chisel to continue with this numbering system.
In my opinion it looks equally well in a small size on e.g. a chest, or large and bold on some timber framing.

It is difficult to describe the feeling when a build is finished. If it was in a movie there would be some nice music and perhaps a special light setting. In the workshop there is usually silence. But you feel it is a special moment.
After a long period of dreaming of your project, pulling yourself together to actually start the project, carrying on with the project and finally finishing it. You and the project deserves some type of formal ceremony. In my shop this is the moment when I find the mallet and the chisel of the appropriate size. I pause and then I mark the piece. When the figures (letters actually) have been added the project is really finished.

The idea of the Roman system is that you add the single figures. If a smaller figure is in front of a larger one, you subtract it from the larger one, and add the remaining figure to the others.

M = 1000
D = 500
C = 100
L = 50
X = 10
V = 5
I = 1

2013 = MMXIII = 1000 + 1000 + 10 + 1 + 1 +1

2014 = MMXIV = 1000 + 1000 + 10 + (5 - 1)

So until the year 2090 = MMXC, you are able to write the year using only a normal chisel and a mallet or a hammer.

Timber framing in the stable, 2011
The inside of a tool chest (2012)

The front of the workbench (2013)


Thursday, April 25, 2013

Milling wood

Gustav have finished the holders for the obstacles for the horses to jump over. And I promised him that we could make some new booms as well.
The old booms were some 1x2" strips that I had, but they were soft and flexed when mounted on the holders.
I decided that the new booms will be 3x3", and the plan is to make an attachment that will allow me to make them octagonal using the sawmill.

The following is a description of how I mill wood, to use for my various projects.

The sawmill is powered by my old Volvo BM 400 tractor (diesel), the PTO shaft is connected to an angle gearbox from an old grass cutter (for making grass for silage).

The sawmill itself is a BMR 900, and old Danish sawmill with a circular blade of 900 mm diameter (36"). The sawmill can handle wood of up to 8.5 m (roughly 28 feet), and a it has a maximum riving capacity of approximately 12". So the wood can be of a diameter of up to about 16", since normally you don't split it right down the middle anyway.

The log is hoisted onto the sawmill by means of a
manually operated chain block and a home made
crane beam.                                                            

The log is positioned on the moving table and is
secured by means of some small wooden wedges.

The first cut is made near the edge of the log.
Note that the fence is retracted all the way.   

This is how the log looks like after the first cut.
The log is then rotated 1/4 of a turn, so the flat 
side is facing down. Then another cut similar to
this one is made, so the log has got two flat sides
meeting in a 90 degree angle.                               
 

Now the fence is set to the desired thickness of the
finished board which is 3" in this case. The log is   
positioned so it is resting on a flat side, and the other
flat side is against the fence.                                       
 

Now the narrow board is 3" thick, and
it will be parked on the table beside the
saw while another one like it is being    
made                                                      

Now the board which is 3" thick is    
placed flat on the saw mill. The fence
is once again set to 3" to make the boom.
 

If the off cuts are a little wide, I will usually rip them
in order to make them more suited as firewood (then 
they need no splitting). In addition to this it produces 
some more sawdust which is used in the stalls for the 
horses. If the size of the off cuts permit it, I normally 
try to make a board e.g. 1x4" out of it.                         
 
If it is hardwood (elm), which I would like to use for
making furniture, then there is a small pause in the    
process (2-3 years) to allow the wood to dry.              


Wednesday, April 24, 2013

Putting children to work.

As the strict father that I am (according to my children), I require them to participate with some chores for 2 hours every day during the teachers lockout.
This has included adding white wash to the walls of the stable, helping with fire wood, washing the cars etc.
Normally I make a working list at breakfast, and they can choose from some different jobs.
Painting, moving firewood by use of the ATV or raking the riding court are all popular jobs. White washing is not popular, neither is sweeping the barn.

Gustav and Laura Emilie are painting a barn door.

Asger moves firewood using the ATV.

Fnug has helped by checking if the paint is still wet.

Tuesday, April 23, 2013

Display case continued, and making stuff for the hide glue

I finished the recess to the base plate for the model steam engine.  Then I tried to mark the location of the screws on the bottom of the base plate onto the wooden foundation, so I could drill some holes in the correct locations.
I also marked the outline for the well for the flywheel.

The holes were drilled 2 mm oversize, so it theoretically was able to take up any inaccuracies in my marking. The holes for the well were drilled to the exact width of the corresponding square hole in the base plate i.e. 18 mm wide.

I brought the foundation to my small drill press, and decided to use some of the Forstner drills I purchased for another project some time ago. I have a feeling that I bought those drills too cheap, because they aren't very good. But they have been adequate for my use so far.

Some way I managed to malposition 5 out of the 6 holes which is quite a lot below my normal standard. The problem was that I didn't measure, but used the actual base plate to lay out the locations. This was not possible to do super accurate, and I made myself believe that it would be OK, but it wasn't. It doesn't matter a whole lot, since I could make the holes fit by chiselling out where the screws touched the wood. And nobody will see it unless I take pictures of it or they take out the steam engine from its display case. Which is unlikely to happen.

Gustav wanted to make some holders for obstacles for the riding course, he likes to jump on the pony, and I think it is a good idea to keep the hide glue fit.
The holders are made out of some 2x4" larch with some small pieces nailed on to hold the boom (I don't know if it is the correct word).
I helped him by sawing out the pieces so he could concentrate on measuring and marking the wood. He then drilled pilot holes and nailed on the small holders. He learned about leverage, since he had to use a bolt cutter to bite a bit of the nails so they wouldn't protrude on the back of the post. At first he tried to bite the nails holding halfway on the handles, but that was hard. Using the full length of the handles helped.
The foundation with the holes drilled (the upper right one had the correct position)

Concentration.

The engine base plate fits nicely in the recess.

Sunday, April 21, 2013

Display case for a model steam engine

I have started routing out the top of the foundation, to make a recess for the base plate of the steam engine.
I am using my old fashioned router plane for the job. It is so wide that it can ride on the sides of the foundation.  The plan is to drill out the majority of the waste for the depression in which the flywheel is hidden. Then the depression will be cleaned up using a chisel and holes will be drilled for the various screws that hold the column, cylinder and bearing supports to the base plate.

I still need to determine the best way of making the frame for the glass, so it will look good.  I might even go the safe way and make a test using some left over scraps of larch. I thought about gluing the frame together, but then it will be impossible to change the glass if it ever breaks. So the current idea is to make some sort of system where a small strip will hold the glass in place.

I am expecting to get some Dictum wax for my birthday present, so the goal is to use it for finishing the display case. The reason why I am expecting to receive something this specific is because I ordered it myself, but I haven't yet opened the package.
The package could also contain a book: Das Zimmermannsbuch (a reprint of a 1895 carpenters book) and most likely also a Veritas skewed rabbet plane.  So it is exciting to see if SWMBO will give it to me for the birthday, or if it is for Christmas.

Tomorrow during the daytime, the most energy will probably be directed towards cutting up an elm that was downed 4 days ago due to some very hard winds. It was already dead because of the Dutch elm disease, but I think I might be able to use the lower part of the trunk to make some nice boards.
The rest of the tree will be split into firewood and stacked in the shed for drying.


Ask not what your country can do for you, but what you can do for your country

Today we participated in the major clean up day on our island. I explained to the boys that an American president once said: Ask not what your country can do for you, but what you can do for your country. And this also applied to things such as voluntary community service which you can actually participate in even if you are only a child.

The weather was really nice, so we had a lot of talking as we picked up plastic, empty cans, paper, cardboard and bottles etc. from the side of the road.
It very quickly turned into some competition about who could find the most and both the boys really enjoyed it.
We talked about the dangers of broken glass for dogs and other animals, and how long some materials would stay in the nature before being degraded.

I once saw a TV interview with a woman from a development country, and she had seen a small film from an industrialized nations dump site. She said that if they only had such high quality garbage in her country, she could better make a living out of sorting the garbage compared to what could make of it at that time. It made an impression of me, that what we see as waste is considered a resource to others.

But I suppose that I feel the same way regarding pallet wood and scrap metal.

Anyway, it feels good to have done a good deed for the environment and the nature. And in addition to it having had some real quality time with the children.

Thursday, April 18, 2013

Large scale working and small scale working

The enemy of woodworking (the moto cross bike) decided to strike a fierce blow yesterday. On the track at a training session, the water pump called it quits, left its shaft and severed the shaft seal allowing the cooling water to enter the gearbox. This in turn allowed the piston to overheat and seize the piston rings..
So last night didn't offer any possibilities for woodworking.

But today I have ordered spare parts, and therefore even Gustav acknowledges the fact that we have to wait until they arrive before we can repair the bike. This has given me a chance to get on with the woodworking which I enjoy quite a bit more.

A couple of days ago, I sawed my first board on the mulesaw. I would love to be able to say that it was a success, but it wasn't.
The foundation is not sturdy enough, and the 6x6" stiffeners that I have attached didn't help enough. So I have decided to move on to plan C (Plan B was the stiffeners). Plan C is to fill up the inside of the brick foundation with concrete.
So on the large scale woodworking side, I have been making the foundation ready for this concrete adventure. It will roughly require 0.8 cubic metre to fill it up. Hopefully I can get it done tomorrow.

On the small scale woodworking side, I started a display case for a model steam engine I finished on the previous contract on the ship.
The idea is to make a nice hardwood base, and then I'll see how I manage to make the strips for the glass.
It should help to get the steam engine out of its current domicile (a red plastic cookie box) and take up some space inside the house instead of in the workshop.

The foundation of the crank and pulleys of the mulesaw

Planing the foundation for the steam engine

The rabbets have been made, and a small chip has been reglued
 

The model steam engine


Monday, April 15, 2013

Teachers lockout in Denmark

The teachers in the public schools in Denmark have been lockouted for 2 weeks now as part of the struggle to reach an agreement of the wages and working conditions for the next four years. I haven't got any idea if they are making any progress, but the children are still out of school, so I have to teach them some skills at home and make sure that they don't feel the time is wasted. Today we made driving lessons.

In the autumn we received two or three truckloads of empty sea shells (blue mussels) from a nearby sea food factory. We use these to spread out on the riding court, to make it stable and firm. The riding court is behind the house, and it is not possible for a truck to drive there. The most efficient way to spread out the sea shells given the equipment we allready have is to hook up a trailer after a car, fill up the trailer and ease the car and the trailer past the house and onto the riding court.
Once on the court, the contents are shovelled off and the shells are subsequently crushed as you repeatedly drive over them.

Today we managed to spread out the last 7 or 8 cubicmeter.

And Gustav (10) learned how to drive (a stick shift car). He can use the clutch, engage a gear and start + stop the engine and the car. It is funny how fast a child can learn if it is really interested in the subject.
It helped a little, that the car could be put in low 4WD, so the the engine wasn't prone to stalling, but I was proud of him, and he was proud himself too.
So I stood in the trailer and shovelled out all the shells, and he drove the car. Real father - son teamwork.
Ready to rock'n roll

Shaken not stirred
 
Checking the chrushing action of the tyres

Sunday, April 14, 2013

Egg oil tempera

I finished the second Shaker hanging cabinet, and I decided that it could be used for an experiment regarding the finishing. The first cabinet received a coat of Danish oil, but I decided that it would make an interesting change to paint this cabinet instead.

My last try at making an egg oil tempera didn't start out too well:
http://blog.lostartpress.com/2011/11/08/anarchy-in-denmark/

But it was more than a year ago, so I was ready for trying one more time. This time I wanted to play safe, so I enrolled some family members to help, that way I had someone to blame, if anything went wrong.

Asger and Laura volunteered to mix the paint and Laura even volunteered to paint the cabinet.
Last time I added some white to the Bordeaux red, and that caused the unpleasant purple colour. So this year we agreed to only add the red colour and then to see what happened.

The recipe we used is: 1 egg, the equivalent volume of water, half the equivalent volume of boiled linseed oil, half the equivalent volume of turpentine.
According to the book in which I found the recipe, it is the preferred mixture for newly processed wood. There are 2 more recipes for wood that has been painted before.

We added some Bordeaux red colour to the batch, approximately 1 tablespoon. And it looked really good. Actually we added some of the batch to the colour, and made a paste, and then added the paste to the rest of the batch, to make sure there was not going to be any lumps in the paint.

I didn't have any real turpentine, so I used mineral spirit instead. I hope it will be OK, The boiled linseed oil is actually some ordinary oil that I have once tried to boil when I had a wood burning stove in the workshop. It might take a bit longer to dry than real boiled linseed oil.

Apparently it was very fun to paint, because Asger and Laura managed to produce 6 test boards while I finished installing the hinges.

They wanted to do some experimenting which ended up in roughly half the paint spilled onto the workbench I use for metal working. I think it will be pretty easy to remove once it is dry, if it isn't, it doesn't mater much anyway.

The good thing about an egg oil tempera is that it is easy to make, and flows really nice. It does not cover very well, but allows you to see through the paint afterwards. So it is not recommended if you are trying to hide knots or figured grain.

Laura painting

The spillage on the workbench.

The (identical) test boards

Thursday, April 11, 2013

Everyday inspiration

Yesterday the boys and I went to the workshop without a definite goal.
I decided that I would finish the second Shaker hanging cabinet, so the wood wouldn't be wasted.

Asger has started a collection of sawdust, so he wanted to make his own sawdust to put in a small box. He really enjoyed sawing small pieces of some pine. We had put a page from a newspaper below the board, so all the sawdust could be retrieved.

Gustav had been reading our favourite toy catalogue: The "Mini Grene catalogue" 174 pages packed with agricultural toys. http://viewer.zmags.com/publication/49af2863#/49af2863/1

He had read it thoroughly and found that you could buy a silage space. But he reasoned that it would be fun and realistic to build one by himself.

I told him to find a tractor and a wagon and make a sketch to assess if the size was appropriate before we would start cutting some wood for the project. After a little time this was accomplished, and we could start the actual build.

Gustav making a silage space


The finished silage space
 
Asger practising sawing
 

Wednesday, April 10, 2013

A new stall in the stable

In order to cater for the future source of hide glue, I have started on the last of the planned 4 stalls in the stable.
The Danish regulations concerning the layout of stalls and stables for horses requires that the area of the stall is at least the square of the double height of the horse, the shortest side has to be at least 1.7 times the height of the horse. Our stalls are all the same size: 3.5m x 3.5 m, so it is legal accommodation for a horse of up to 1.75 m.
In addition to the area requirements, there are an enormous number of other regulations regarding the height of the interior of the stable, how much volume of air per horse, how much natural light to come from windows and so on.. But since we rebuilt the stable two years ago, it complies with those regulations.

The stalls are made by inserting boards between the posts that form the outer edges of the stall.

Some 2x4" larch were sawn to length (125 cm), and then they were ripped on the tablesaw.
All the children including one playmate were "forced" to participate for 1 hour.

We didn't get to do much actual building, but we cleaned the area and started on making the holders for the boards.

Some of the boards only need to be 85 cm long, so I can use some of the twisted and ugly larch that is unsuitable for anything else. For this stall I plan to use boards of 5/4" thickness. The rest of the stalls have got normal 1" thick boards.

Previously it was common to make the upper board for a stable out of elm, since horses and pigs don't like to bite in it, presumably it doesn't taste very good. The existing stalls have boards made out of either larch or Sitka spruce. They have been painted with something called "bite stop", so it hasn't been a problem with the horses destroying the wood.

Please note that I do like horses and do enjoy riding myself once in a while.

Gustav (10) crosscutting a 2x4
 

Some fairly twisted larch
 
The boards inserted between two holders.
 
The future source of hide glue


Tuesday, April 9, 2013

Shaker hanging cabinet

After a weekend with a lot of motocross and very little woodworking, we were ready to get back into the workshop yesterday. Unfortunately we couldn't reach an agreement as to if it was still necessary to wear a sweater while in the workshop, so then Asger decided to go on strike.

That left me with the chance to get on with the installation of the mulesaw, which has been at a standstill for a couple of months.

Anyway, today we reached an agreement, he agreed to wear a coverall, and that was a fine compromise.

We nailed on the back of the cabinet, and made the clenching of the nails to hold the battens in place. Asger really liked the idea of deliberately bending nails.

We made a small turning lock, and Asger decided that the pull should be a semi circular piece of wood.

Once everything was assembled and the door installed, the cabinet received a coat of Danish oil (which is not called Danish oil here in Denmark).

Once the cabinet was finished, and Asger burned his name on the back with a small burning marker, we headed on to the next project: Making another stall in the stable. (the post for tomorrow)

Asger sawing on the back of the cabinet


The proud craftsman with the finished product

Friday, April 5, 2013

Shaker hanging cabinet from New Lebanon

This little cabinet is one that I have been wanting to build for a long time. I have thought that it would make a good project to do with my children in the workshop. So today we started it. (Popular woodworking magazine feb. 2011 page 48)

The first thing was to prepare some wood. I chose larch since I still have about 1000 board feet in the barn + 30 logs outside that I stil haven't processed. It might not be a classic furniture wood, but it is cheap and plentifull in my workshop.

Gustav (10) helped me with the planer, at first he was at the outfeed table, but he would like to be on the infeed table, since it looked more interesting. So we switched places. Asger (7) was in charge of removing the chips that came out of the planer. Therfore we didn't run the dust collector, but stopped the planer every now and then to clear it.
All the chips were put in a large cardboard box, and taken to the stable, so they could be spread in the boxes for the horses.
By the way, is there a more correct English word than box for the compartment inside the stable, where a horse is kept? In Denmark it is called a boks (the same pronounciation as box).

Finally we were ready to start with the real woodworking as Asger put it.
He boldly stated, that sawing was not real woodworking, but to use a hammer and some nails, a block plane and some sandpaper was the true way to work wood. I tried to tell him that I believed that sawing was a somewhat noble and fairly integral part of woodworking as well, but he was not convinced.

They both sawed out the rabbet and the dados in the sides, and removed the wast with a router plane. Gustav tried to use a chisel as well, since he didn't want to wait idle for the router plane.
Sadly Gustav made a mistake for the dado for the shelf, so it was not the same height on both his sides. We didn't glue it together, so we will fix it by shortening the sides  some other day. He was preparing for riding lessons anyway, so he stopped for the day.

Asger whom I had helped a little more than Gustav, was thrilled when we were nailing the carcase together. He asked if The Schwarz had ever made such a cabinet? I had to show him that it was actually Chris Schwarz himself who had written the article. He immediately responded that he intended to make his cabinet better looking! Talk about having a high self confidence.

I hadn't prepared the wood for the door and the back, since I didn't expect the project to go this far on the first day. So later I glued up some boards to make those wider things. The sad thing is, that I used a perfect 8" board for the first narrow parts, because I thought that I had some more. I didn't! The next width available was only 7".

I would love to do some woodworking in this weekend, but Gustav is active in driving motocross. This absorbs an enormous amount of time and energy. The bike has to be maintained, training always involves a parent (me when I am not at sea), The Moto cross club expect and count on that parents willingly devote entire days for tending the track and participating as officials whenever a race is being held etc.
So yesterday I was summoned to be an official tomorrow (Saturday) from 07:30 to 17:30.
Yesterday and today I have been toiling with repairing the bike so it will be ready for some special training on Sunday held 2 hours drive away from our home..
That is the bulk of the weekend. The positive things about it is that we get to spend some quality time together Gustav and I, and I get a lot of semi fresh air with two stroke smoke and a lot of dust.

I hope that you will all have a nice weekend doing something that you will enjoy.

Asger collecting chips from the planer

Gustav and Asger are making dados

Asger sanding the roundings of the exterior bottom

Asgers cabinet at the end of the day

The fiercest competitor of idle hands


Thursday, April 4, 2013

Very coarse woodworking

After a long flight, and a good nights sleep, few things beat working outside on a nice clear day in the early spring.

I had to cut off a few branches from a large ash, since they are touching the roof when the leaves return to the trees and therefore weighs them down a bit.

Those branches were about 7 m up, so I had to use a ladder. I try not to use a chainsaw while I am on top of a ladder, and these branches could be tackled with hand powered tools.

I enrolled my children in the logging team, and they were responsible for holdig the rope that would prevent the branch from falling down. We had wrapped it three times around a large tree, so they had a small lection in the forces of friction as well.


Ahh, working outside is nice when the sky is blue.
Sawing with a small foldable japanese pullsaw.

One branch to go.