I have now had some time to reflect on the builidng of my timber frame for the small barn by our summer house.
Technically the timber frame isn't completed yet, as I haven't installed any rafters yet, but the majority of the framing work is done.
The first lesson I have learned is that timber framing is fun. I really like making large joints and getting them to fit together. It is a lot like making a piece of furniture, except for the dimensions. And the wood that I used is not surfaced on four sides, but used straight from the mill. There is some heavy lifting involved, but given that I never go to a gym, it is probably beneficial for me to do some sort of exercise - and timber framing appeals more to me than lifting weights.
It might come as a surprise to some of you, but this project is the first one where I have used a marking knife. I am sure that is one of the things that has helped the assembly go smooth. I am so impressed with the results, that I am considering making a marking knife that I can use on some of my normal projects like dovetailing etc.
The drawings for the barn were really interesting to make, and I like that I have no one to blame if there had been any issues with wrong calculations. But everything went together as it should, and all the various parts were either level or plumb as they should be. Even when I reached the top of the frame.
Raising the frame was easier than I had feared. I had spent a lot of time wondering how I could raise the bents and if they would fall over etc. The biggest challenge was actually to assemble the lower frame or the sills.
I had made those joints a bit on the tight side, but with the help of some securing straps I managed to pull them together.
To make sure that the sills would be level, I assembled them to a frame, and then I leveled out that frame by placing it on top of some pieces of scrap wood in the corners. Then once the assembly was level and in position, I mounted the brackets and poured the concrete.
The first bent was the most difficult one to raise, since I didn't have any high spot where I could attach the chain block. So to overcome that problem I started by lifting the top using a hi-lift car jack. I lifted the top as far as I could and then placed a set of saw horses underneath it. Then I lifted to the maximum capacity again and used the chain block on the lower frame and it went smoothly.
The subsequent bents were raised using the neighboring bent to hang the chain block in.
To keep the lower part of the posts from sliding around I attached a piece of a 6x6 timber approx. 12" long with a clamp on the sill. Once a bent was raised I screwed on some boards to help stabilise it and keep it plumb.
All the dowels I used were made out of larch. Traditionally dowels are made out of oak and other hard wood, but my dowels are just added to keep the tenons in the mortises, so the strength of the frame is not that dependent on what species they are made of.
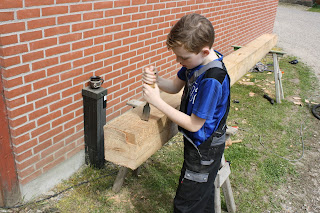
I sawed out the stock for the dowels trying to follow the grain lines as well as I could, and then they were hammered through a 3/4" hole in a steel plate to make them round. This was something the children liked to help with. Instant results seem to appeal a lot to children.
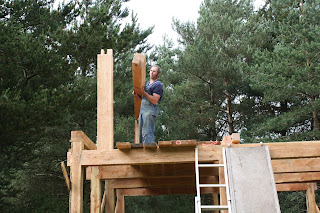
The single thing that I had given the most thought was how I should lift up the beams for the upper plates and for the ridge beam. Once I finally got to that point in the process, it dawned upon me that I could raise them on an end, and then lift them up a bit. I then lifted and pushed the timbers until they reached their pivot point. Then it was just a matter of a few more inches and then I let go of them. That put them on the first floor in very short time. With a little more than half their length supported by the joists. My choice of dimensions for the timbers allowed me to do all the lifting myself. So if you plan on making a frame using 12x12 x 18' It might not work.
It is a strange feeling to see a frame grow that has only existed on paper and in your head and in the form of some loose pieces of timber with joints here and there. It shouldn't feel much more different than seeing a table or a chair coming together, but for me it did.
Maybe it was the size, or maybe it was the pioneer feeling, that this could have been a home for me and my family. I actually think the pioneer feeling is the most true description.
Sunday, June 26, 2016
Monday, June 20, 2016
A small barn for the summer house 4, Making joints and raising the frame.
I guess that if I had been on one of those other Internet things such as Instagram, and if I ha had a slightly more modern phone, I could have shared the progress a bit more fluently than this.
My problem is that when I get immersed in a project, I work on it as much as I can, and that means that I rarely turn on a computer, and even more rarely take my time to blog about what I have accomplished.
Yesterday I took the children with me to the summerhouse, to have them help with part of the raising.
Mette had instructed Gustav to take some pictures, so if you find the pictures better composed than normal on this blog, that is probably why.
As a warning to wives of readers from Pennsylvania, I haven't even taken the time to visit the hairdresser this home period, so I look like the "before" shot from some makeover article.
I had constructed the sub frame and poured some concrete to form a foundation. While the concrete hardened, I started on making the joints for the next part of the frame: the 4 bents.
Olav visited me in the beginning of the process, and he gave me some advice, that I gladly took. That resulted in that I made the joints a bit narrower, 1.5" instead of 2" and all the mortises were not made as through mortises, but as 4" deep ones instead.
Olav was so kind as to lend me a portable chain mortising machine. That thing is amazing. And it sure speeds up the process.
Asger helped chopping Roman numerals for identifying the joints.
The raising of the bents was done over a couple of days, because I had to do other things as well, such as sawing more timber and making more joints for the next frame parts.
That status of the build is that the frame is erected all the way to the ridge pole/beam. I still need to make some rafters and mount those. But since I'm going back to sea on Wednesday, that'll have to wait for the next time I am home.
All the raising was done by hand with the help of a chain block to raise the individual bents. The timbers for the first floor were lifted up by hand. I raised the timber on end, and lifted/pushed it up till it reached the pivot point. Then I let it drop on the joists for the first floor.

Asger, Gustav, Fnug and Jonas

Roman numerals

Asger helping with a tenon.

The tenon after breaking off the small pieces.

The slick (Stossaxt) has been used a lot in this project.

Wrestling a piece of 6x8 timber.


Close up of a joint.

Negotiating the joint in place.
Subscribe to:
Posts (Atom)