Tuesday, June 11, 2019

Statsraad Lehmkuhl details 3, the Boston Teapot Trophy

The Boston Teapot Trophy is a trophy that is awarded to the sail ship that covers the greatest distance over the course of 124 hours.
Why they have chosen that time frame I have no idea of, but as it happens, Statsraad Lehmkuhl has won the trophy 8 times.

Our ship is the current holder of the trophy, and due to that, the actual trophy is sitting on a shelf in the CEO's office.

The trophy itself is a copy of a teapot which was made by Paul Revere (yes, that Paul Revere!). Whenever we hold a meeting in the CEO's room, I find myself drawn to the box that holds the trophy.

Today after the meeting, I quickly snapped a few pictures of the box. I tried a little bit to remove the teapot, but I couldn't see a proper way of doing it, so I stopped before breaking something. While writing this, I got to think of that I think the correct way is to lift out the upper part (the teapot itself), and then remove the base.
I tried to pull a bit at the middle shelf surrounding the teapot.

Technically the trophy isn't part of the ship, but this is my blog, so I decide that it is OK anyway.
According to a link I found, the Trophy was established in 1964

You will be able to find some pictures of the teapot itself in the first link, but here are a couple of other pictures of some details of the box.

I can't see how the box itself is constructed, I mean if it is with secondary wood and veneered shell -or solid wood with blind dovetails. But the overall size of the box is something like 16" x 16" and 8" deep and inside it is lined with some dark blue velvet.
Neither of the screws are clocked which I find a bit strange, after all I am certain that the box was made by someone professional.
The original silver plate on the right hand door has nice engravings, whereas the new silver plate inside the lid has got some not so nice machine type engravings. This is to be expected,as engraving is not something that any goldsmith can do anymore as far as I have understood.
The bracket holding the top of the teapot in place is clearly made with a Forstner bit. I think that is the one detail that look the most out of place to me. Using a Forstner bit is OK to remove the material, but it wouldn't have taken much to take a spade bit of a similar size and ground it to a round shape. Then carefully rounded the bottom of the hole.

Now all this may sound as I am ungrateful for the Trophy which is not the case. Instead I would say that I find it intriguing that after having built stuff myself - I am able to see that not everything that was made 50-60 years ago was better than what could be built today.
Maybe the cabinetmaker tasked with the job had to work on a tight budget because the teapot itself had cost more than anticipated, so a bit had to be saved on the box. Or maybe it was someone who had never heard of clocking screws? We will probably never know.


Silver plate on top of the box.

The closed box.

Hinge stay, new silver plate visible inside the lid.

Description of the inspiration for the trophy. 

Teapot lid holding bracket closed.

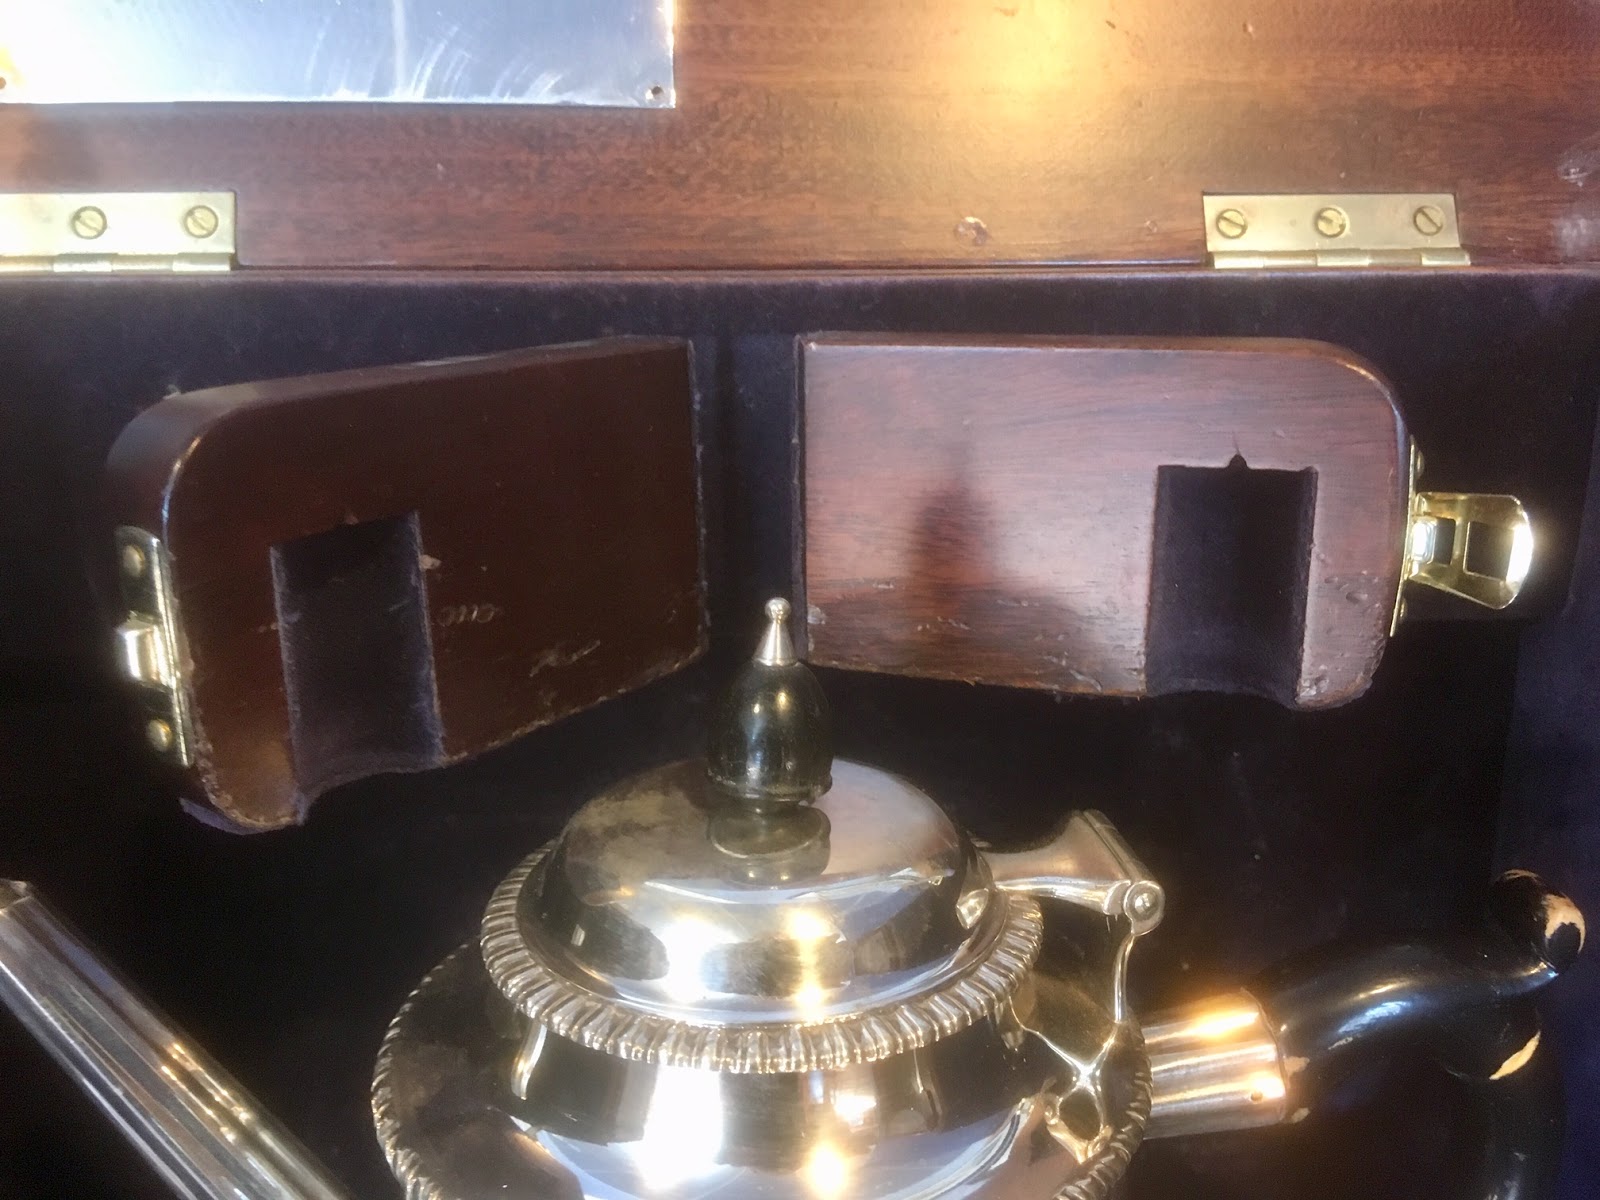
Let's just use a Forstner drill, no one will ever notice..

Sunday, June 2, 2019

A small barn for the summer house 17, laying tiles on the roof.

Though it might not seem that way, I do occasionally still work on the small barn at our summer house.
I have completed the interior cladding of the walls, and also completed painting the outside.

Last year I wanted to install the tiles on the roof, but I never took the time to do so, instead I built some nice hydroplanes with the boys, and I think that was a great idea.
The month of April this year was fantastic regarding the weather. So I jumped at it and started cleaning mortar of the old tiles from the house. I have been saving all those tiles since 2013, when we installed a new roof at home.

The tiles are as old as our house which means that they were made in 1924. They are of a much better quality than most of the tiles available today since they are burned harder than today's tiles.
A drawback is that they do not comply with any of the available fixation systems. Back then they were secured from the inside of the attic using some heavy gauge iron wire similar to what was used for fencing the fields.
That would still work if I had an accessible attic. But since I have decided to make a sub roof with tarred paper, the tiles are not accessible from the back.

Instead I resorted to drilling a small hole in the top of each tile, and then I fixed them with a screw directly to the lath. That will ensure that they don't blow off in the event of heavy winds.

Laying the tiles was more arduous than really difficult, and I finally found out what the correct spacing should be, so I know that when I start on the second side of the roof.

When I go to the summer house, I usually do so in the morning after tending the horses. Mette and Asger (the only child at home at the moment) have both left for work and school at that time, so after letting the horses out, I put the leash on Bertha and lifts her into the passenger front seat of the green Volvo Valp.
We then drive down to the small shop in the village and I get out and buy a package of sausages or some pork, a loaf of bread and maybe some milk.
As soon as we get to the summer house, I put the groceries in the refrigerator, and then lifts out Bertha and we go for our regular morning walk. It is maybe one and a half mile, so it isn't that long, but there's plenty of deer tracks for Bertha to examine and there's also a canal which she will swim in regardless of the temperature.

Back at the summer house I'll start working and around noon I'll light a fire in an old type grill. I then roast sausages or pork and Bertha and I helps each other eating it while I sip a cold beer.

Around 3 I'll pack up and head home so there's someone to greet Mette and Asger when the workday/school day is over.

It might not sound like a big deal, but to me those days are reinvigorating. The only problems Bertha and I face in the summer house are that the local squirrel population are decidedly unsportsmanlike. They will occasionally appear and then clear off into the treetops - Now that is hard for a Newfoundland dog to understand and accept.

Putting tiles on the roof.

This is the sort of thing that will lower my blood pressure.


Bertha is patiently waiting for the food to get ready.


Thursday, May 30, 2019

Ash log Roubo project 5, the completed bench.

The two leg vises each had a parallel guide installed. I made a mortise and tenon joint with lightly tapered run out, so the guide was thoroughly fixed be means of a couple of wedges.
I made two lines of holes, so I can adjust the parallel guide with 1" increments.

A groove was routed in the underside of the top, and a sliding deadman was made and installed. A bunch of holes were drilled in that one too. 

My old bench was never fitted with a shelf, I have often thought that it is one of the few things that could make a good bench better, so for this one I wanted to install one. 
The shelf itself was made out of small ash boards of varying width. I simply milled whatever pieces I could find from the large log, and to avoid live edges, they were all trimmed. 
The shelf lies loose on top of a batten that is screwed to the stretchers. I positioned the shelf so that the ends and the rear was flush with the top of the stretchers. That way it will be easy to sweep debris of the shelf, or push/pull a heavy object in and out of the shelf.
The front stretcher carries the sliding deadman, so that one ends in a triangular shape that raises above the shelf.

The ends of the slab were sawed square and they and the top were planed using a couple of hand planes.

I purchased a really nice Record quick release vise from Brian Eve, and I plan on installing it at some point. But I'll wait a bit because the wood is still moving a lot as a result of it not being completely dry.

I think that I need to run the tap through the threaded holes in the legs too when the bench dries, just in case the wood movement distorts the legs and thereby shrinks the holes.

The bench hasn't received any sort of finishing, but I might give it a coat of linseed oil to protect the surface a bit.

I told Gustav, that I would like him to have the bench, since he will train to become a carpenter. So we have installed it in the shop so he can start using it.


Completed Roubo work bench.

Twin leg vises and sliding deadman.

Rear of the bench (now on a clean floor)

Shelf is flush with the top of the rear stretcher.

The patched up top of the slab.

Spindle with apple hub and ebony pegs for the dowel.

Complete with Roman numerals.

This end will feature a Record quick release vise at some point.

Sunday, May 26, 2019

Statsraad Lehmkuhl details 2, braces blocks

This is one of the details that somehow looks incredibly attractive in my eyes.
We have four of those "stations" on the ship. Each consists of 3 blocks of varying sizes, all mounted pivot-able on a common axle.

Each block is for a brace. A brace out here is a line/rope that will pull a yard and thereby altering the angle of a sail in relation to the ships hull. That way you can adjust the sails to perform if you alter the course.

These particular braces blocks are located on the port side on the main deck, and are connected to the three lower sails on the fore mast.

The lower sail is named the "Fore sail", and its brace is "fore brace".
The sail just above is the "Fore lower topsail", and its brace is " fore lower topsail brace"
The third sail from the deck is the "Fore upper topsail", and its brace is "fore upper topsail brace" (what a surprise!)

The block for the fore sail brace is the biggest one, it measures 12" in height, 15.5" in length and it is 4.75" thick.
All three blocks are made out of mahogany.


Port fwd braces blocks station.


After sunset 


The author of this blog 
(we had a pirate cruise for kids today)


Saturday, May 25, 2019

Ash log Roubo project 4, leg vise spindles and chops.

During my final trip on the Troms Capella, I used the ships lathe to turn a tap for making wooden threads.
It makes a 2" thread with a pitch of 4.5 modules. Modules is actually just a fancy word for Pi mm, so the thread is 14 mm or pretty close to 9/16"

It seems as though I only took one picture while making the tap, and now it is at home, so I can't really take anymore pictures of it at the moment.

The tap worked really well, despite ash not being the easiest wood to turn a thread in.
After making the internal threads in the legs, I watched an episode of Roy Underhill, where he makes a die for wooden threads.
I basically copied all he did, and though I couldn't do it as fast as him, eventually I ended up with a die that could produce a thread.
The first spindle looked utterly magnificent, with the slight but important part - it didn't fit..
I had to do quite a bit of adjusting to get the die working in a way that produced a spindle that would work. But finally I had two spindles (made out of whitebeam).

I turned a couple of ends for the spindles out of some apple, and glued them on. Then a hole was drilled through, and a couple of sticks were turned and inserted.
Those sticks were retained using small ebony pegs, so technically I can't keep on claiming that the entire bench is made from the same tree.

The chops were made out of the ash log, and I made those a bit tapered to make them look nice.
A square recess was chopped in each of them to receive a garter for the spindle.

Completed spindle.

Close up of cutting action of the die.

Turning a spindle blank on the metal lathe.

Fabricating a 2"/4.5 module tap.

Two pieces of ash for the vise chops.
 
Recess for the garter.


Thursday, May 23, 2019

Statsraad Lehmkuhl details 1, mast centering blocks

As you might have seen from Don Williams' blog post where he visited the ship, there are an incredible amount of details on this ship.
I will try to see if I can make it a habit to blog about one detail of the ship on a regular basis.

Those details are not necessarily the most important ones in respect of keeping the ship afloat, but they are details that have intrigued and impressed me.

All our masts are the original ones from 1914, they are made out of steel plates that have been rolled to shape and then riveted together, They taper all along the length, and I am still horrified thinking of that in order for those mast to be riveted, it means that someone had to hold a bucking iron on the inside of the mast. Clearly those were the days prior to any interference from occupational hazard inspectors!
Using ear protection was not custom at that time, so I am afraid that the building of this ship and others have caused deafness to a lot of ship yard workers who had to endure the noise from riveting and other operations.

The main mast (the middle one) goes through 3 decks. The main deck, the tween deck and the provisions deck before it is finally seated in the ballast deck.

The mast can be dismounted from the ship, and we do this occasionally for inspection purposes.  I haven't participated in this yet, but I hope that I will be on board next time we have to do it.

Where the mast passes through a deck, it does so in an opening that is a bit larger than the mast, something like 6" larger in diameter.
Today's detail are the small blocks of wood that are later on pressed down to fill out that void, and thereby centering the mast in the hole. The blocks are made out of oak and fits neatly around the mast. The uppermost blocks (where the mast passes through the main deck) are covered with sailcloth/canvas that is painted to make the penetration watertight.

The bottom of the main mast of Statsraad Lehmkuhl
Seated firmly in the ballast deck.

Mast centering blocks seen from below (penetrating the provision deck)

The same blocks seen from above (penetrating the provision deck)

Mast and centering blocks and the provision deck.

The blocks in the tween deck penetration seen from below. 


The covered blocks on the main deck (it is raining)
Notice the figure sewn canvas covering.

Wednesday, May 22, 2019

Ash log Roubo project 3, the undercarriage

With the legs all done and the short and long stretchers ready, I was ready to begin the assembly of the undercarriage of the workbench.

All the joints were drawbored, and I made a bunch of dowels for the project. I can't quite remember what size, but I think they were sort of 3/8" in diameter.

I used my homemade drawbore pins to test the fit of each of the joints, and they worked really well. Having made four of those enabled me to test both ends of a stretcher/leg assembly at the same time.

The long front stretcher was made with a triangular shape at the top, to accommodate a sliding deadman. I even remembered to make a slot in the front legs for the parallel guide for the leg vises before assembling all the parts!

I placed the top upside down on a couple of battens so I wouldn't mar the top in case there was a small stone or any other debris on the workshop floor.
The tenons and the mortises were lubricated with an old candle, as I didn't want things to seize up half way. The undercarriage was brought up to the mortises, and I double checked that the front of the bench top was also aligned with the front of the undercarriage before I began to negotiate the legs into place with the help of a hammer and a block of wood.

Slowly but surely the legs seated themselves in the mortises, and once the sound changed upon hitting a leg, I knew that they were in position.

The assembled undercarriage.

Checking that all parts line up.

Checking both sides.

Half way through.

About an inch to go. 


Tuesday, May 21, 2019

Environmentally friendly or just a green car?

There is going to be an election in Denmark, and like most other places on the earth, politicians are competing with lies and grand plans of what they will do if they are elected.
One of the buzz-words of politicians is environment and all derivatives of this word.

I normally don't pay much attention to what they're saying, since it sort of gets old after a while, but people will often try to chat about all the good stuff they do if you are at a social gathering, and in those cases it is nice to have collected a few thoughts about what I do.

Some time ago I read that a study showed that the most environmentally friendly thing regarding cars was to drive an older car.
The new cars might use less fuel, but a lot of energy goes into producing the car, and a lot of raw materials as well. The funny thing is that I had actually used that reasoning earlier on but without the back up of an international study.

So this suddenly elevated me into being green and environmentally friendly.

Most of the time while at home I drive one of the Volvo Valps, and since they are both vintage cars, they are only required to go through MOT every 8 years.
This year I need to get the black one though MOT, so I started by assessing the state of the bodywork.

Not surprisingly, there is a bit of rust. Those of you who live in Arizona or California might never have heard about it, but rust it what happens to old cars to all of us that lives in a climate where the authorities sprinkle salt on the roads during the winter months.

The black Valp is a 1963 model, and was first abused in the Swedish Army by various hamfisted conscripts. Then by civilian rednecks and now finally by me.
After replacing a lot of rusted parts of the fenders, and a few other pieces of the body, I repaired a part of the frame and had the MOT inspection.

I don't really enjoy repairing rust on old cars, but it is still a satisfying thing to repair something and ensure that it can run for many more years.
In a couple of years, the green Volvo Valp will have to go through the MOT as well. That one still needs some welding, but both sides are OK, so basically it is only the front and the rear that still needs some work. I have earlier dedicated a couple of days in a home period for working on it, that way I don't feel like I am spending all my time welding and doing bodywork.

I saw on the news one day, that repair cafes were starting to gain popularity in Denmark, so perhaps there is a chance that it will again be normal to repair stuff instead of just mindlessly throwing it out and buying something new.
They can call that "environmentally friendly" or whatever they please, I just think it is perfectly normal to take care of the stuff that you have. (But I am as you know pretty old fashioned)

As you can see on the picture, the green Volvo Valp is still a hit with Gustav and his friends.
And I like to have a car that can handle having teenagers sitting on the roof without having to worry about scratches in the paint etc.


Ready to be driven to a party!

Monday, May 20, 2019

Ash log Roubo project 2, legs and mortises

It is with a slight embarrassment that I discovered that I forgot to blog further about the build of the Ash log Roubo bench, so I'll try to spread the rest of the pictures and information over a few blog posts to make up for that.

I had read in the Roubo book, that the legs should be rectangular, which puzzled me a bit, since they are square on all the drawings. But I decided to follow the written instructions. So I made the legs 4x6".
I made a little shoulder on the inside of the legs, and then sawed out for the large double tenon with the angled front.

I used the chain mortiser to make the mortises in the top. I had to make a new attachment to get it to work that way, but a bit of plywood and a few small strips of wood was all that was required.
The machine took care of the bulk of the work, and there was just a little bit of cleaning up in the corners of the front mortises that had the corners defined by a saw cut.

Once I had made all the mortises in the top, I remounted the chain mortiser in its stand and made the mortises in the legs for the stretchers.

Making the tenons on the stretchers was easy, basically a bit of sawing and chopping.
Prior to making the tenons though, I had drilled a hole in the two legs destined to become the front legs of the workbench. And I had threaded those holes with my homemade tap.
My plan was to make sure that the bench could be used for boat building (just in case), so I wanted to make two leg vises on the front.

I had decided to use as much ash from the same tree as possible, so the legs and stretchers were all from the same trunk as the top itself. It was far from bone dry, and in the end one of the stretchers had twisted a bit - but not enough to stop me.


Making a double tenon on a leg. Notice the shoulder.

Marked up and ready for sawing.

Portable chain mortiser attachment.

Drawbored stretchers.

Sunday, May 19, 2019

A fid for a friend

I am back on the ship, and this time our sailing schedule is to do evening cruises in and out of Bergen, so I have the rare pleasure of a functioning Internet connection that comes with being alongside in our home port.

Some might think that evening cruises are a bit dull, but just like all woodworking can't be ebony inlay, once in a while you need to build the casework that will house the inlay.

These cruises with paying guests are part of our bread and butter, and in addition to providing the ship's foundation with some needed cash to run the ship and keep her well maintained, these cruises actually give the residents of Bergen a sense of ownership of the Statsraad Lehmkuhl.
So it is part of our strategy to be active visible and accessible in our home port for two months of the summer every year. That way people feel proud of the ship and recognizes it and feels that it is "their ship."

The incredible support that we have from the local community can not be overestimated, so it is only fair that we do our part in giving back to the community by doing these small evening cruises.
And just like in woodwork, it is difficult to say that one operation is more important than the other.

Since there are comparatively few tall ships on a world wide basis, often young people who wants to work in this field have a difficult time finding a ship to do it on, we usually have 6-8 volunteers sailing with us, who have completed their basic training on a training ship.
One of these volunteers told me last time I was on board that his birthday was tomorrow, (we discussed it because it was close to the date where I was signing on again).
Now these volunteers get room and board and that is it, but they do an incredible job on board, so I thought that I would make him a small birthday gift.

So a week ago I took the time to head into the shop and I turned a fid for him. It is made out of some dark exotic wood that I once purchased, and I think it might be mahogany, though I am not sure.
Turning a fid was pretty straight forward, and in the end I tried to polish it with some Carnauba wax. I have never tried this before and I was so impressed with the look of the surface that I ended up making yet another fid for him. This time a bit smaller.
He doesn't read this blog, so it will be safe for me to post a picture of the large fid here. I forgot to take pictures of the smaller one.

The large fid has a length of almost 12", and the thickness at the fat end is something like 1.5"
I can't remember the size of the smaller one, and it is already gift wrapped.


Saturday, April 27, 2019

Protect the whales

Before leaving to sea last time, I cast two more drafting whales, so I had a full dozen. Once I had done that I painted all of them. First a coat of primer and then followed up by a classic tractor colour: Massey Ferguson light grey.
That made the whales look nice and grey, but I was aiming higher!
I found a bit of white and painted eyes on all of them, and finally a little black made the pupils. I made a couple of whales that were "concentrating" on the task, and I also made a couple of whales who were rolling their eyes.

Since I wasn't going to use the drafting whales a lot, (and because I like making boxes), I decided on making a dedicated storage box so the whales could be protected between the jobs.

I dovetailed a little chest, and glued in a couple of strips to hold up the bottom.
The bottom was fitted with pie shaped compartments, to keep the whales apart to protect them from rubbing against each other.
A loose upper part was made the same way, but not glued in, now the chest could hold all 12 drafting whales.

A set of handles were mortised into the ends of the chest.

I also found a piece of larch wide enough to form the lid, but that was as far as I got that time, so I still need to make a lid and mount it.
Originally my plan was to paint the chest in some sort of marine inspired theme, but so far I would be happy if I just got the project completed.

There are as usual a lot of different projects requiring my attention, and this box is not very high up on the list. Instead stuff like getting the old Volvo Valp through MOT and installing tiles on the roof of the barn near the summer house are top priority. In addition to this there are a couple of confirmations (one of them is Asgers), and two limousine "jobs" with the Volvo Valp for my nephew and for Laura's prom dance.
But at least the whales are all done now :-)


Drafting whales in action.

This little fellow just about had enough.

Holding a batten in place  

Drafting whale storage box.

Wednesday, April 24, 2019

Top 50 woodworking blogs!

As you might have guessed I have returned home, and have taken the time to fire up a computer once again.

I'd like to thank Brian Eve for doing a guest post in my absence, and it sadly looks like the days of Atlantic woodworking blogging are over for now. Our Internet connection on board the ship is really limited, and it also has to be shared with a large crew, so it wouldn't be fair to slow everything down in order to blog.
However.. This time it was special since a lot of the time was spent crossing the Atlantic from Norfolk VA to Bergen in Norway. Normally we'll be in port a bit more frequently, and I can probably blog from there. I just need to get my act together and get down to it.

While I was out travelling in the old fashioned way, I got an email from a gentleman called Anuj.
He runs something called feedspot, and he informed me that my blog had been elected as one of the top 50 woodworking blogs on his site.
I just checked, and actually my blog is No 44.  There are some woodworking blogs on the list that I know, and some that are new to me.

I hope that being on that list will generator some sort of traffic, from people that otherwise wouldn't have visited my blog. And if those people then further click on one of the blogs that I list - maybe one day someone will find a topic that will be of interest, and that person might build something.

Once again I would like to thank people that either run a blog aggregator like Norse Woodsmith, Unplugged ShopTop 75 woodworking blogs or keep a list of blogs on the side bar of their own blog.
The more places it is possible to find a blog the better the chances of someone finding just what they never knew the wanted to try out building.


Sunday, March 31, 2019

Guest Blog by Toolerable - Update on Jonas' Whereabouts

I think Jonas is up in the main skysail.
You just can't see him because 
the sail is in the way.
Yes, this blog has been hijacked by me. Brian Eve, aka Toolerable because Jonas has been away far too long, I'm sure you are all worried sick about him.

Fear not. The Statsraad Lehmkuhl has the latest in internet technology considering what you would expect in a vessel of this vintage.

In other words, his connection is so slow, he can hardly websurf, let alone post. Jonas has been able to send me a few emails, however.

In preparation for this guest post, I have been learning some Danish:

Hun har heste. Ænder drikker vand. Vi læser aviser. Elefanter og skildpadder er vegetarer. Elefanter spiser ikke svinekød, og drikker ikke vin. Jeg drikker øllene. Kvinder spiser ikke kartofler.

Danish is a very serious language, and should be used sparingly.

Jonas joined the ship this time in Norfolk, Virginia. He was there long enough to host Don Williams for an evening, which sounded like great fun.

Shortly after Don's visit, there was some kind of fancy cocktail party that he wrote to me about:
We had a cocktail party on Board, and there were several admirals, one 4 star and a 3 star plus a bunch of regular ones. Some generals and the likes too. I talked to a Danish Brigadeer general, and sone of the very high ranking US admirals.
The admiral was actually a bit of an accident. Because I was talking and joking about horses with a Portugese colonel who was the chief commanding officer of the Portugese Cavalry officers School. And suddenly this senior admiral was trying to get past us and the Portugese almost jumped to attention and excused so much that we didn't get out of the way immediately. 

So I felt that I had to explain that it was my fault since I had started talking about horses, but the admiral was OK with it all. 

But damnit there was a lot of brass!
About a week ago I got this update:
We have passed the Newfoundland banks, and are now well underway towards Norway. Yesterday we saw icebergs, but luckily we didn't crash into any of them.
That's always good to know. Sadly the ships bingo tournament was postponed for a day due to the weather.

Yesterday I got this update:
Things are going well out here.

We are constantly heeling 20ish degrees to one side except for the occasional dip to 30 degrees. The speed is around 12 knots, and we hope to reach Norway in 3 days.
I suppose this means everything on board is as normal as could be on such a ship.

Woodworking related, he has told me that on his plans for things to make are finishing up a box he is working on to hold his home-made collection of drafting whales. Also, last time he was home he milled a giant beech log and got several huge slabs for table tops, and also a single, six inch thick slab for another Roubo bench. We all look forward to seeing pictures of these.

Jonas, do us all a favor and ask your son to take some pictures.  :)

I'm not exactly sure when Jonas will return from this rotation on his ship, but I'm looking forward to reading on this blog about how his new job is going.

Sunday, January 6, 2019

One man's trash is another man's treasure.

For some inexplicable reason we have a bit of teak on board this vessel.
The former captain who was on the ship when it was delivered from the yard in India thinks that it came on board at the yard.

So far it has escaped being thrown out as garbage due to its sheer size that makes it a bit awkward to move around.

I would like to bring it to Denmark and mill it on the sawmill, but my luggage allowances aren't that high.

So in a rare moment of sensible brain activity from my side, I offered it to my new ship, since I figured that they would have more use for it than an industrial garbage facility.

I haven't measured the actual length of the pieces, but a quick guesstimate is that there are two short pieces of 3' each, and the one long piece is 6'. All the pieces are solid 12x12", so technically it is something like 144 bf of teak.

Someone out here for some strange reason decided to crosscut about one foot of the length of one of the pieces. I have no idea why (and no for once it wasn't me who did it).

Is this trash?

Or is it a treasure?