Showing posts with label Cabinet. Show all posts

Thursday, December 18, 2025

Cabinet for equestrian events ribbons

 A friend of Gustav asked if we could make a dedicated cabinet for ribbons that are won/awarded at equestrian events. If you participate in a lot of events, you eventually end up with a bunch of those. She wanted it around 55" x 35" and preferably in light oak if possible.

I normally don't have any oak in stock for building furniture of, but I once got a great tip from Ty Stange: Buy old oak furniture and reuse the materials. 
In the late 70'ies and beginning of the 80'ies, there were some Danish furniture factories that made some good honest oak furniture, but the design is really not something that strikes a chord today. I found a cabinet with stained glass doors at a thrift shop, and paid 27 US$ for it. That was solid oak, furniture grade, and enough to build the entire cabinet from.

After some stock processing, to reduce the thickness, I dovetailed the corners of the main frame. A face frame was made using half lap joints in order to make it a fast build. 
I glued on some strips to help making a rabbet for the back to be glued onto, and that worked pretty good. Due to the original size of the back, I had to glue some reinforcement strips to cover where the back was joined.

The doors were also made using half laps in the corners, and after the glue had dried, I routed a rabbet for the glass to fit into.

The glass was something that I had leftover from the greenhouse, and I could reuse the hinges and pulls from the original cabinet.

A couple of strips with holes in where glued to the sides. I weaved some 1/8" braided line through all the holes, to give something for the ribbons to be attached to.

Finally two magnetic closing mechanisms were mounted, and the cabinet was complete.

I didn't go all wild with sanding, since it will be placed in a stable, but all in all i am happy with the result. 

Ribbon cabinet

Dovetails and piano hinges.


Wednesday, July 23, 2025

Drydock pallet frame cabinet part 2

Browsing through my phone, I suddenly realized that I had forgotten to make a blog post about the pallet frame cabinet completion last year.

We ended up having a bit of a tight deadline for the completion, since it was a wedding gift for Klaras friend. Furthermore I had to remain calm and pedagogical while trying to explain that: If you want the cabinet to be completed in time - well then you need to work on it. 

For some reason it was very hard to understand that you couldn't both go to the movies or go to a sauna all evening and at the same time work on the cabinet.  And that realization was really hard to fathom.

But after I had explained very clearly that the clock was ticking, and that I had spent hours helping, which was why I sort of expected some effort being put into completing the project, Klara saw what I meant and worked at it. 
Klara originally intended to paint the cabinet, but lack of time made this impossible. I told her that the recipient would no matter what be thrilled to receive a homemade cabinet, and that painting was one of the things that she could easily do at home without my tuition.
She also needed to decide on a closing mechanism (magnetic or latch type)

Lessons learnt:
For young people it is very hard to miss out on anything social in favour of a project that they have started themselves. So I should probably have advocated for a much less complicated project from the start. But I had been completely honest with the amount of time that it would take to build something like that, and also described how it could be achieved by a steady effort each day for maybe a couple of hours. But somehow the coupling between doing other stuff for 6 days and suddenly be short of time was not clear.

The actual build was helped a lot by the fact that we had a table saw at our disposal and also a thickness planer. 

Mouldings really help giving a finished look, as does a raised panel door.

It itched in my fingers to do part of the project myself, to speed up the process, but I managed to not do it, I wanted it to be her build, and I would only make sample joints so she could see how they should be carried out.


Klara planing a moulding.

The cabinet with the face frame on.

The completed cabinet with mouldings and a raised panel door.


Wednesday, September 11, 2024

Drydock pallet frame cabinet part 1

 We have a volunteer engineer apprentice on board. She is doing her initial training and is doing a great job. We talked a bit about making stuff one day where she was knitting a sweater. I told her a bit about what I had made earlier of woodworking, and she told me that one of her oldest friends were going to get married - and that she would like to make something for her as a wedding gift.

After discussing the various possibilities and showing her examples from my blog she set her mind on something like the small hanging cabinet with drawers which I made 9 years ago.

As per usual, we started off finding a decent pallet frame so we had some wood to make the cabinet out of. Since we are in drydock at the moment, and due to the nature of our ship, we have a lot of the carpenters machines ready set up in a warehouse on the yard. So stock preparation was much easier than it used to be. We have a small Makita planer that could trim the boards to the desired thickness in very little time. The table saw is out of service at the moment due to someone sawing into a hidden screw and activating the Sawstop. So for the ripping of boards we had to use the band saw.

Klara is new to woodworking, so I decided that a rabbeted construction would be the best bet, also given that we need to complete the cabinet before the wedding.
For some reason we don't have a router plane, so for the dado for the shelf, I had to make a small router plane out of a block of wood and a sharpened screw. That worked OK.
There is a Lie Nielsen rabbet block plane on board that we used for the rabbets. I like my Veritas skewed rabbet plane better, or the old combination plane that I have in my ocean going tool set. I didn't bring this set with me, so we had to rely on what we could find on board.

The case was assembled using some headless brads and glue. We had glued up a back panel which was reduced in thickness to 1 cm (3/8"). The back panel was attached in a rabbet with a dab of glue in the center and some more headless brads. The idea is that the back can then move a bit with the seasons without splitting.

I demanded that the face frame was built traditionally with mortise and tenons and rails and stiles. No mitered corners and quick solutions. Klara really liked the look of the face frame on one of my other old cabinets, where there is a small moulding on the inner part of the frame. In order to make something like that, we found an old moulding plane that someone has once donated to the ship, and it was still sharp enough to work. 

So far we have made one corner of the face frame, but today we are going to see of we can complete it and glue it onto the case.

Klara planing wood for the face frame.

The case with the back panel mounted

Klara using the moulding plane.


Monday, July 1, 2024

Chimney Cupboard

 Back in January 2023 I built a chimney cupboard again. Like last time (2017) I used the plans from Bob Rozaieski, as they were published in Popular Woodworking. I built the cabinet with the intention of having it on display to show potential customers what we could make for their tack rooms. 

The cabinet I built previously has been a great source of storage space in our own tack room, and I still like the look of it a lot. It is such a classic shape in my opinion.

All of our other products are made out of high grade pine, but since I didn't have a customer, I didn't want to spend more money than needed to get some really nice wood, so I made this one out of spruce boards. Admittedly I regretted it as soon as I had to stain it. Pine stains nice and evenly. Spruce doesn't..

I can't remember how long time it took me to build it, but it is a reasonably fast build. It might have been around 14 hours or so, I forgot to write it down at that point. Since it was intended to be for sale I wanted to make it as fast as I could, and while the cabinet can easily be made purely by hand tools, some operations like making dadoes for the shelves are fast if done using a router. Also the raised panels for the doors I usually make on the table saw. 
Another thing I normally do is to install the raised panels in a rabbet instead of in a groove. that way I can assemble the door frames first, then make a rabbet all along the inner edges and install the panels using some small strips of wood and some brads. 

I didn't sell the cabinet, so after at bit of time I decided that I might as well start putting it to good use. So I filled it with a lot of the remedies that I use for repairing stable rugs. 

The cabinet would probably look better if it was painted compared to stained and varnished, but it is easy to wipe over with a damp cloth when it is varnished, and if it was installed in a tack room that would be appreciated. 
I can't praise the cabinet highly enough regarding storage space based on footprint. There is just so much useful space inside the cabinet, and the simple yet elegant lines still makes it a favourite of mine. 

It is without a doubt one of the most rewarding builds that I can think of. It is easy to accommodate in a small space like a flat or a small shop, and it easy and fun to make. Most people that sees it like it instantly, just like a hanging Shaker cabinet appeals to most people. 


Flattening the back a bit

A No 8 that I bought from Brian Eve

Marking out for the face frame

Face frame mounted.

The divider is simply glued to the front of the shelf.

Ready for finishing

Plenty of storage space in here.

Roman numerals and our branded logo

Stained and varnished.

I didn't finish the inside.

Spruce doesn't stain very well..


Monday, July 13, 2020

Chimney cupboard for a friend

One of my old friends has started a guesthouse at his place where people sleep in old circus wagons.

The wagons are actual old circus wagons that have been stripped and rebuilt. Kind of like a tiny house.

I visited him while he was working on a wagon and one of his challenges was that he didn't want the inside to simply look like a caravan or an Ikea catalogue. 
Some stuff he does get from Ikea such as beds etc. but he would like to add something that was purposely built for that place. 
So we agreed that I should make a chimney cupboard for the bedroom of the wagon.

I couldn't make it quite as tall as normally, since the rounded ceiling started a little less than 6' up from the floor. 
It also had to fit in a corner, so I had to keep that in mind when making the top and the base.

The tractor driving the saw mill suffered from a damaged priming pump form about 7 months ago, and though I have bought the spare parts, I haven't taken the time to actually fix it yet. So instead of using some home milled larch, I bought some wood at the lumber yard. It is nice to be reminded once in a while how expensive that is, just so I am able to appreciate my own home milled lumber a bit more. 
The boards for the case itself were of a worse quality than I had expected, I had tried to be picky when choosing the wood, but it was filled with knots and I was a bit disappointed about it. 
For the back panel I had chosen some T&G roofing boards. And they on the other hand were of an amazing quality! Not a single knot in any of the boards, and clear straight grain. It was roughly the same price, so I guess I should have used that for the rest of the case as well, But I know that for next time.

I am leaning on the plans from Bob Rozaiesky from Popular Woodworking, and though it can be made as a full hand tool build, I use some machines like a thickness planer to speed up the process a bit.

Again I must conclude that it is a really nice project. The finished cabinet has an appealing look and despite its small footprint there is a lot of useful storage inside. 


Solid wood construction

Both doors can open up!

Five shelves inside.

Newf and gambrel stamp.

Sunday, September 2, 2018

Small display cabinets for Asger

Asger collects matchbox cars, and he has gotten himself a nice little collection. In order for him to organize all the small cars, we decided to build a couple of small display cabinets.

The original idea was to not make the joinery complicated, so that he could help himself in nailing the cabinet together. The front frame is made with half lap joints which is then later glued and nailed to the carcase. The carcase itself is assembled using rabbets in the corners.

For once I did something unusual. I actually bought the wood for the project.
I purchased the best pine they had in the lumber yard, and I now realize how expensive it is to buy wood. But it is nice to work with something else than larch for a change, and pine smells so good when being worked.

The back boards received tongues and grooves by means of a hand plane. That was just the right project for a child.
The moulding on the back boards were also handplaned, Asger tried to plane one, but using the combination plane wasn't easy, so I finished the rest of them.

The cabinets were finished with some spar varnish, and in a very short time they were both filled to the brim.

Actually this project was completed a year ago, and it ended up in the "draft" section because I couldn't pull myself together to take a couple of pictures. Mind you, it was prior top me getting a smart phone!
So before heading to sea this time, I took a couple of pictures, but off course there are none that will show the progress in the shop.

Display cabinets made of pine.

Moulded backboards.

Door open showing bridle joint construction.


Moulding detail on the door.

The shelves are adjustable.

Old Britains vehicles and detail of backboards.

Glass retaining strips.

Rabbeted construction and half laps on face frame.

Sunday, May 27, 2018

A new door for the quick closing valves cabinet 2, door and varnishing.

My less than ideal resawing meant that there was a lot of material that needed to be removed by a plane before the four pieces of wood were flat and reasonably identical.

First a rabbet was planed for receiving the glass (which is not real glass by the way), and next a small beading was planed on the front side.

The door frame was assembled with short tenons (1.25" long), and the beading was made continuous by mitering the corners of the beading /rabbet portion of the parts.

I removed the glass form the old door and adjusted its size so it would fit the new door.
The glass was mounted by means of some Sikaflex and 12 small screws that were driven in at an angle, so the head would press the glass down into the rabbet. Not exactly high end furniture style, but OK for this application.
A bit of the Siaflex oozed out, but given that the glass is plastic, I don't want to risk destroying it by being too eager with a chisel when scraping it off.

The two door latches were then mounted by chiseling out a recess, so I could attach the nut from the backside. They are not designed to be used on stuff much thicker than 1/4", so I had to remove some material from the front and the back.

Finally the door was mounted using the reclaimed hinges, and the door latches were adjusted so they could keep the door closed.

I have applied one coat of varnish to the door and the face frame, and as soon as it has dried, I plan to give it another coat, I think that will be sufficient, though the common rule of thumb according to boat varnishing in Denmark states that you should apply 7 layers of varnish with a light sanding in between. This is probably a rule of thumb that has been invented by the manufacturers of varnish!


New door, with first coat of varnish.

New door prior to varnishing.

Short tenons 

Beading detail (and ugly mark from the clamp)

Face frame mounted.

Latch for the door.


Thursday, May 24, 2018

A new door for the quick closing valves cabinet 1, hinges and face frame.

Fire protection has generally always been a big issue on board ships. There are various systems in place for keeping the ship and crew safe. Among those systems are fixed fire fighting installations such as either Carbon Dioxide total flooding plants, Flexi fog water mist extinguishing systems, regular sprinkling systems etc.
A system which is not in use int he merchant marine anymore is the use of halon. It was a fine system, but it was ruled out a couple of years ago due to the fact that halon gasses were very effective in depleting the ozone layer.

Other types of protection might not be so obvious, but one of those is something called quick closing valves.
These are spring loaded valves that are fitted to oil tanks (fuel and lubricants), and in regular service they are kept open. In the case of a fire in that area of the ship, or on that particular system, a cabinet for activating those valves are positioned outside the accommodation. That way you can stop the flow of oil in case of a fire and do it from a safe distance.

For some strange reason, many of these cabinets rust like crazy. It is probably because the cabinet itself was never really intended to be mounted outside on a ship, and a stainless steel cabinet is more expensive than a cheap non stainless cabinet is.
Even a coat of paint is normally not enough to keep them good looking.
Fitting a new cabinet instead of the old is a huge and complicated task, mainly due to the fact that you would have to disassemble the actual system in order to move it into a new cabinet, and by doing this you are deactivating a safety system, which is not something that is taken lightly.

On our cabinet, the cabinet itself is in decent condition, but the door has rusted through, and it looks bad.

We discussed the possibility of making a new door out of wood, and mounting that on the cabinet, so it would look a bit better. And I was happy to give it a try. The actual function of the cabinet won't be changed.

The first task was to find a set of hinges. The original hinges on the cabinet are some that are an integral part of the rusted door, so I couldn't really use those. On at least two of my former ships, I knew exactly where there were some spare hinges,but that really doesn't help me on this ship. Out here we haven't got any. So I tried searching the vessel to see if I could come up with something. One of the deckhands told me that he had seen part of an old metal box that had been scrapped lying in the garbage collecting room. I had a look and fortunately it was the top side of the box, complete with a set of hinges that had been welded on during construction of the box.
I brought the parts with me to the workshop and removed the hinges using an angle grinder.

The wood was less of a problem. We have a decent stash of wood on board, including some 2x4 exotic looking reddish wood. (I have no clue what it is, but it seems hard and durable).
I had a bit of help digging the plank out from underneath a bunch of other planks, and cut two pieces of to use for the door.

We happen to have a nice Festool circular saw on board, so I decided to use that one for resawing and ripping instead of doing it by hand. It was a lot faster, but the results were not nearly as accurate. Part of that problem is probably that someone has thrown away the fence for the saw. I have no idea why anyone would do that, the saw itself comes in one of those large plastic boxes (Systainer I think) so there was plenty of room for a fence in there.
So I had to do my sawing freehand following a line.
I did it on the open deck do avoid getting dust all over the shop.

At first I made a face frame. This will be screwed to the front of the cabinet, and then the door will be mounted on it once I get that far in the project.

Salvaging a hinge using an angle grinder.

The top part of an old metal box.

Crappy re-sawing results

Face frame glued up.

Rusted door of quick closing valves cabinet.
(I had to use flash, hence the worse than normal quality)


Monday, April 2, 2018

Pilot ladder cabinet 10, completion

Two days ago I glued in the back panel, and yesterday I managed to smooth the outside surfaces of the carcase. I had to place the cabinet on the floor, and push it against the workbench with a small piece of wood in between, to be able to do a decent job.
I have also glued in some drawer guides and drawer runners. These are merely flat sticks that the drawer will run on and register to.
I tried to sand the outside a bit, but I think that I'll wait with the final sanding until I get home. This wood is so hard that I think a quick run with an electric sander would be better than me spending forever with a sanding block.
My plan has been to give it a coat of clear varnish as a finish, so I might as well do a proper job of preparing the wood for that.

Today I installed the hinges and mounted the door. As per the instructions of Robert Wearing's "The essential woodworker" a hinge on a cabinet should be let into the door, too keep a continuous line of the stile.
The text and drawings are easily understood, and mounting the entire door was a smooth operation without any unfortunate hick-ups.

Before the final mounting of the hinges, I glued in the knob for the door.
The door knob and the drawer pull were both turned yesterday, and while not identical, they still look a bit the same, and that is fine with me.

Our daughter Laura has expressed a genuine interest in this project, and I asked her the other day if she would like the cabinet at some point, and she did. She is left handed, so I decided to mount the hinges on the left hand side of the door, to make the cabinet more user friendly for a lefty.
Actually I am not sure if that is the normal way, but I find it most natural to have the hinges on the right, so I guess that mounting them on the other side would make sense for someone left handed.
I figured that she might as well participate in deciding where the small metal plate should go, and I also have some nice small round headed brass screws at home that would make the mounting look fine.

With the door in place, I made a small toggle to keep it closed, and the final work was to chisel MMXVIII inside the door frame on the hinge side.

Now it will be a matter of finding a cardboard box and make the cabinet ready for the flight home.


Thoughts about the build:

-The pilot ladder wood is definitely harder to work than my regular spruce/pine pallet sides. But I was lucky this time that it didn't twist and cup too badly.

-I would have preferred a regular back made of T&G boards, but since it wasn't really an option, this 3 panel solution was also OK. It took a long time to make and the joinery is not of a very impressive accuracy.

-The door came out pretty well, and making the small beading on the frame went surprisingly smooth. In addition I think that this small detail gives a lot of visual interest and helps to make the door look more "done".

-I was afraid that the cabinet might be a bit too deep, but I think it looks OK. The final test will be once it is mounted on a wall somewhere.
One of my colleagues remarked that it looked a lot like a small bedside cabinet, so that could also be a possible future for it.

-I haven't registered the amount of time that I have used on the build, but I guess it is somewhere around 60 hours. So it isn't a fast build in any way, but with stock preparation entirely by hand, it isn't a surprise.


Pilot ladder cabinet completed.

Left hinged door.

Door and drawer opened.

Not too deep after all.

Chiseling out for the hinges.

Friday, March 30, 2018

Pilot ladder cabinet 9, door and metal plate position.

We have had a couple of days in harbour, and due to the Easter, we have had a chance to relax. For me relaxation means going in the workshop and continuing with the build.

I completed the door for the cabinet, and there was quite a lot of work involved. I have brought a copy of "The essential woodworker" with me, and Charles Hayward suggests that to ease the look of a panel type door, the inside edges should be broken by either planing a chamfer or by some sort of decoration.
After a bit of consideration, I opted for making a small beading on the inside of the frame. Before starting, I honed the blade for the Record No 50, and adjusted it for a fine cut. Despite one of the sides not being 100% with the grain, the beading came out a lot better than I had anticipated. Having a beading made the rest of the joinery a bit more complicated, but after some fiddling, the frame was ready.

Of all the panels that I had glued up in the start of this project, I had chosen the flattest and most uniform looking for the door panel. I could see that it was a bit too narrow, so I glued on a small piece left over from the drawer bottom. It was close in colour, and wide enough to give me the size I needed plus a bit extra.

I like raised panels on doors, and I have made one on board a ship some years ago. I wanted to replicate the method and it worked out just as well this time, despite the wood being a lot less cooperative compared to soft spruce.
The method I used was to initially plow grooves and dadoes along the edges of the panel, to define the raised center. These grooves/dadoes are probably a bit less than 1/8"- I never measured them. 
I make the grooves so wide that my smoothing plane will be able to overlap the flat bottom of the grooves. So for my wooden plane that means a width of 3/8".
The next step is to clamp a batten along the grooves/dadoes for the smoother to register to. Then it is just a matter of holding the plane at an angle and remove some material.

Once all the planing is done I lightly sanded the raised panel to remove a few marks. Mainly on the ends where I had traversed with the plane.
In an uneventful glue up, the panel was mounted inside the frame, and later the horns were removed from the stiles.

Metal plate position:
I have been giving quite some thought to the idea about the metal plate from the pilot ladder.
-My first idea was to put it somewhere hidden on the inside. Other people (including my daughter) suggested that it should be mounted boldly on the front. 

Now if I put the plate on the inside, it will hopefully end up looking like a nice cabinet, that maybe my dad, Olav and whomever I have of woodworking friends will notice and perhaps look at and comment on.
Most other people I know will likely see a small cabinet and never give it any further thought.

If I on the other hand put the shiny metal plate on the front, it will almost certainly attract attention from a lot more people. Who I imagine will go and look at the cabinet and read the label that seems to be out of place. That could likely lead to a series of questions about the cabinet, and that could be interesting.

It isn't complying with Shaker tradition, to boast of something that you made yourself, but it might be an eye opener to some people, that it is still possible to make things with your own hands that looks OK, and that all upcycling doesn't have to involve white paint and some rough boards.

As a experiment, I placed the door and the drawer in place in the carcase, and mounted the small metal plate with some tape, to get an idea of how it could be mounted.
If you have an opinion on the matter regarding if the plate should be mounted as a sort of peoples fishing lure (to attract attention) or not, I would like to read it in a comment.
I would also like your opinion on how the plate should be positioned if you think that it should be displayed prominently. 


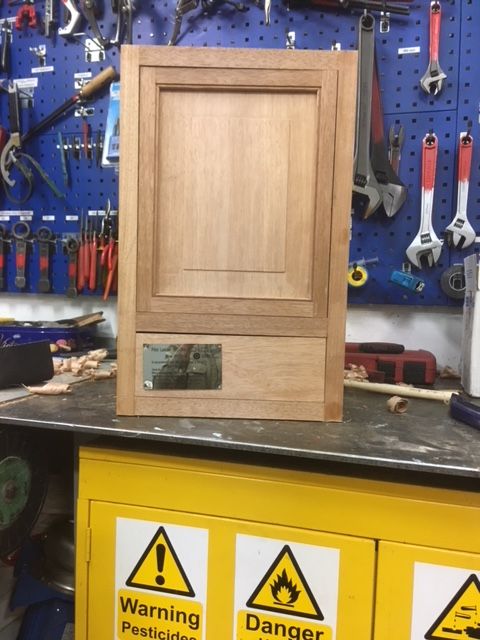
Cabinet with no metal plate
Plate mounted horizontally on door.

Plate mounted vertically on door (similar to raised panel)

Plate mounted on drawer.
(technically it could go in the center of
 the drawer, but that would require
 two pulls instead of one center pull)

Grooving /dadoeing the raised panel.

Position of plane to make the raised panel sides.

Glue up of door.