Wednesday, May 29, 2013

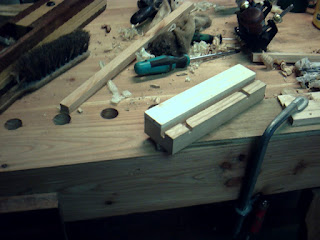
Sawing with the mule saw

50% of the future hide glue does not always want to enter the trailer. A friend of my wife spent a couple of hours one Sunday afternoon, trying to persuade it to go in. This friend also has got hide glue in the rough and a small riding court. My wife asked if I could make bench for her to place at her riding court as an appreciation of her time spent with the pony.

I have settled for a shaker like design which I have always wanted to try anyway.

This also presented an opportunity to try and use the mule saw for something useful. The top of the bench will be made out of a single board of larch (what a surprise), and the rest of the bench will also be made out of larch. This is actually a good choice since the bench will be positioned outside permanently.

I have been testing the mule saw the last week, and it is working better and better. I can still improve on my sharpening of the blade, but all in all it is working as it should. I made some nice boards out of elm that were 16" wide. At that width and the current shape of the teeth of the blade, I need to go really slow. The lowest speed is about 4" per minute, so the saw is not fast at all. But on the other hand, the boards look very nice after sawing, and I don't have to make a living out of it. So being slow is OK.

The mule saw in action on a trunk of larch.

Monday, May 20, 2013

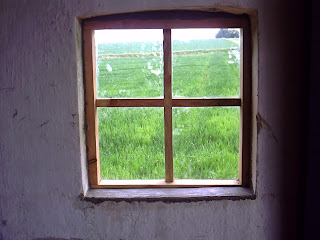
The installed window

As Ralph noticed, there is a nice arch above the window. The original plan was to incorporate this arch in the upper part of the window, but I made the stiles an inch too short to be able to do it that way. So instead I opted for the way the old window was made, i.e. with an arch shaped strip of wood on top of the frame.

The glass was mounted using glaziers putty and metal wire. The putty is a traditional type consisting of chalk and linseed oil. Theoretically you can mix your own, but I have bought mine.
Before applying the putty, I normally wipe over the rabbet with a little linseed oil, as it will help the putty to stick to the wood.
The putty is applied in the shape of a small sausage, all around the bottom of the rabbet. The glass is then pressed into the putty. I like to secure the glass using some small pieces of metal wire. they will later be covered with the outer layer of putty. But they help to keep the glass in place until the putty is hardened.
Small nails or brads could also be used, but I like to use a piece of welding wire from a MIG/MAG welding machine. This wire is fairly stiff, and has got an appropriate thickness. (1 mm in diameter).
I press the wire into the wood using some side cutters, and once the wire is in place I cut it approximately 1/8" from the side of the rabbet.
The outer layer of putty can then be applied using a putty knife.

Since we have started changing the roof on the house, I have had to park the window project for a couple of days. I have spent my time installing the scaffolding, and I am rather pleased with the result.

Today I managed to make the final installation. I have to admit that I am not very good at doing bricklayers work. but since it is for the machinery shed, it will be OK.
The window sill is still damp in the photo. Once it is dry the plan is to give it some white wash to make it blend in with the rest.

The outside of the wall looks a little funny since I have started repairing the grouts . I have not yet cleaned of the wall using hydrochloric acid. That ought to remove the excess lime from the surface of the bricks.


The arch shaped strip glued and nailed in place.


Mounting the glass using glaziers putty and metal wire.


The new window sill.

The window from the outside.
 

The scaffolding on the house. (the children suddenly erected a tent).
 

Tuesday, May 14, 2013

The window part 2

I decided to join the corners of the window frame with dovetails. As they were pretty large, I used my tenon saw for the job. The saw is from Flinn Garlick in England, and like my dovetail saw it has got fairly fine teeth. I think it is 18 ppi. Actually it seems a bit too fine for soft wood, but it worked OK. It leaves a very nice surface that is ready for the glue without paring it with a chisel.

The dividers were prepared with double tenons on the ends that would go into the frame, and a single tenon where the dividers intersect.
I could clearly see progress in the appearance of the tenons when comparing the first set and the last set of the dividers. I think that the last ones actually looked quite good.
The problem with tenons is that they need a mortise.
I am not very good at making mortises by hand, but I had decided that I didn't want to fire up the mortising machine for this project. So I drilled out the majority of the waste using my crappy Forstner drills and cleaned up the rest with some chisels. The mortises were nice and tight, but I just don't think they look very good on the inside. Actually it shouldn't bother me, since they will have a glued in tenon, so it will probably never show anyway.

All the edges were chamfered before gluing up the window. I have a nice Japanese chamfer plane that my little brother gave to me for a Christmas present some years ago. It works brilliantly.

I had tested the individual joints after finishing, so theoretically it should all go together without any problems.
Whenever I have a glue up like this: 4 dovetailed corners, 4 double tenons with corresponding mortises and 2 single tenons with mortises - I am kind of intimidated.
I get a feeling like the first time I took my drivers license. You know that it should be all right. But you are not completely sure anyway.

I added glue to the various joints using a small acid brush, and miraculously it all went together and the diagonal measurements were within 1/16". Apparently I must have done something right.

The mortises  were made with a slight slop outwards, so I could wedge the tenons once assembled. Each tenon received two wedges. I used a method described in Woodworking Magazine, where they suggested that you merely split the end of the tenon using a chisel. After that the wedge should be hammered in place using some glue. The theory is that the split will follow the grain of the wood instead of a sawn kerf that will go where you put it.

 As an answer to a recent question regarding if I could take out the extra layer of bricks, I have attached some photos of the windows in this part of the machinery shed. There are a total of 8 windows that have all been remodelled with extra bricks. I think it would look strange if  only one window was lowered to the original height.

Making a double tenon.

All the pieces laid out.

Glued up and wedged (and square).

The front of the Japanese chamfer plane.

The window from the inside.

Two more windows (the original cast iron stable type).

Sunday, May 12, 2013

Making a new window

After finishing the gable, I decided to tackle a project that I have been meaning to do ever since we bought the farm (in 1999). One of the windows on the back of the machinery shed is past its premium.
The plan is to make the new window a bit smaller, since the original window have been partly covered by adding 3 rows of bricks. I assume that it was done because the machinery stable was once used to house pigs. And if they were able to get to the bottom of a wooden window - they would eat it. Therefore all the windows on the backside have been made smaller by adding three rows of bricks.
I intend to add another 3 rows on the outside once the window is going to be installed, so it will look nice.

There is no need to make a window that can be opened, so it will be a fairly simple model. The original frame is made using 1 3/4" thick stock. I am going to use some rough 2x4" stock, so my frame will end up being close to the original but maybe a tad stronger.

I am going to make the arch on the top part in the frame itself rather than nailing on a small ornamental arch. I expect that it will look OK.

At first the stock was cleaned up using the jointer, and then I sawed the pieces to the correct length. except for the dividers.
I then planed all the rabbets. I think it would have been faster to make the rabbets on the table saw, but they wouldn't have looked as good.

The idea is to dovetail the frame together, and mortise the dividers into place. But that will have to wait for another day.
The finished gable and the disassembled scaffolding.

The window (or what's left of it).

Truing up the stock for the frame.

A bunch of curly shavings from the rabbet plane.

Wednesday, May 8, 2013

The answer to a most difficult question.

The Danish spring has returned in full power - meaning that it is pouring down every 20 minutes or so. There is a constant wind which isn't too cold, but nevertheless it is not a perfect day for continuing the new gable on the machinery shed.

Instead I decided to try and organize my plane cabinet a little bit. I have acquired more planes, and it is starting to get rather cluttered.

Since I have bought a Veritas skewed rabbet plane, I decided that it would be kind of neat if that too could fit in the cabinet. But that would require me to make some sort of mounting system to accommodate the plane.

I pondered about various solutions that would fit the cabinet, and truly understood that this was one of the most demanding questions of woodworking of today.
But as you will see in the pictures, I have uncovered the truth and seen the light regarding the solution to this ancient problem that has pestered mankind for millennia (or at least ever since Veritas introduced the plane).

A shelf could be a solution, but I was afraid that I would knock down the plane, if I needed to get something else in the cabinet. I didn't want to merely put it in the bottom of the cabinet, because that is where my mallet usually go.
So my solution has been to make a small shelf like holder with a groove and two dadoes for the fence of the rabbet plane. The groove and the dadoes will protect the plane from moving accidentally, and the sole of the plane is parked on a small strip of wood that is glued on top of the shelf. So the plane is well supported.

I sawed the groove using a tenon saw, and a small piece of wood as a guide. Then the waste was removed with a chisel. The dadoes were sawn free hand and again the waste was removed with a chisel.

I will wait until the glue is completely dry before installing the plane on the shelf. Glue does contain water which isn't the best companion to bare iron, and I don't want to risk causing rust on the plane.

Besides creating a safe haven for the rabbet plane, I made mountings for my coping saws, for my extra mortising drills, for my block plane and I mounted a screw for hanging my Stanley No 80.
I moved my extra Stanley No 6 into my storage toolbox along with a Stanley No 79 which I don't know how to use and some Japanese chisels. So now the cabinet looks quite a lot better when you open it.

The cabinet before the organising.


The cabinet after the organising
 
 
The pictorial guide to make a mounting for a Veritas skewed rabbet plane:
 
Draw the outline of the fence.

Saw the sides of the groove.

Remove the waste of the groove and the dadoes with a chisel


Glue a strip of wood on top for the sole of the plane (3/8" thick).

Testing the bracket before mounting it in the cabinet is a good idea.
 

Tuesday, May 7, 2013

Working on the machinery shed

As spring has finally arrived, I have decided to try and finish some old projects.
I changed the roof on the machinery shed in the autumn of 2009 and have wanted to finish the project by making a new whatsitisname gable (thanks Gavin)

As usual I am using larch since it is very weather resistant (and I still have a load of it). After mounting it will be painted.

The pattern is traditional Swedish (although I live in Denmark). The wider boards are 1x5", and the thinner strips are 1x2". The wider boards are nailed on using 3" nails and the thinner boards are nailed using 4" nails. That way each board has got 2" of holding in the frame.
The wider boards are placed a small distance apart, and the thin strip covers this gap and the nail passes through the gap and into the frame.

On the bottom of both parts, a vandnæse (directly translated into water nose) is sawn. It is a 45 degree slope that will prevent water from seeping into the end grain and cause premature rot.

Traditionally in Danish building this is omitted, probably because the carpenters like the idea of being able to secure a job some years ahead by making sure the panels have started to rot at that time.

Another thing that is important to ensure longevity of the wood is to make sure it is oriented correctly. I follow the idea that the heart wood should face outwards. And the grain direction should be so that if you wanted to plane the board, you would have to do it vertically down.
On rough sawn wood, you can see the small ends of the wood fibres pointing one way. They should all be pointing down. That way the wood will be protected the best possible way against damage from the water.

The part of a house that I don't now do know the English name of. :-)

Close up of the water noses (perhaps there is even an English word for those as well?)

The view from top of the scaffold.

Saturday, May 4, 2013

JPBO, Danish manufacturer of wooden bodied planes

During my last project I needed to mark a line out to determine the area for the base plate of the steam engine. I had already made the rabbets on the foundation for the display case. This resulted in that I couldn't use my Veritas marking gauge since the fence is too high.

I found my old scratch type Danish marking gauge. It can also be used as a mortising gauge, since it has got two points that are individually adjustable.
Brian Eve pointed out he would like some more information about it, so here is a little portion of unnecessary knowledge:

The brand is JPBO which is an abbreviation of: Johan P Bendixen, Odense. I guess that the founders middle name was Peter (a common name), but I am not sure. The company was positioned in Odense which is the 3rd largest city in Denmark. Normally this brand is associated with planes rather than marking gauges, so here is a small description of this Danish contribution to the world of planes:

This company is mainly known for their production of wooden bodied planes. These planes are still fairly common, since they were supplied for a lot of schools for Sløjd classes (sloyd / woodworking).

The company went bankrupt in 1992, but I don't think that they produced planes that late. My guess is, that they stopped the production of planes sometime in the late 1970'ies

The planes are typically made out of beech, but some of the fancier ones also have some exotic wood in them.

Since we don't have any steel production in Denmark, the blades were imported from the worlds leading country concerning high quality steel: Sweden. And not only from this country, but also from the worlds absolute finest producer of chisels and plane irons: Erik Anton Berg of Eskilstuna. (please note that parts of this paragraph are my points of view, and not necessarily the truth, the whole truth and nothing but the truth). I am in no way affiliated with E.A. Berg or any of its subsidiaries etc. bla. bla. bla.

It seems that the irons for the smaller planes weren't necessarily from E.A. Berg, as one of my specialty planes has got a British iron from Sheffield (I can't remember the manufacturer).

My 24" wooden jointer, with a 63 mm iron (2.5")

Close up of the lamination.
 
The jointer sadly has a crack on one side besides the mouth, I guess that some earlier owner smashed the wedge in too hard. It doesn't affect the function of the plane as far as I have noticed though.
JPBO is cast into the cap iron, and the width of the blade is stamped on the back of the plane.

My wooden smoothing plane with an adjustable mouth.

Close up of the adjustable mouth. The sole of the plane is of a hard exotic wood.
 
 If you look carefully, you will see that some jerk (me) ground the iron to a round shape to be able to use the plane as a scrub plane. I can't really explain what went through my mind that day, since I have other less delicate wooden planes that I could have converted. I can just say that I am sorry.

A JPBO plane that I have never used.

Front view of the plane.

I have never used this plane, since I have absolutely no clue as to what it should be used for. It was placed in a tool cabinet that my father bought at a second hand shop. It has been in there since it was new, and the guy who made the cabinet is a trained cabinetmaker. The width of the blade is 20 mm.

Another specialty plane from JPBO.

Front view of the plane.
 
My guess is that this plane is used to make a 30 degree chamfer on both sides where two boards meet. e.g. floor boards. But if there are someone out there with more specific knowledge, please enlighten us all.

The marking gauge that caught Brian's eye.

The wear surface is covered with a plate of brass.
 
I prefer the Veritas marking gauge, but one advantage of this gauge is that you can turn the rods containing the points 90 degrees, enabling you to use the marking gauge on the side instead of end wise.
Thursday, May 2, 2013

Exotic wood, glass and steel.

I needed to make some retaining strips for the glass for the display case. This was clearly a job for my new rabbet plane.
Since the strips were designed to be only 11 x 11 mm (7/16" square), I had to make some sort of improvised work holding.
I found a piece of plywood that was lying in the workshop. I attached a thin board to the top of it, by clamping both to the workbench. I mounted a small screw to act as a planning stop. I double checked, to make sure that I wouldn't hit it with the iron of the plane.

Making the rabbets all by hands was a bit more work compared to making them on the table saw, but there was no burning and they looked nice and crisp.

After the rabbets were made I made a chamfer on the opposite corner of the rabbet, where the screws would go.

I had cut the glass yesterday, and I cleaned it thoroughly. After I cut glass, I normally remove the sharp edges by using a fairly coarse old grinding stone. Just a couple of strokes, and there is no risk of cutting the fingers on the edges.

I drilled clearance holes in the glass retaining strips and pilot holes in the frame itself. I had found some old brassed steels screws that were perfect for the project. Having a bras screw breaking in such a delicate frame as this one is not funny. So the harder steel screws were most welcome.

I tried my new Dictum wood wax as a finish, and it was easy to apply after a minute in the microwave oven. I settled after two coats.

I finally installed the steam engine on the base, and put on the top part of the display case. Now I just need to find somewhere to put it in the house where it will look good.
Personally I like the way the different materials compliment each other. glass and exotic wood enhance the steel of the steam engine in a way that is hard to do otherwise.

The work holding for rabbeting the glass retaining strips.

Close up of the planning stop screw

One rabbet down, eleven to go.
 

The finished result.