Monday, November 23, 2015

Treasure chest with curved lid part 9, The finished chest.

I asked my wife what finish she would like to see on the Shaker cabinet, and her answer was Danish oil (what a surprise..)
I had hoped for a paint finish, but since it will probably be given away for someone as a Christmas present, I chose to stick to what she wanted.

But there were no restrictions to the treasure chest with curved lid that I made some time ago. That thing has just been sitting idle under a table to be out of the way.
I asked Asger if he would like to paint it, and he was really exited about it. I decided to give up most of the control and told him that he could choose the colour.
We looked at the paint shelf, and I tried my best to advocate for a green, blue or red coat of paint. But Asger was not convinced that it was the right path. Finally he made up his mind and settled for Massey Ferguson light grey, a classic tractor colour.

He rolled on a coat of paint that quickly got absorbed by the wood. So we agreed that was a primer, the next day he rolled on another coat, and that helped a lot.

Finally I added the last layer using a brush instead of the roller, because our cheap roller more or less dissolved in the oil based paint.

I had made some hardware on the ship while I made the chest itself. An escutcheon and parts for some lifts. 
The lift handles themselves are old handles from some metal pails that comes with various chemicals and soap.

Since I made a treasure chest, I opted for some fantasy inspired hardware. something that could spark an interest in a child. So I made a dragon/vampire bat as a theme. 
It turned out better than I had hoped for. But I think they would have stood out more if the chest had been in a different colour.

The finished treasure chest.

Asger sanding

Asger painting

Painting

Dragon escutcheon

Dragon lift

Wednesday, November 11, 2015

Shaker hanging cabinet, North Sea edition, completion

I started by trimming the back of the cabinet to the desired size, that meant also sawing out a curve on the top, and making a keyhole slot for the future hanging of the cabinet.

The back is attached using only nails. This is to allow for the inevitable wood movement. If I had glued on the back, since it is such a wide piece of wood, it would be like asking for trouble.

The door had managed to contract itself a bit during a couple of days, so I had to saw about 1/4" of the thin end of the battens before pushing them back in. So far they are able to keep the door flat.

Next up was to make a small locking device. I tried to make it look like the ones I have made before, since I find it a pleasing design. It is just made from a bit of wood I had left over from the stiles.

My last cabinet of this type had a semicircular door knob, because that is what my youngest son thought would look the best. On this one I wanted to try something a bit different.
The inspiration is some drawer pulls that my father has made for my parents cottage in Sweden.
This one is just smaller.
Making it was basically a paring exercise with a chisel.
Before mounting it by simply by gluing it into a hole in the door, I sanded the front of the door, as the knob would have prevented me from going continuously with the grain during sanding.
After the glue had dried a bit, I cut off the protruding part on the inside and sanded the inside again.

I discovered that I didn't bring any screws that were long enough to satisfactorily mount the locking device with. So I drilled a small hole, and mounted it temporarily with one of my longest screws (something like 3/4") When I get home I'll find a nice round headed screw and mount that instead.

After planing a little bit on the side of the door to get an even reveal, I started mounting the hinges.
These were placed their own distance from the top and the bottom, and it went fairly smooth.
When I tested the door after mounting the hinges, there was a bit of binding just before it closed. A bit of investigation revealed that the door was a bit thicker in the middle than at the ends, but a few swipes with the smoothing plane corrected it.

All there is left to do out here is to mark the cabinet with Roman numerals and pack it for a safe trip home.
Once I get home I'll try to decide how to finish it.

Shaker hanging cabinet, North Sea edition. 

Shaker hanging cabinet, pallet wood build.

This batten is now too long.


Tuesday, November 3, 2015

Shaker hanging cabinet, North Sea edition, stiles and door.

Since I want the door to be as wide as possible, I found it to be the smartest move to finish the door first, and then adjust the width of the stiles to fit afterwards.

The door was planed to the same thickness as the stiles, and then I squared it up on the shooting board.

The original version of this little cabinet has battens that are nailed on to keep the door flat. Since I have taken the trouble to make blind dovetails for the case instead of using nails, I figured that i'd might as well attach battens using sliding dovetails.
At home I have a special plane for that purpose, but I didn't bring it with me, so I'll use a slightly different approach.
My idea came after chatting with Brian Eve over at Toolerable. He showed me a picture where he had done it this way, and I wanted to try it out myself. 

First I made a set of battens that tapered slightly in width. I planed the narrow sides of the battens at an angle.
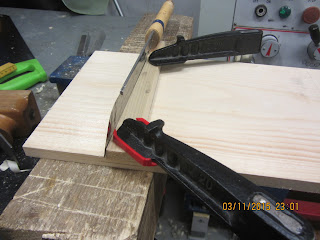
I then used the battens themselves as sort of a template to guide my saw. 
A thing to remember is that it should be possible later on to tighten up on the battens if they become loose. So the taper on the door part needs to be a bit narrower than the battens.
After sawing out the sides for the door part of the sliding dovetails, I removed the waste with a chisel and followed up with my router plane.

I added a small chamfer to the end of the battens, to soften up their appearance before inserting them in the door and tapping them into place. This should also prevent any grain blow out if someone hits them harder with a hammer in the future.

With door at the correct width, I was able to establish the width of my two stiles. These were ripped to the correct width and the sides cleaned up with a plane.
I crosscut them what I believed was the correct length and followed up with the shooting board to make a fine fit. Somehow I managed to make them bot a bit short, but not enough to warrant making a new set.

When that was done I simply glued them into place. A few brads or nails would make it even stronger, but I doubt that strength is much needed with a cabinet of this size.

Marking up for the sliding dovetails.

Guiding the saw.

Testing the fit.

The finished door with battens in place.