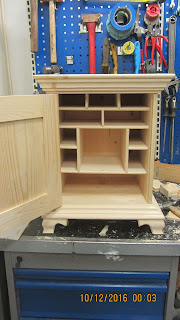
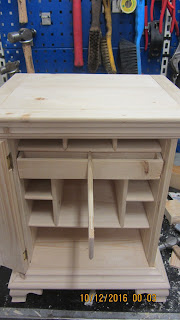
Out here blogging takes longer time than building.
Not that I am such a slow writer, but just getting blogspot to open the page where I can actually write takes half an hour every once now and then.
But Brian Eve has sent me a tutorial on how to make my pictures smaller, so hopefully that should speed up the process of uploading pictures on the blog. Let's see about that. I remain skeptical until proven otherwise.
The crown moulding and the base moulding were difficult to mount. Mostly because I managed to make the box a little bit out of square, and on top of that I had to struggle with workholding for non flat pieces of moulding.
The front of the crown moulding was glued to the entire width of the case, and the two side pieces were just glued in the forward 2.5" more or less, and then got a few brads to secure them near the backside. Hopefully that will allow for a bit of wood movement.
The base moulding all attaches to a frame that was joined with mortise and tenons. So all the mouldings are simply glued to that frame. The frame is also where the legs are attached.
For the feet of the spice chest, I considered either turning some or making shaped feet. Spruce is not a super good wood for turning, plus I wanted to prove to myself that I could make shaped feet without a bandsaw or a jigsaw, so shaped feet it was.
The front legs were joined by gluing the miter. I didn't ad any reinforcements, cause they would also be glued to the sub frame anyway, besides there was no idea in pushing the difficulty of this to an extreme level.
The rear feet were left as a long block of wood (7.5"), so I could plane the shape for both feet at the same time.
I sketched the desired shape on the end of the feet, and used my moving fillister plane without the depth stop and the fence. The outside curve was a walk in the part to make, the inside curve took a bit longer and was cleaned up using a half round file with some coarse sandpaper wrapped around it.
When the shapes were planed on all the parts, I drilled a couple of holes to remove some of the clumsiness. For some strange reason, we have some incredible fine wood drills on board, approximately 1" and 1.25" in diameter. I used the 1"drill and the result was perfect.
After the drilling, I marked some angled lines that I sawed next to, and finally I eased the outside edges with a round file and a bit of sandpaper.
The feet were glued and screwed in place after I eyeballed their position.
Thanks to Brian Eve's trick, it only took 8 minutes to upload a picture :-)
Please note the very neutral and non disturbing background for my picture. I take a lot of pride in presenting my work so it looks the part. A key ingredient to this is to make sure that there is no clutter in the picture..
Outside completed.


