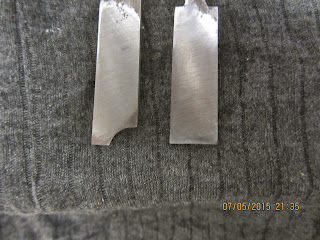
The irons were taken out and I cleaned some areas with emery cloth to get rid of the tiny bit of surface rust that was on them.
Next I found a face shield and some rubber gloves and a bucket. I poured a bit of water in the bucket, just enough to cover the bottom. Next I added some Sulphuric acid (96%). I guess that my final solution was around 30%.
The solution got hot as I expected, and I dropped the two irons in the bucket.
At home I have tried to remove rust using vinegar, and it works fine, albeit a bit slow.
This hot Sulphuric acid solution worked like something from a cartoon: Bubbles, smoke and a bit of hissing, and in a matter of maybe 10 minutes the irons were completely free from rust.
I removed the irons, rinsed them of and disposed off the acid solution. In the workshop I used a brass brush to remove the black layer on the irons. As soon as this was done, I sprayed them with some oil.
The bodies of the plane were not completely straight any more, so I used our lapping plate as a base for a piece of sand paper, and corrected the soles and the rabbets. The hollow for the moulding side of the plane was straightened using a 12 mm (1/2") steel pipe wrapped with some sand paper.
I discovered that the threaded rods were a bit loose, probably because of the heat from the insect treatment. I didn't bring any hide glue with me this time, so I have decided to wait until I get home before glueing in the rods again.
The sole of the moulding part of the plane had a few insect holes when I first looked at it, but after the straightening, it became evident that the insects had had a great time living and working in this old plane. I was a bit in doubt, if it would be of any use to continue the project, but it looked as if the worst part of the plane was at the rear end. The wood around the mouth and the front didn't look quite as bad, so I continued.
The wedges looked OK, and I lightly sanded them and went straight on to the sharpening part.
At first I tried flattening the backs with some emery paper and the lapping plate. A few strokes revealed that the backs were far from flat. Someone had ground the back side of the edge to a slight bevel (the ruler trick?).
I wasn't going to wast my evening trying to fix that by hand, so I started the grinding machine and flattened the backs using the side of the wheel.
When I do a thing like this I never wear gloves. Because if you wear gloved there is a much greater risk of over heating the iron. When I feel that my fingers are getting hot, I stop and cool of the iron in a cup of water.
After flattening the back, I ground the bevels and honed everything on my oil stone.
At first I tried to mount the moulding iron, but when I tried to remove the wedge it broke into two pieces. It was completely porous inside. I had seen an insect hole or two from the outside, but I had absolutely no idea that it was so eaten away on the inside.
So I quickly made a small detour from my original plan, and made a new wedge using a piece of old pilot ladder wood from one of my earlier projects (Gerstner inspired tool chest).
The plane was assembled and after a bit of fiddling, the position of the irons looked OK to me.
I found a piece of spruce that was reasonably straight grained and started planing.
The plane leaves a really nice surface, and it cuts exactly as it is supposed to. The only thing that could be better is the shavings ejector from the rabbet part of it.
It looks like the original builder of the plane has managed to angle the blade a bit inwards, so instead of ejecting the shavings away from the plane - it sort of packs them into the plane instead..
I think that I can make a small wedge that can be glued to the plane body that will help divert the savings out of the plane. But I want to attach this with some hide glue, so I can remove it again if it should make things worse instead of better.
As long as I removed the shavings after a series of strokes, everything worked astonishingly well.
Insect eaten sole.
This sole is not so bad.
Remains of the wedge.
Sharp irons.
Nice and crisp.
The profile.


Nice rehab. I think there is nothing like taking a worthless tool and make it work 'astonishingley well.'
ReplyDeleteFor the chips that build up, you might first look at your replacement wedge. I can't tell from any of the photos, but often the wedge has the end trimmed in such a way as to help push the shavings out the side.
Hi Brian.
DeleteI think that you might have a good point on the wedge being the problem.
The original wedge is still in use on the side that jams up, but it is very short, so it doesn't help pushing out the shavings at all. I think I'll try to make a new replacement wedge for that side as well. I might remove a bit of material from my first replacement wedge at the same time, to make it go nearer to the edge of the iron.
Brgds
Jonas