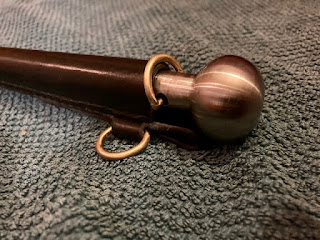
I have helped a lot of my colleagues turning marlinspikes out here, and I have made some myself as well, but those have either been for the ship's bosun shop, or as gifts to other colleagues. I have however never made one for myself.
Probably since I don't need a marlinspike, but this time I decided to make one for myself anyway.
I found an old steel bolt for the cylinder heads of the main engine, and I deemed that it would be perfect for the purpose.
The shape is the one I usually help the trainees to achieve, a long sleek body with a mushroom shaped head. The conical body gradually turns from round to oval the nearer to the tip of the tool it gets. the tip itself is ground or filed flat and gets and edge of approximately 60 degrees.
The dimensions for my marlinspike is a length just shy of 12", the head is 1.25" in diameter, the upper part of the body is 19/32" which tapers to a width of 1/4" at the very tip. Just above the ground part, the width is 3/8" and the thickness is 9/32" (due to the oval shape).
A hole was drilled in the upper part and I made a small D-ring of bronze that I silver soldered in place, this is so that the marlinspike can be secured with a lanyard when working aloft. I made an extra D-ring that I could mount on the sheath, so that the securing line has a place to be secured to.
For the sheath I decided to test myself a bit, and make it as small as possible.
A wedge shaped piece of leather was sewn to the backpiece. this would form a rabbet that the rounded part of the sheath could register to.
During the sewing of the wedge, I mounted the D-ring on the sheath. The wedge also moves the marlinspike a bit forward of the back piece, so that it will in theory stay a bit more clear of the hip when worn in the belt.
The rounded part was first made wedge shaped, so that the sheath would also taper in its length, both in width and height. I sewed it on using angled stitches that would enter the side of the rounded piece and pierce through to the back of the leather.
Finally the edges were trimmed and polished a bit.


oooh thats shiny and downright purdy.
ReplyDeleteThanks Jeremy,
DeleteIt is almost a shame that it isn't something that I'll use every day :-)
Brgds
Jonas
That is one of the tools i allways lust after but never found a reason to get it.
ReplyDeleteCheers
Pedder
Hi Pedder
DeleteIt really is a nice tool, but even I have a hard time justifying having one. I really don't need it, but I just think it is fun to make it :-)
Cheers
Jonas