Wednesday, September 11, 2024

Drydock pallet frame cabinet part 1

 We have a volunteer engineer apprentice on board. She is doing her initial training and is doing a great job. We talked a bit about making stuff one day where she was knitting a sweater. I told her a bit about what I had made earlier of woodworking, and she told me that one of her oldest friends were going to get married - and that she would like to make something for her as a wedding gift.

After discussing the various possibilities and showing her examples from my blog she set her mind on something like the small hanging cabinet with drawers which I made 9 years ago.

As per usual, we started off finding a decent pallet frame so we had some wood to make the cabinet out of. Since we are in drydock at the moment, and due to the nature of our ship, we have a lot of the carpenters machines ready set up in a warehouse on the yard. So stock preparation was much easier than it used to be. We have a small Makita planer that could trim the boards to the desired thickness in very little time. The table saw is out of service at the moment due to someone sawing into a hidden screw and activating the Sawstop. So for the ripping of boards we had to use the band saw.

Klara is new to woodworking, so I decided that a rabbeted construction would be the best bet, also given that we need to complete the cabinet before the wedding.
For some reason we don't have a router plane, so for the dado for the shelf, I had to make a small router plane out of a block of wood and a sharpened screw. That worked OK.
There is a Lie Nielsen rabbet block plane on board that we used for the rabbets. I like my Veritas skewed rabbet plane better, or the old combination plane that I have in my ocean going tool set. I didn't bring this set with me, so we had to rely on what we could find on board.

The case was assembled using some headless brads and glue. We had glued up a back panel which was reduced in thickness to 1 cm (3/8"). The back panel was attached in a rabbet with a dab of glue in the center and some more headless brads. The idea is that the back can then move a bit with the seasons without splitting.

I demanded that the face frame was built traditionally with mortise and tenons and rails and stiles. No mitered corners and quick solutions. Klara really liked the look of the face frame on one of my other old cabinets, where there is a small moulding on the inner part of the frame. In order to make something like that, we found an old moulding plane that someone has once donated to the ship, and it was still sharp enough to work. 

So far we have made one corner of the face frame, but today we are going to see of we can complete it and glue it onto the case.

Klara planing wood for the face frame.

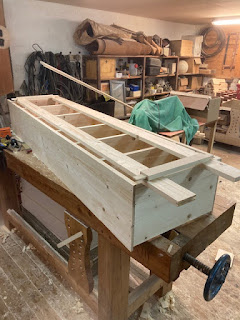
The case with the back panel mounted

Klara using the moulding plane.


Wednesday, September 4, 2024

Saddle holders

Some of the products our little company makes are what is generally known as eventing inventory.

The idea behind this description is something you can use at any type of horse event where you will keep your horse(s) in a competition stable such as a giant tent stable. This will mean that you suddenly haven't got the access to the stuff you normally have at home such as holders for the halters and bridles, holders for the saddle blankets or for the saddle itself.

Generally people bring a saddle cabinet which is sort of a transportable cabinet on wheels with room for a saddle and other stuff. But in addition to this a lot of people like to have the stuff ready at hand and that is where our products excel.

For some time we have offered a saddle holder for two saddles. A lot of people like those because you can have the saddle on the upper peg and the saddle blanket in use on the lower peg. The spare saddle blankets are kept on a saddle blanket holder.

But we have had some inquiries for a saddle holder for one saddle. One of the ideas is that it takes up less space when you need to pack the trailer and your car, and some people keep the saddle blanket under the saddle even when it is stored during an event. 

This time at home I made one horse saddle holder. It is 20" high, and on the back of it there are two sheet metal hooks that are each 1.52" wide. These are used to hang the holder over the edge of the box where your horse is kept during the event.

The board is made of first grade pine, the edges are routed to look nice. The wood is then stained using some mahogany stain and finally it receives a double coat of spar varnish. That makes the stuff easy to wipe over with a damp cloth to remove all the dust that inevitably comes from being in a stable.

Saddle holders mounted on a pallet.

Single saddle holder.


Thursday, August 8, 2024

Journeyman's certificate as a carpenter

 About a year ago, Gustav completed his exam as a carpenter and got his journeyman's certificate.

Needless to say, I was as proud as a peacock. If I remember correctly, they had 2 days to complete their building assignment and then one day where they had an oral exam.

The building assignments are drawn by lots, and each holds to focus points. There are off course measurements that has to be observed and adhered to, and beside that they also need to make an assessment of the delivered materials and make remarks if they would have sent some of it back in real life if it is twisted or otherwise damaged. 
Gustav had to make an inside corner with a roof that has to be prepared for clay tiles, and the construction of a wall and an opening for a window.

For the oral exam, I think they also drew a lot and had to talk about that subject. Gustav got a question about moisture based problems in wooden constructions.

The building part is made as a small portion of a building to save materials. They have to show how the things are constructed, so they deliberately leave part of the wall and roof uncovered so the censors can see that they know how to place the sub roof and the wind breaker and insulation etc.

When all the projects have been examined, the tradition calls for that the families and the colleagues from the various companies including the masters meet at the school to congratulate and to have a look at the completed building assignments. 

Finally the next day, the school hosts an arrangement for the parents and the masters where the actual certificate is given to the new journeymen.

For someone like me who has got a bit of interest in history and traditions, it was awe inspiring to participate in the ceremony where the certificates were handed over. the certificate itself hasn't changed the last 100 years I think, and the feeling that this ceremony has been going on continuously for the last 500 years or more was just so amazing. The recognition of the fact that this small certificate means the same now as it did back then, and that it is recognized from Australia to Zimbabwe that a carpenter is someone who can build a house or a structure out of wood is just amazing.

Pedder from two lawyers toolworks gave Gustav an ebony handled dovetail saw with a German silver back. That was almost enough to make me want to be a carpenter!

In Denmark if you get straight A's at a journeman's exam, you will get a silver medal. The idea behind that it is not a gold medal is that no handcraft can be perfect, because perfection is divine. And even the most skilled carpenter can't see inside a piece of timber if there is a small defect hidden inside. and that is why silver is awarded as the highest recognition. (Gustav got a silver medal)

Gustav right after the oral exam
Two Lawyers Toolworks dovetail saw ready!!

Gustav and Martin Vester (the master carpenter)

Gustav and his building assignment.

Gustav with his new dovetail saw


Tuesday, July 30, 2024

Making a staircase

 Given my lack of blogging the last couple of years, I often forgot to take pictures of whatever little or large thing I have been making. And contrary to my earlier blogging where I tried to take logical pictures of the process, all I have at the moment is a bunch of pictures on my phone that shows a bit of the progress on various projects.

The company that Gustav and I have together invested in a house. The house hadn't seen much maintenance or modernizing in the last 30 years or so. 

One of the interesting details was a really narrow staircase going to the basement. The staircase was hidden inside a cabinet in the kitchen, so it looked kind of an entrance to the Bat Cave.
The problem with this layout was that the staircase was incredibly narrow. I think it was only around 18" wide. 
When we discussed the plans for our rebuilding, we agreed that we still needed a staircase to go to the basement. But it had to be a bit wider so that someone could carry a hamper with clothes to and from the washing room which we planned to put in the basement. 
Technically there is also a door and a staircase outside that leads to the basement, but I know that I wouldn't want to go outside just to go down the basement and then go back inside again. So that entrance is mainly for when you get home in the winter time covered in mud or soaking wet from the rain.

The limitations were the height of the ceiling in the basement and the spacing of the joists. The spacing meant that placing the new staircase in the other end of the kitchen would give us a width of some 36" (as far as I remember). We still had to make the staircase fairly steep in order for it to work without using too much floor space for the descending hole. Still it is not as steep as the original one.

I sawed some spruce for the sides and the steps and milled it all in the planer. 
The positions for the individual steps were marked, and I clamped on a batten and sawed to the intended depth. A chisel and a router plane made quick work of getting a dado that the steps could be seated in. Given that it is sort of a secondary room staircase, I felt that it was most appropriate to not go overboard in ornamentation and fancywork. So each step just received a nice little chamfer on all sides and then a couple of saw cuts  were made that would allow the front of the step to pass over the sides.

When all the steps were made and I had checked that each of them would fit, I transported the pieces to the house. I had figured out that if I'd assembled the staircase at home, I would most likely not be able to get it into the basement.

I swept the floor carefully where I was going to work, in order to avoid marring the sides of the stairs while working on it, and then I assembled it. Each step was glued and nailed in place using two large nails for each step. 
Technically screws would be easier and perhaps even hold better, but I think that large nails look the part on a staircase, and would have been the traditional way to do it in a house of that age anyway.

Once the staircase was completed and I had ushered it into place, the protruding ends of the steps were sawed off in something like a 30 degree angle. 

Test fitting in the workshop

The front of the staircase.

Assembling in the basement.

View form the backside of the staircase.

MMXXIII (2023)

The installed staircase.


Thursday, July 25, 2024

Repairing a riding boot

 I have begun making more and more out of leather in the past years. Part of it is for our little company, where I change zippers in riding boots and occasionally make other small repair jobs on shoes and boots etc. 

Gustav had an old set of riding boots where the sole had come halfway off, I have kept them in the workshop for about a year, with the intention of one day taking them apart and see if I could use them as template and make a new pair. But in the mean time I got inspired to try and fix them myself.

First the sole was removed by means of a set of pliers. 

The insole needed to be replaced as did the midsole. both of these were made of some cardboard like material. Kind of surprising actually that a set of decent boots are made with such crappy materials.
Another thing that was surprising was the fact that the insole and the uppers weren't sewn. it all relied on glue to hold the boot together. 

I made a new insole form a piece of vegetable tanned leather and glued it into place. Then I used an awl with a hook to sew it in place. The steel stiffener was glued in place and the voids were filled with some small scraps of leather. I had tried to make my own filler putty of of some PVA glue, sawdust and a bit of latex paint. After about a day I decided that I didn't trust that enough, so I removed it again. In addition to being difficult to remove, it left an ugly white deposit on the lower part of the boot. (So much for that experiment).

The next thing to come on was the midsole that I also made out of a piece of vegetable tanned leather. With that in place, the underside was sanded using a sanding wheel. This was done to get nice flowing curves and make sure that it would fit the rubber sole that was also going to be glued on.

I don't have a heel press for shoes and boots, so all the pressing of the contact glue was done by means of a hammer.

Finally the boots got some long needed black leather grease, and now they will hopefully last a couple of seasons more.

The damaged boot.

Closeup of the damage.

left to right:
Sole, inner lining, midsole, insole (with the metal stiffener on top)

New insole glued in.

After the sewing (not very pretty)

Voids filled with leather scraps.

Midsole glued in place and sanded.

Boots ready for service again.


Sunday, July 7, 2024

Table extensions for a Barnsley Hayrake table

 10 years ago I made a Barnsley Hayrake table to a friend of mine. The table ended up looking a bit weird since the legs were to close to the ends and the sides, and they were also too large compared to the size of the tabletop, giving it a bit of a clumsy look. 

The problem back then was that I had first been given a size that the table should end up being, and I started constructing the lower part of the table according to that. When I was done with the legs and stretchers and all assembled, my friend suddenly called me and asked how small I could make the table..

She had forgotten to take into account that in order for a table to work, it is fairly important that there is sufficient room for someone to pull out a chair to sit in.

Anyway, about half a year ago, she called me and asked if I could make some extensions for the table. 
I was curious to see how it looked, and I loved the idea of having a chance to make it look a bit more harmonic.
I drove up to see her and took some measurements of the table. the top had shrunk a bit unevenly, so one side was 3/4" narrower than the other end. But all in all the table still looked great.
As luck would have it, I still had a bit of larch left in dimensions that could be used for the extensions.

In order to avoid having to make an extra leg or some swing type support, I chose to make a frame and panel type extension. That way it could be held by just a couple of long sliding sticks underneath the tabletop. Also this meant that the extensions could be removed and there wouldn't be anything to interfere with the knees of the people sitting at the ends of the basic table.

I didn't do any finishing, but she said that she planned on giving it some soap just like the rest of the table had been treated with. 

Trimming of tenons.

Proof to Brian Eve that I still use his old plane :-)

Barnsley Hayrake table with extensions.

Frame and two panels.

Marking up for the holding sticks.

Working on the underside.

All completed.


Saturday, July 6, 2024

Hammer block for children

 Looking at past pictures, I stumbled on these pictures from back in 2022.

The grand son of some of our friends really liked hammering. 
And I remember that when Gustav and Asger were small, they had a hammer block in the workshop that they could hammer nails into at their hearts desire.

So I made a similar hammer block to our friends to give to their grandson,

The top is around 10" x 10", and the height is maybe 20", It is made out of spruce, so it is soft. Furthermore the grain is oriented with the end grain facing upwards, so even the smallest child can manage to hammer in some nails. 

The entire thing is glued together, and due to the slanted legs it is really stable. In order to make it instantly usable, I supplied a small hammer and a box of various nails with the hammer block.

I branded our logo on the block and the box and burned the name of the grandson into the handle of the hammer.

Since it is not intended to be a piece of fine furniture, I didn't see any reason to go wild in sanding the thing. As far as I remember, it was roughly sanded with some grit 60, and the edges were chamfered. And that was that.

Back when Gustav and Asger used their block, I remember that they were so proud when they had hammered in a large nail, and I had to come and admire it all the time. When they had friends over, it was always a sure hit as well.


Monday, July 1, 2024

Chimney Cupboard

 Back in January 2023 I built a chimney cupboard again. Like last time (2017) I used the plans from Bob Rozaieski, as they were published in Popular Woodworking. I built the cabinet with the intention of having it on display to show potential customers what we could make for their tack rooms. 

The cabinet I built previously has been a great source of storage space in our own tack room, and I still like the look of it a lot. It is such a classic shape in my opinion.

All of our other products are made out of high grade pine, but since I didn't have a customer, I didn't want to spend more money than needed to get some really nice wood, so I made this one out of spruce boards. Admittedly I regretted it as soon as I had to stain it. Pine stains nice and evenly. Spruce doesn't..

I can't remember how long time it took me to build it, but it is a reasonably fast build. It might have been around 14 hours or so, I forgot to write it down at that point. Since it was intended to be for sale I wanted to make it as fast as I could, and while the cabinet can easily be made purely by hand tools, some operations like making dadoes for the shelves are fast if done using a router. Also the raised panels for the doors I usually make on the table saw. 
Another thing I normally do is to install the raised panels in a rabbet instead of in a groove. that way I can assemble the door frames first, then make a rabbet all along the inner edges and install the panels using some small strips of wood and some brads. 

I didn't sell the cabinet, so after at bit of time I decided that I might as well start putting it to good use. So I filled it with a lot of the remedies that I use for repairing stable rugs. 

The cabinet would probably look better if it was painted compared to stained and varnished, but it is easy to wipe over with a damp cloth when it is varnished, and if it was installed in a tack room that would be appreciated. 
I can't praise the cabinet highly enough regarding storage space based on footprint. There is just so much useful space inside the cabinet, and the simple yet elegant lines still makes it a favourite of mine. 

It is without a doubt one of the most rewarding builds that I can think of. It is easy to accommodate in a small space like a flat or a small shop, and it easy and fun to make. Most people that sees it like it instantly, just like a hanging Shaker cabinet appeals to most people. 


Flattening the back a bit

A No 8 that I bought from Brian Eve

Marking out for the face frame

Face frame mounted.

The divider is simply glued to the front of the shelf.

Ready for finishing

Plenty of storage space in here.

Roman numerals and our branded logo

Stained and varnished.

I didn't finish the inside.

Spruce doesn't stain very well..


Friday, June 28, 2024

Stuff our company makes

2 years ago, Gustav and I started a small company called Hest & Hus ApS.

Our primary plan was to buy and renovate a small house that is to be rented out. We are nearing the completion of the renovation, and it has been a thorough round with new electric wiring, new plumbing, insulation, new floors, new kitchen etc. 

But in addition to the house renovation, I have been able to actually make money in my workshop! 

The biggest customer group we have is horse people, and since a lot of the stuff associated with horses is quite expensive, it is worth to repair. 
In the shop I have 2 leather sewing machines. A Singer patcher and a Singer class 7 (saddlemakers sewing machine). The patcher is used for repairing stable rugs (horse blankets), and other small articles such as girths etc. Once in a while something will be made out of such heavy fabric or heavy leather that I use the Singer class 7 for the repair job. 

Repairing things appeals a lot to me, and there is a need for people who can do repairs on horse rugs at a reasonable price and within a reasonable time. It isn't the most exciting thing to do, but it is honest work and it generates a pretty steady income.

Once in a while I also get some jobs repairing saddles. It is mostly the girth straps that need to be replaced, and that on the other hand is a task that I find really interesting and challenging. It is almost completely handwork to do these repairs. On the odd occasion, I can use the class 7 to stitch something at the bottom of a saddle flap, but mostly hand sewing is needed.

We make something called "event inventory" (directly translated from the Danish stævneinventar). It is stuff that you can bring with you to a horse event and use it for holding your equipment like saddles, saddle blankets, headstalls and halters etc. 
We also make these things for tack rooms, where the customers decide on the size they want. Those things are all made out of pine that is stained and varnished. The saddle blanket holders and the headstall holders are made with leather straps that are used to fix the items to the front of a horses box in an event stable. 

Saddle blanket holders in the workshop.

Headstall holders and saddle blanket holders in an eventing stable.

Close up of a headstall holder.

Headstall holder. The wooden hooks are made with splines for strength.

Headstall holder with 4 hooks.

Headstall holder with 3 hooks (plus a curious horse)

Saddle holder for 3 saddles for a tack room.

Bit holder for a tack room

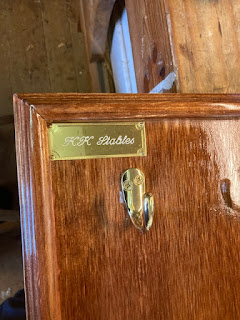
I bought an engraving machine to make name tags.

Logo on the bit plate.