Thursday, January 29, 2015

New tool chest for the sea 5, the lid.

After the grooving of the frame parts in the last post about this build, I continued with the fabrication of 4 mitred bridle joints.
I sawed out the tenons and the "mortise" using a hacksaw.
I am not sure if it is called a mortise for this type of joint, but until I find out, that is what I am going to call it.

I am becoming increasingly skilled at sawing out mortises with a hacksaw, so the joints went together with only a minimal trimming of one of the tenons.
The frame wasn't completely square, but I didn't expect it to be. I had made the parts slightly oversized to be able to deal with this situation.

The way I do it is similar to trimming the mitred dovetail joint:
I assemble the frame and square it up by measuring the diagonals. Each joint is pressed together until it makes contact somewhere. Next I clamp the dry assembly to a flat piece of wood taking care that each member of the frame is secured.
With a thin kerfed saw I saw down the middle of the joint, removing a little bit of materials from each side at the same time.
The frame is then flipped over and the joints on the other side receive the same treatment.
Usually I can get by with one or two rounds of doing this, but it all depends on how accurate you manage to make the mitres in the first place.

With the frame square and with tight joints, I measured the size for the floating panel.
I do this by measuring the "hole" in the frame, and then I add twice the depth of the groove to each measurement. Since this wood is bone dry, I am pretty sure it will expand when I bring the tools chest into my workshop at home. Therefore I subtracted a couple of mm's on the width to allow the panel to expand a little.

The panel was then brought to the desired size, and I ploughed a groove on all four sides of it to allow it to fit in the panel.
When I was done I made a test assembly before fetching the glue.
For glueing up this sort of lid, I allow the panel to be completely floating. So I only add glue to the mitred joints of the frame.
I added some clamps on the joints to make sure the walls of the mortises were pressed firmly together. It wasn't really necessary, but it doesn't hurt to do it, as long as you remember to put some blocks of wood between the clamps and the frame to avoid marring the surface.

The lid went to the top of the transformer for drying, and I started out attaching the bottom of the chest.

First I laid out the ship lapped boards and numbered them. I then ripped the end boards to make them approximately the same width. One of the end boards had some ugly tear out, so I opted for removing this instead of the two boards being the same width. I doubt that anyone will ever notice.
The bottom boards were then cross cut to the required length.
Since the rabbet is a bit shallow, I pre drilled holes at a slight angle to prevent them from accidentally wandering into the chest.
I glued the first board to the end of the chest before nailing it on. The remaining boards were mounted without any glue. To allow for some movement, I used a spacer to create a small distance between each board before attaching it. In this case the spacer is a 0.5 mm shim that I found in the junk box. The last board was also glued to the end of the chest before hammering in the nails.
My reason for doing this is that it will add some strength to the ends so the rabbets hopefully wont break as luggage handlers shift my bag in airports.

Test assembly of the lid.

Attaching the bottom, note spacer.

Detail of the mitred dovetail.

Testing the lid on the carcase.


Tuesday, January 27, 2015

New tool chest for the sea 4, Carcase assembled

After marking out the pins, I used my universal 4x4" workbench substitute for holding the end boards while I did the sawing.
To facilitate the process, I treated myself to a new blade in the hacksaw. I chose the coarsest type that we have on board: A 24 ppi blade. 
With a new saw blade and very little movement of the ship, the pins came out quite well. 

The lower dovetail of each corner ends in the rabbet for the bottom. There are different ways to end such a dovetail, and I chose to make a mitre. The idea is that before test fitting the dovetails, you saw out a 45 degree portion of the thin side of the rabbet. Then you push the assembly together and if the mitre seats before the rest of the dovetails you simply run a thin saw down through the mitre. It gives a nice clean look.

For glueing up I use a small brush to apply the glue to both sides of a dovetail assembly before putting them together. Maybe it is overkill, but I won't have to worry about all the glue being absorbed by the end grain before I push the pieces together.

The dovetails were made pretty tight, so I used a clamp to seat them fully. I removed the clamps afterwards to minimize the risk of the sides getting curved.
Before putting the assembly out on the transformer to dry, I checked the diagonals. There were about 1/32" difference between them. I used a quick grip to correct this.


Yesterday, I started working on the lid.

The lid will be made up of a frame and a panel. The frame will have mitred bridle joints. 

The first thing I did was to make the groove for the panel. I wanted the groove to be as wide as the open mortise for the joint itself, so I had to make two passes with my grooving plane to get to the correct width.
I aimed at a width of 1/4", since that is also the size of my smallest chisel. If I made the bridle joint any thinner hat the smallest chisel, I would have to sharpen a screwdriver to remove the waste from the joint.

After grooving all parts, I laid out the sizes of the individual parts for the frame, and sawed them to this length.
the longer pieces were sawn square in the ends, and the shorter pieces ends in a 45 degree mitre.

Next I used the marking gauge to transfer the location of the groove to the sides where I would be sawing out the shoulders for the tenon and the sides for the mortise.
Again I used a hack saw for the actual sawing.

The joints were cleaned up using a chisel and then it was getting time to call it a day.

Universal 4x4" workholding setup.

The glued up carcase.

Saturday, January 24, 2015

New tool chest for the sea 3, dados, rabbets and dovetails.

After finishing the stock preparation, I decided to try out my moving fillister for making ship lapping on the boards for the bottom of the chest. It went so well that I forgot to leave two end pieces with only a rabbet on one side. I still have a stretch that is wide enough, so it shouldn't be a problem.

Next I sawed the pieces for the case to their finished lengths + a small bit for squaring up on the shooting board.
The shooting board was out of square. I knew it was last time I used it, but I never did anything about it. But this time I had the fillister that could work as a rabbet plane. So I dismounted the fence and the rod and used it it adjust the shooting board with.
After that the ends were squared up.

I remounted the fence on the moving fillister and planed the rabbets for containing the bottom of the chest. This went surprisingly smooth.
Next I engaged the nicker iron of the moving fillister, and made a rabbet on each end of the tail boards. I discovered that I had a tendency to tilt the plane a bit, so the rabbet isn't completely level. It is a bit deeper on the outside which could result in visible gap once I assemble the case, but time will tell.

To try something new out here, I decided to go the "tails first" route. It is what I prefer to do while at home, but with my new rabbet making possibilities I figured that I would give it a go out here as well.

The tails were laid out using a divider. Given that this is supposed to be a tool chest I made them a bit sturdy. I used my old cardboard dovetail marker for laying out the angles, I think the slope is 1:6, but I can't really remember. Anyway that used to be the traditional slope in Denmark for soft wood, so it should be OK.

Instead of using a hack saw for sawing out the tails I tried using my dozuki saw. It is not the best saw for the job, possibly because it is filed for cross cutting. But nevertheless it got the job done. An advantage of using such a narrow blade for the tails is that the corners become more crisp compared to when I use a hack saw.
For the tails I think I'll go back to the hack saw, as it is easier to control, and the corners at the bottom of the pins will be square to the ends of the boards so a fat kerf doesn't matter here.

The waste between the tails were chopped out with a chisel.
I almost feel sorry for mentioning this again, but the Crown chisels I have in this set have steel that is as soft as tin foil. They are easy to sharp, but they very quickly get a damaged edge which would be understandable if it was iron wood, elm, superdry pitch pine or something along those lines. But this is soft spruce, so the edge ought to hold for more than 3 tails.
I think that I'll might find a 1/2" and a 1" E.A. Berg chisel at home and substitute the two Crown chisels with those. Thaw way I won't have to become irritated every time I need to chisel across the grain.

At the next opportunity I'll work on the pins and hopefully be able to glue the case together.

Set up for making dados.

Chopping out the waste between the tails.


Thursday, January 22, 2015

New tool chest for the sea 2, making your own nails

For this project I have decided to take a slightly different approach compared to how I have previously done things out here:
I plan on doing all the stock preparation before starting the actual joinery. My idea is that it is probably a bit more effective compared to the system where I prepare stock as I go along. I think that it might make the process faster as well, since I won't have to shift focus all the time. But we'll see once the project is done.

I have settled my mind for a ship lapped bottom, so I needed to find some nails to attach it with. I was pretty sure that we had some appropriate nails on board, but it turns out that we didn't..
This meant that I had to take a small metal working detour of the stock preparation, and make a small batch of nails. I quickly summed up the number of nails I would need for the bottom, and set to work.

I pretty much copied my last effort of making nails, and it worked even though the material for the nails had changed from brass wire to mild steel.
I would have preferred brass but we didn't have any. The closest thing we had was some bronze brazing that had the right diameter, but it was too brittle. So that when I tried to form a head it will just crack and break. 
Just in case you are wondering why it is not on my own blog: Brian Eve over at Toolerable generously allowed me to try out if blogging was something for me by writing a few posts as a guest writer.

Making your own nails can be accomplished with very few tools/materials:
Some single strand wire; steel, copper, brass etc. 
A ball peen hammer.
A stout piece of iron/steel
A drilling machine with a drill in the same diameter as the wire.
Pliers for cutting.
Pliers for pulling the finished nail out of the stout piece of iron. (You can use a combination pliers).
A machinist's vice.

1)
First test that the wire is malleable. Just hit one end with the ball end of a hammer and see if you can flatten it. If the wire flattens without breaking, it is usable. I am not talking paper flat here, but just get an idea if the material is brittle or not.

2)
Decide for the length of your nails. Find a drill of the same diameter as the wire you are using (I used 2 mm).
Drill a hole in the stout piece of iron. The depth of the hole correspond to the length of your nail.
Please remember to wear safety glasses while drilling. Small drills are prone to breaking, so be careful. (The extra hole that can be seen in the pictures was because I broke a drill..)

3)
Clamp the stout piece of iron in the vice with the hole facing upwards.

4)
Insert one end of the wire into the hole (make sure you reach the bottom). 

5)
Cut off the wire approximately 5/32 (4 mm) above the hole (this will work for a 2 mm nail, if you go up in diameter you might want to increase the figure a bit.

6)
Use the ball end of the hammer to shape the head of the nail by hitting the protruding piece of wire. The trick is to hit the periphery of the small wire. It takes a bit of practice, but it is not that hard. 
Don't use too big a hammer, I find it easier to control using a lot of small blows instead of 3 heavy ones. (But I am not a blacksmith so that could be why). This is essentially the same technique that is used when forming the head of a rivet .

7)
Pull up the finished nail with the pliers.

8)
You can add a bit of texture to the shank of the nail by either clamping it in the vice after it is done or scratch up the surface with a file. But this is optional. I just like that the nails aren't too smooth on the surface, I think they'll hold better with a bit of texture.
The vice trick works pretty good for brass nails and I suspect also for copper nails.
For these I used a file.

A piece of wire, being pressed into the hole.

Protruding piece after cutting the wire.

Head shaped by means of the ball end of a hammer.

A finished nail (before adding texture to the surface).


Tuesday, January 20, 2015

New tool chest for the sea 1

I have used the old tool chest for the sea in a bit more than a year, and I can't ignore the fact any more: It needs to be replaced.
Being thrown around in a bag in various airports have taken its toll on the chest, and it is pretty much beyond repair now. 

The good news is that it gives me an excuse for building another small chest while I am on the ship. Furthermore I now know that it needs to be a bit more sturdy built than the old one. 

There was hardly any space left in the existing tool chest, so I want to make the new chest a little bit bigger, so it can accommodate my moving fillister plane as well. But I still need to be able to put the chest in my bag for transportation.

I have pretty much settled for a chest with outside measurements of 16 x 11.5 x 8" My aim is to make the stock approximately 5/8". That should give me an inside volume of around 3.5 gallons (13.5 L) which is a bit more than my current tools chest.
I might make the bottom just 1/2" which should give a little extra volume. With a bit of luck, I can maybe use the bottom of my current tool chest. 

Normally when I attach a bottom to a small chest, I either nail it on and cover the sides with a skirt, or I'll plough a groove and insert the bottom in that.
For this chest my idea is that instead of adding a skirt for covering the end grain of the bottom, I'll make a rabbet for the bottom and thereby leave a clean looking side. The bottom will then be nailed in place with nails from the sides to add strength to it. That will also give me an excuse for using the moving fillister.
If I am able to use the plywood bottom from the old chest, I'll use screws from the bottom only
I should be able to see in a year or so, if it is an OK solution.

The lid will probably be a panel in a frame assembled with mitered bridle joints. 
I would like to paint the chest, so that will rule out using the lid for a shooting board this time. Instead I might be able to make a small shooting board that can fit inside the chest. Kind of like a bench hook.

As usual I'll make the major parts out of pallet sides, I found this set of sides that looked OK. It is for a half pallet, and It should be enough for the sides of the chest.
I started out by sawing off the hinges.
Next I flattened one side of each of the boards and then I tried to make it 5/8" thick. 
I am not very good at planing 4 panels to the same thickness, so there is bound to be a bit of planing to do once it is assembled. I did get pretty close on these boards though, and that is fine with me.

One of the boards revealed a massive pocket of liquid resin, once I had planed it to the final thickness.
Even I couldn't ignore such a pool, so I had to do something about it.
I traced the outside of a piece of wood that would cover the resin pocket. Then I carefully sawed on the inside of the line and chiselled out the waste afterwards. Kind of like a very shallow mortise.
The piece was glued in, and when the glue has dried, I am going to plane it flush with the board again.

The pallet sides.

Stock preparation.

Resin pocket.

Shallow mortise and graving piece.

Graving piece glued in.


Sunday, January 18, 2015

Buy flowers for your wife day

There are all sorts of days where shops try to press you into buying flowers, candy or jewellery for your wife or girlfriend.
The problem with those days is that the person receiving the flowers know that you didn't think of this yourself.
If on the other hand, you suddenly out of the blue presents your loved one with flowers on some ordinary day, the effect is often quite remarkable.

Since it is unlikely that your wife or girlfriend regularly visits woodworking blogs, I figured that this would be a good place for advocating the idea.

So please consider giving your wife some flowers today or tomorrow. You don't have to buy them, if you can find some flowers in a field or someone else's garden it will be fine too (provided that you are allowed to pick those flowers!).

It doesn't have to be a super fancy bouquet, just some flowers to make her happy. If you are in doubt, I am sure the florist at the shop can help you with a suggestion.

If you are not near your home at the moment, consider getting flowers delivered to your wife via Interflora or some other long distance flower delivery system.

I am in no way economic connected to any flower programme, so I don't make any money on you buying any flowers.

Have a nice day :-)


Saturday, January 17, 2015

Ståhls moving fillister

In the large chest of old tools that I got for Christmas, there was moving fillister plane.
The plane looks like a copy of a Stanley No 78.

As far as I have found out on the Internet, the company Ståhls was a large retailer that branded tools made by other companies. Therefore the plane is most likely manufactured by Järnbolaget Eskilstuna (Sweden).

A couple of things on this plane are peculiar:

1)
There are both inch based threads and metric threads present on the plane. And it doesn't look like the metric threads have been added later on as a repair job.
The screws for holding the iron and the lever cap look a lot like 3/16" threads, but the thread for the rod holding the fence and also the screw to tighten the lever cap are M6. The thumb screws are both M5 and the screw for holding the nicker is M4.
The best suggestion I have as to why the manufacturer didn't stick to either imperial or metric threads, is that the setup for the drilling and tapping of the two diagonally placed holes were a dedicated machine that was difficult to change, hence they continued with the imperial threads in those places. The rest of the holes are all square to the cast and ground body, so they could be made on any drill press. But this is just my guess.

2)
The spelling of Sweden is wrong.
Apparently they must have decided that the function of the plane was more important than any misspelling, so they finished the run of planes.
Now this is the only plane that I have from Ståhls, so I don't know if this is a mistake that is on all their planes, but I doubt it.
The misspelling must have started out somewhere, perhaps it was drawn correctly on the drawing that was sent to the die pattern maker, but the pattern maker routinely corrected the spelling to suit how the name Sweden is spelled in Swedish (Sverige). If anyone had to check the model before starting to cast the iron, either they didn't notice or didn't know it was not correct, or they just didn't want to take the trouble to make a new model.
Whatever the reason, the spelling is as you can see SVEDEN.

I think that whenever I will use the plane, I will always know that whatever mistake I make in the project, It will be easier to conceal than a misspelling in cast iron. That is a comfort.

I cleaned the plane and checked the sole for flatness. It was dead flat. The fence was square to the sole and also flat. The only thing that was a bit out of square was the depth stop. I fixed that with a file and some emery paper. After that I honed the blade and cleaned the plane a bit.
I filed the knicker at the same time, so it didn't protrude quite as far.
The only part missing was the thumbscrew for the depth stop. I made a new one out of brass on the lathe followed by a bit of sawing with a hacksaw and some filing.


Note the spelling: MADE IN SVEDEN

Plane before cleaning.

Ståhls moving fillister.


Monday, January 12, 2015

Small hanging cabinet with drawers part 9

As some might remember, I started this project about a year ago while on the ship. I actually completed the project in the beginning of December 2014, but I never posted any pictures of it because it was going to be a surprise for my wife,

Together with the children we made it a calender gift, so each day the children would put in some small gift in one of the drawers, so she got 24 small gifts before Christmas.

Some of the gifts were a package of chewing gum, some were a vanilla fudge, and others were hand made gift certificates on things like a vacuum cleaning of the lower floor of the house, or raking the riding court etc. The children really took the project seriously and it was fun to see how much effort they put into making nice looking gift certificates.

At first my plan was to dovetail the drawers, but I decided that it would probably be overkill and that a rabbeted construction was OK for a small cabinet like this one. After all it will probably only hold small lightweight items.

The front, sides and back of the drawers are made out of larch. The bottoms are 6 mm birch plywood.
The drawer pulls are some that my dad once gave me They are perfect for small project like this one.

I applied a mixture of camelia oil and orange oil to the drawers. Then they were finished with some paste wax made out of beeswax and orange oil.

The door had swelled a bit after leaving the relatively dry and hot air of the engine room on the ship. I planed a bit of so it could just fit in the frame.
After entering the house it shrunk a bit again, so now the gap is a bit larger than I would like it to be, but nobody except me seems to notice it.

I made some small pieces of moulding that I attached to the top and bottom of the cabinet. Furthermore I planed a small chamfer on the two front corners to add some more visual interest.

I made an escutcheon out of a piece of bone. Attaching it was actually harder than I imagined. The stiles are pretty thin, so there there is not a lot of material between the lock case itself and the surface. Therefore the nails couldn't be longer than about 1/4". The escutcheon is around 3/16" thick, so there isn't a lot of holding power left in the small nails.
I have used a bit of liquid hide on the back of the escutcheon, and it seems to work so far.

My original plan was to paint the cabinet green and red, but since it was for my wife, I figured I'd better ask her what colour of furniture she preferred. She said that it was a bit of an odd question, when she didn't know what furniture we were talking about, but I told her it was a secret so far. She reached the conclusion that she likes blue furniture. This was based on an old enamel advertising sign that we have in the kitchen. She likes those bright blue and red colours.

I found some old blue enamel and some Volvo BM red tractor enamel that looked pretty similar to the colours of the old sign, so they were applied.

All that is left is to find out where the cabinet should be placed.

The finished cabinet. (16" x 12" x 6")

Drawers with continuous grain lines.


Wittler enamel advertising sign.
(Inspiration for the paint scheme)

Drawer construction.

Escutcheon and details of paint job.

Sunday, January 4, 2015

Sandvik No 761, Tenon saw / Zapfsäge

In the tool chest that I got for Christmas, there was also a backsaw. At first I guesses that it was a dovetail saw, but after a little bit of investigation, I found out that it was actually a tenon saw.

The handle had lost most of its original lacquer, the blade was loose in the handle, but the steel itself looked fine.

The handle is originally attached to the blade by means of some large rivets. Technically I could just have smacked them with a hammer and have fixed the blade a bit better, but I wanted to remove the blade completely and than I would make a different system.

To remove the rivets, I drilled a hole down the the centre of them, and progressively increasing the size of the drill until the shaft of the rivet broke.

I sanded the handle lightly and added some oil to it. I used a mixture of tung oil and orange oil that I had left from a previous project. The oil was added using a Scotch brite pad and wiped off after a little while.

The saw blade was cleaned using some fine sandpaper and some emery cloth. I didn't want to ruin the etching on the side, so I didn't go all wild with the job of shining the blade up.

The set of the teeth was fine, and the saw blade was straight, so I just filed the teeth. 2 light strokes per tooth was all it took to make it nice and sharp. I went for a rip tooth, but with a small angle, so technically I suppose it is a cross cut. I guess the angle is around 80 degrees.
The toothing is 10 PPI, which is a bit coarser than my Flinn Garlick tenon saw (13 TPI), but I think it will be fine for softwood.

For attaching the handle, I made some saw nuts out of brass on my metal lathe. I designed them so that the shaft of the nut would fit perfectly in the elongated slots of the blade. That way the blade wouldn't just be held in place by the pressure of the handle.
For screws I opted for using some 5 mm carriage bolts. They have a 13 mm head that looks a bit like the head of the original rivets.

After assembling the saw, I tested it on a piece of larch, and it makes a nice cut.  All that is left is to come up with a project where I can use the saw.


Die kleine Säge in die Werkzeugkiste war nicht ein Zinksäge sondern ein Zapfsäge.
Ich habe der Handgriff geschliffen und leicht einölt. Ich habe ein Mischung von Tungöl und Orangenöl verwendet.

Das Sägeblatt war leicht mit Schleifpapier gereinigt.

Am Drehbank habe ich zwei neue Muttern aus Messing gemacht.

Die Zahnung ist 10 TPI (ist das ZPZ = Zähne pro Zoll in Deutsch?).


Disassembled tenon saw.

Handle before sanding.

Sawblade, back, rivets (drilled out), handle.

Etching on the sawblade
 
Sandvik No 761 Tenon saw
 
Sandvik No 761 Tenon saw


Thursday, January 1, 2015

Tools for Christmas / Werkzeuge für Weihnachten

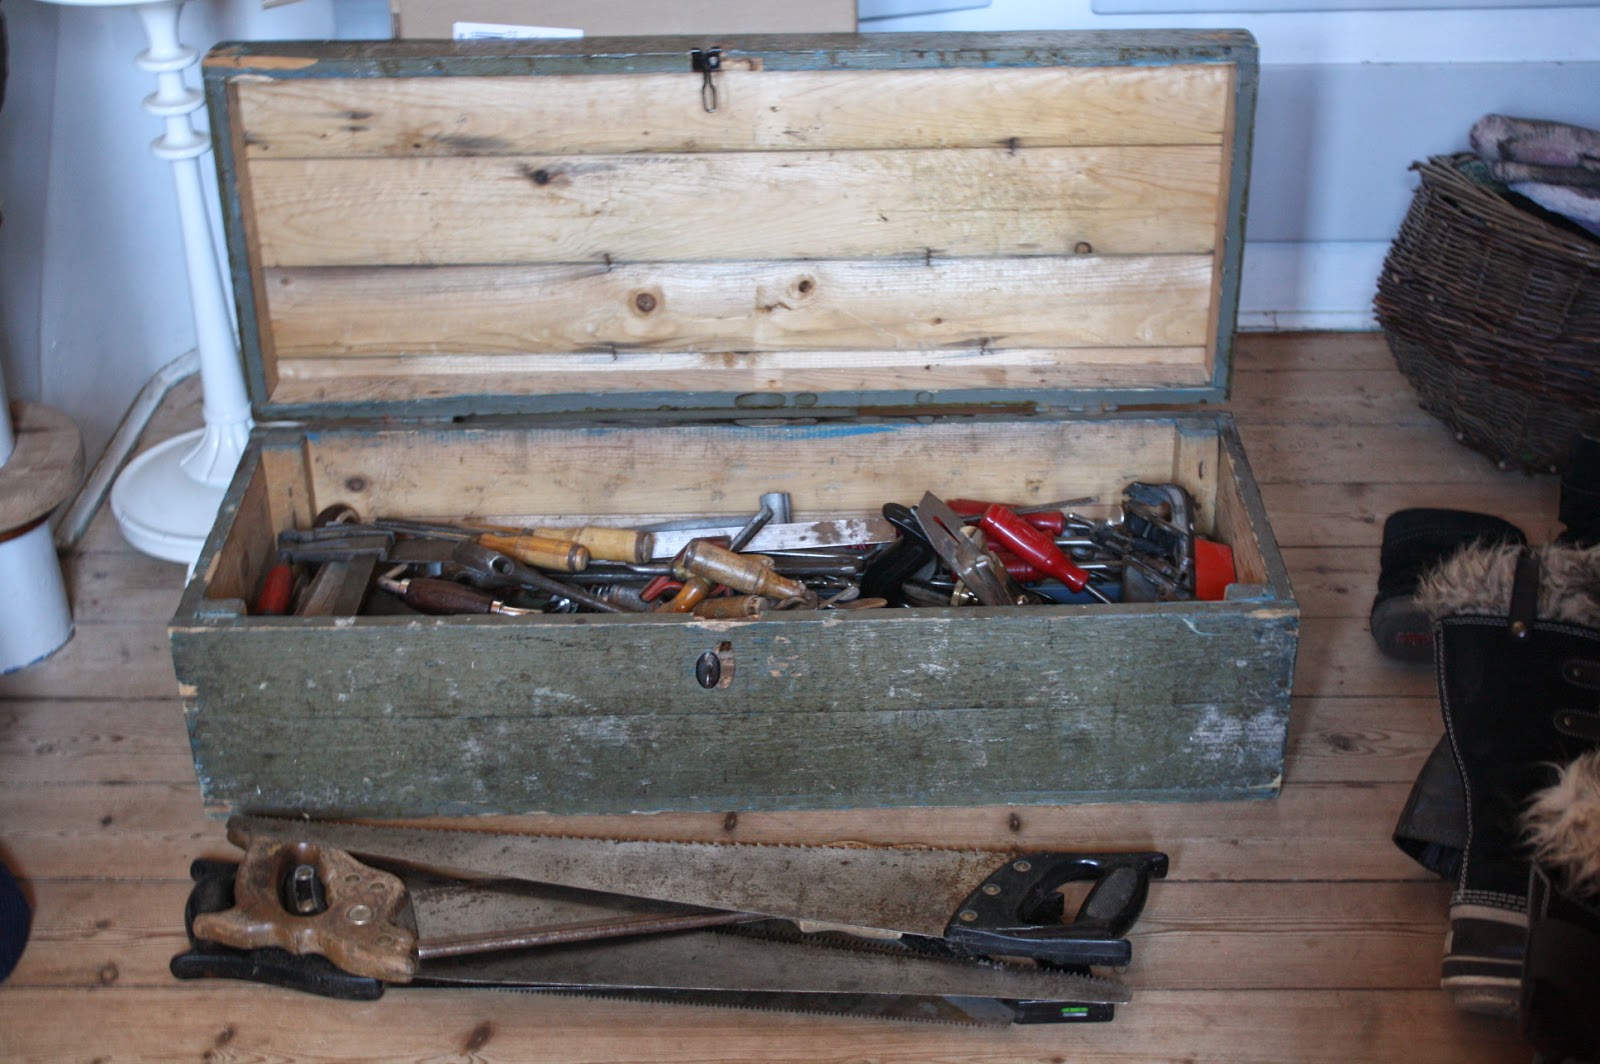
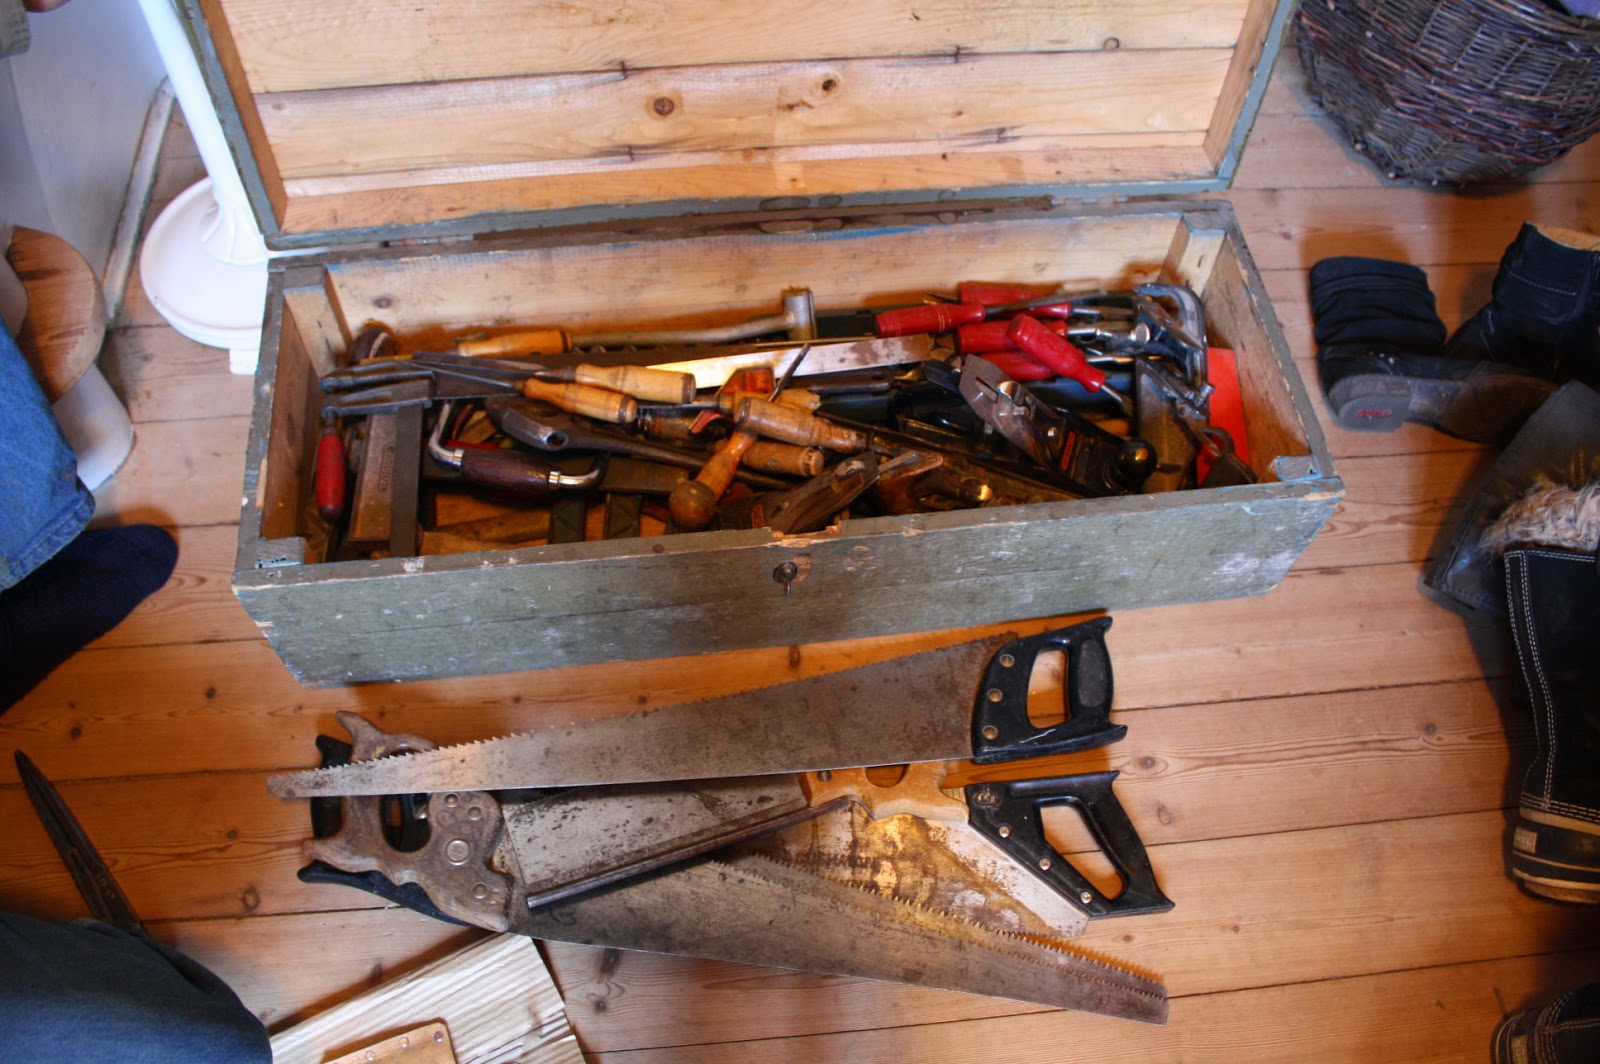
I got an old tool chest filled with tools from my parents for Christmas. My dad had bought it at an auction in Karlstad in Sweden not far from where they have a summer house.
The chest itself is nailed together, and it is fairly long and sleek. It looks like it has seen some work, it is worn but still in OK shape.

In addition to the chest, my dad gave me an old Danish produced slick that he had in his workshop. He made a small leather sheath to protect the edge.

I have spent a couple of hours sharpening some of the chisels and the slick, and generally just looking at all the old tools.

Here is a list of the content:

21 different drills/augers
9 metal chisels and drift pins
1 hinge bender
14 chisels ranging from 1/4" to 1½"
2 No 4 planes
1 No 5 plane
1 auger (practically new)
1 old Swedish rabbet plane
4 panel saws (rip + crosscutting teeth).
1 dovetail saw (Sandvik)
2 gouges.
3 adjustable wrenches 15" in length.
4 smaller adjustable wrenches.
2 long auger drills.
4 clamps.
2 squares (1 is adjustable)
3 hammers
2 saw set pliers.
1 marking gauge.
1 compass with quick release mechanism.
1 angle grinder. (which I traded with my dad for a No 7 Kunz jointer).
+ various bits and pieces.

HAPPY NEWYEAR

Meine Eltern haben mir als ein Weihnachtsgeschenk ein alte Werkzeugkiste voll von Werkzeug gekauft. Mein Vater hat es auf ein Auktion in Karlstad in Schweden gekauft. Das ist in die nähe von ihre Sommerhaus. 
Die Kiste ist ziemlich schmal und recht lang. Die ist mit Nageln gemacht und sieht aus wie ein alltags Kiste.

Mein Vater hat mir auch ein alte Dänisches Stoßaxt gegeben.

Ich habe ein paar Stunden in der Werkstatt gebraucht und bis jetzt habe ich an die alten Stemmeisen gearbeitet.

Hier ist eine Liste über das Einhalt in die Kiste:

21 verschiedene Bohrer
9 Metall Meißeln und Dornen.
1 Scharnier Gebogenwerkzeug.
14 Stemmeisen zwischen 6 mm und 38 mm.
2 No 4 Hobeln.
1 No 5 Hobel.
1 Bohrwinde.
1 alte Schwedische Falshobel.
4 Fuchsschwänzen.
1 Zinksäge (Sandvik)
2 Hohl Eisen.
3 Schraubenschlüssel 15" lang.
4 kleinere Schraubenschlüssel.
2 lange Bohrer rund 50 cm in länge.
4 Schraubenzwingen.
2 Winkel ( ist justierbar)
3 Hammer
2 Schränkzangen.
1 Streichmaß.
1 Spitzzirkel.
1 Winkelschleifer die ich mit ein Kunz No 7 Hobel tauschte.
+ Verschiedenes Kleinigkeiten.

PROST NEUJAHR

Toolchest with contents 

Slick / Stoßaxt

Tools :-)

Hinge bender.

HInge bender.