I sawed some 1/2" thick boards on the saw mill that I installed between the joists. These boards are only there to hold the insulation, so they won't carry a lot of weight.
The insulation was added (6"), and a plastic membrane was mounted on top. I am not quite sure that it is needed since there will not be much human activity in the barn to breathe out humidity, and besides it also shields the insulation a bit while I am working on the floor itself.
The floor boards are 1 3/4" thick and are joined by means of a loose tongue.
I have finally gotten around to using my Veritas BU jointer that I bought some years ago at a great price. I use it to joint the edges of the boards before I make the groove for the tongue.
The upper corner is planed off with two swipes of the block plane, so it is just a tiny bevel that will keep splintering to a minimum.
The groove is made with an electric router. A year ago I finally had it with my old router and forked out some real cash and got myself a more professional Makita router. That thing is so much better than the old one, it is easier to hold, it can actually retain the cutter in the desired position and it does a quick job of making a groove.
Due to the width of the boards I am installing them with nails through the top instead of using hidden nails or screws.
I would have liked to use headless nails like I used for the porch, but those are not available in 5.5" so that is why I am using regular nails. They look a bit crude, but it is a barn after all.
They are mounted 5/4" form the sides of each board, and if the board is very wide I also put a nail in the middle as well. To keep the heads aligned, I am using a piece of string to mark out the position.
Olav stopped by today and gave me a hand, and also took some pictures. So all the pictures of today are by the courtesy of Olav.

Hammering.

Hammering.

Floor boards on the right, Merlin half way hidden.

Veritas BU jointer with fence, now in use!

The board is clamped to a 5x5 to be able to stand on an edge.

Beveling the edges of the groove.

Larch floor board prior to grooving.

Cross cutting.
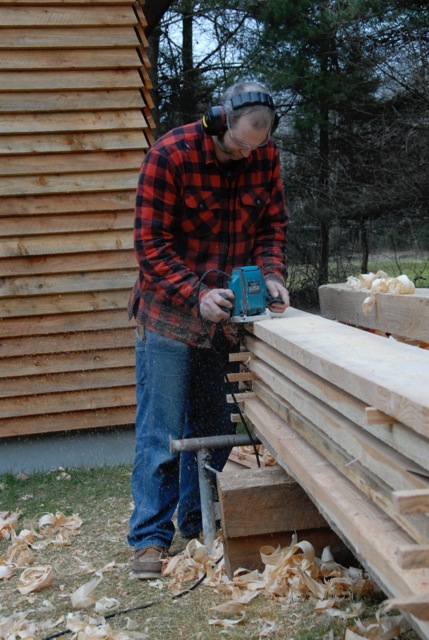
Grooving with the Makita.

A router is noisy and dusty but fast.

Merlin is supervising the project.

A finished board with grooves.
Jonas,
ReplyDeleteBack in the day when the back would last the day, there was nothing I enjoyed more than framing out and drying in a barn/outbuilding with my best friend. Your photos brought a flood of wonderful memories.
It is a beautiful barn and looks to be made to last plus doggie pictures...
Give Merlin a butt scratch and treat, Sam and Maggie say woof.
ken
Hi Ken
DeleteEvery time I am out there working, I think of our old dog Fnug. She would always accompany me and sleep in the shade.
Merlin is Olavs dog, and it follows him literally everywhere. Bertha was at home yesterday due to a small disagreement Wednesday. We saw different on the subject of biting off ones line and then running out for a small adventure. Bertha managed to bite off her line 4 times on that day, and the third time she did it I tried to chase her, but she interpreted it as a funny game so she accelerated like a Yamaha RD 350, and vanished into the scrubs. I walked a long time before finally returning to the summerhouse, and there she was. Looking at me like she wanted to accuse me of being irresponsible leaving a small delicate puppy like her all alone.
So yesterday she stayed at home with my wife Mette.
Staying at home didn't keep her out of trouble though, as the surrounding fields have all been drenched in liquid manure from pigs. My wife told me that she had run into a field and found a "nice" puddle to roll herself in. So a shower was found necessary. Ah the joys of living in the countryside..
Woof back from Bertha.
Brgds
Jonas
That last photo looks like you have a groove on each side. Are you joining them with a spline?
ReplyDeleteI wonder why dogs find it necessary to roll in the dirtiest, smelliest thing they can find?
Hi Brian.
DeleteYup, I am joining the boards with a loose spline. It isn't particularly loose though, as I planed the splines to be a light press fit.
Regarding the dog smelling rolling thing, I once saw a documentary on TV that suggested it was sort of a camouflage idea that they had by instinct, so it could disguise their smell from the prey. I doubt that the food bowl will behave different though, but reasoning with a puppy is not super easy..
Cheers
Jonas
Looking great, this would be quite a building once finished.
ReplyDeleteHe he the joy of doggies in the country side. Jake, my Bearded Collie, was the master of evasion. When he decided he is going for a stroll in the woods, there was no holding him, he was quite the Houdini :-)
Woofs to Bertha and Merlin from Rudy
Bob, whose Puppy Rudy still likes to chew stuff....
Hi Bob.
DeleteI guess that if God provided you with such a nice set of teeth it would be a shame not to use them. And a leash is as fine a project for chewing as any stick :-)
The kids have just bathed her again using shampoo again, but there is still a bit of odor left.
I am still enjoying every bit of the building process, and there is luckily quite a bit left to do.
Brgds
Jonas
I lenjoy seeing things built with traditional methods. I'm not sure the double groove is 100% traditional in your area (but your method seems very quick and reliable), but it's going to be so much better than a simple plywood or OSB floor. I love the looks of your little barn.
ReplyDeleteHi Jeremy.
DeleteI think the traditional method for a barn would be to just nail on the boards without any inter connection, like a butt joint. The next most traditional method would probably be regular tongue and groove boards. The good thing about using a loose spline is that the boards are not narrowed.
My boards are a lot thicker than what is usual in Denmark, but I like the stability that comes with a thick board. Plus
I am glad that you like the looks of the barn. It is a lightly scaled down version of a barn that I found at Louisiana State University. http://www.lsuagcenter.com/portals/our_offices/departments/biological-ag-engineering/extension/building_plans/barn/framing/general-barn-1
Brgds
Jonas
The barn looks phenomenal! I love the look of the wide floor boards; it reminds me of the flooring in the historical colonial houses in my region.
ReplyDeleteOnce again, WELL DONE!
Hi Bill
DeleteThanks for the very nice praise of my small barn.
I have made those floor boards as wide as I could, and I have not made them parallel. Each board was first cut to the correct thickness, and then I sawed of the sides so they taper slightly like a regular tree trunk would.
I try to alternate the ends of the boards so that two boards give an almost parallel "unit". Most of the boards just taper something like 1/2 - 3/4" in the width, so it isn't a lot, but I know that this was sometimes done in order to utilize as much wood as possible.
Brgds
Jonas
From what little I know about the subject, you are correct. They would use the boards in their "tapered" states, and just butt them together to get the gap as close and even as possible. Apparently, only the most wealthy people would have floor boards that were perfectly symmetrical.
DeleteWhen I designed the barn, I made it so that it wasn't longer than any of the boards that I have available from my saw mill. I buy the logs in pre cut lengths of 14'. prolonging boards is difficult if they are tapered, so in that particular case parallel boards would have made sense. But I think that tapered boards are kind of interesting and that counts for a whole lot in my projects :-)
DeleteWhat a great floor. I've always liked the feel of thick, heavy wood underfoot. The big nails sound like they look just right, too.
ReplyDeleteHi Jeff
DeleteThanks. The floor is really sturdy. I am just waiting for some better weather, since I have to do the routing and jointing outside. As usual it is raining like crazy, but maybe someday it will stop.
Brgds
Jonas