There was a little bit of metal left from the sawing, but all in all it went pretty fast.
This was where the exiting part started. There wasn't really much more I could do except trying to assemble the pieces.
The sides went on with a few taps from a plastic faced hammer, and then it was a question of mustering a bit of courage and start peening the metal.
A couple of small clamps would have been nice, but we haven't got any on this ship, so I found a pair of pliers that could work for the initial holding.
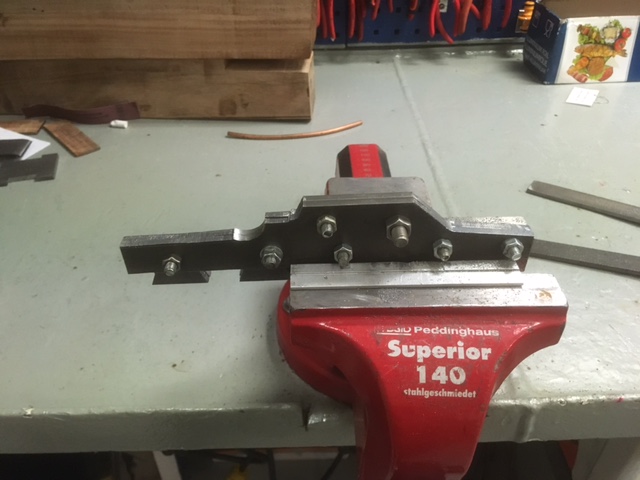
The side that was to be peened was mounted securely in the vice, and I started hammering.
I had no idea if I had hammered adequately, too much or too little, but I could feel that the side had become attached to the sole. After peening all the tails, I was astonished by how solid the plane felt. Like one single unit.
I peened the protruding pins a bit as well for good measure, and then it was back to more sawing and filing..
After quite a bit of work, the plane no longer looked like a hammering exercise, but more like a plane body.
I discovered a few places where the dovetails were not as tight as I would have liked them to be, but overall I am happy with the result.
There is still a long way to go to make it a shiny plane, but at least it has got the shape. A belt sander would have come in pretty handy, but lacking one, a file can still do the job.
I would like to thank Peter McBride for an excellent page with a bunch of useful information on building infill planes. I am sorry that I have forgotten to mention that site before, but it has been a great source of inspiration for this project.

Assembled plane body after first filing.

Plane body.
Dressing the edges.

After peening the metal.
The joinery looks great, what a contrast from post-peening to the final look. You've got me thinking about making some metal dovetails now just for fun. Also, I like the profile even more every time I see it - nice looking design.
ReplyDeleteHi Jeff.
DeleteThanks. A nice thing about the brass/steel combination planes is that you can instantly recognize the dovetails. That will be a little hard on this model once it is done, but I will know it is there.
I think the profile will look better when there will be some wood inserted in it.
Brgds
Jonas
My God, man! Everything you touch seems to turn to gold! It looks fantastic!
ReplyDeleteThanks Brian
DeleteIt did turn out quite well. :-)
Brgds
Jonas
He must have purchased his wand at Ollivanders.
DeletePerhaps that Phoenix left a third tail feather?
DeleteI could almost guarantee it!!!
DeleteThe secret is to only buy a wand which is made from pallet wood with hair from a Newfoundland dog inside. Those are unquestionably the best for woodworking spells.
DeleteJonas,This is amazing. It always surprises me how much metal working skill I've developed as a hand tool woodworker. I don't think I'm ready to make an infill plane yet, but I love watching your build. Keep up the great work and stay safe on the big pond. Take Care - Chris
ReplyDeleteHi Chris.
DeleteThanks for the nice comment.
At home I wouldn't have made such a project, but out here I find it OK to make experimental projects like it.
Perhaps if it turns out really nice, I could consider building another, but I'll have to see about that.
I am looking forward to working with the wood infill.
Brgds
Jonas
Wow, making great progress, I can barely keep uyp with your blog entries :-)
ReplyDeleteWhat did you use for a buck while peening the dovetails??
Bob, impressed as usual. Back in with Rudy all wet, its pouring hard out there
Hi Bob
DeleteI seem to be on a streak at the moment regarding my blogging. :-)
I didn't really use a buck for peening. I just clamped the side to be peened in the vice and then peened one tail at a time, moving the piece in the vice to get maximum support all the time.
At last I laid the plane on its side and peened the pins as well, using the anvil of the vice as base. Technically I could have distorted the bottom, but that would have required smashing blows instead of peening.
Brgds
Jonas
The final result looks very good.
ReplyDeleteI have no experience with this but I would have thought that the pins were to be peened to prevent them to slide out.
Sylvain
Hi Sylvain.
DeleteThanks.
I filed some tail depressions (for lack of a better description) on the lower inside of the pins. So if you look at the last picture of post No 5, you can see that the underside of the pins aren't square to the sides. So when the side pieces with the tails are inserted, there is a void on the inside that need to be filled. This will ensure that even if I removed 2 mm of thickness from the sides, they will still stay in place.
If it had been brass sides, it would be a lot easier to see, but it looks a bit like an impossible dovetail.
Brgds
Jonas
Jonas,
ReplyDeleteGood show, it's a bit more than I would tackle but it's great watching you put it together.
ken
Hi Ken.
DeleteThanks.
I like that I can feel a steady progress of the project. I am beginning to understand why infill planes are so expensive. There is more work involved than I imagined.
Brgds
Jonas