Sunday, January 4, 2015

Sandvik No 761, Tenon saw / Zapfsäge

In the tool chest that I got for Christmas, there was also a backsaw. At first I guesses that it was a dovetail saw, but after a little bit of investigation, I found out that it was actually a tenon saw.

The handle had lost most of its original lacquer, the blade was loose in the handle, but the steel itself looked fine.

The handle is originally attached to the blade by means of some large rivets. Technically I could just have smacked them with a hammer and have fixed the blade a bit better, but I wanted to remove the blade completely and than I would make a different system.

To remove the rivets, I drilled a hole down the the centre of them, and progressively increasing the size of the drill until the shaft of the rivet broke.

I sanded the handle lightly and added some oil to it. I used a mixture of tung oil and orange oil that I had left from a previous project. The oil was added using a Scotch brite pad and wiped off after a little while.

The saw blade was cleaned using some fine sandpaper and some emery cloth. I didn't want to ruin the etching on the side, so I didn't go all wild with the job of shining the blade up.

The set of the teeth was fine, and the saw blade was straight, so I just filed the teeth. 2 light strokes per tooth was all it took to make it nice and sharp. I went for a rip tooth, but with a small angle, so technically I suppose it is a cross cut. I guess the angle is around 80 degrees.
The toothing is 10 PPI, which is a bit coarser than my Flinn Garlick tenon saw (13 TPI), but I think it will be fine for softwood.

For attaching the handle, I made some saw nuts out of brass on my metal lathe. I designed them so that the shaft of the nut would fit perfectly in the elongated slots of the blade. That way the blade wouldn't just be held in place by the pressure of the handle.
For screws I opted for using some 5 mm carriage bolts. They have a 13 mm head that looks a bit like the head of the original rivets.

After assembling the saw, I tested it on a piece of larch, and it makes a nice cut.  All that is left is to come up with a project where I can use the saw.


Die kleine Säge in die Werkzeugkiste war nicht ein Zinksäge sondern ein Zapfsäge.
Ich habe der Handgriff geschliffen und leicht einölt. Ich habe ein Mischung von Tungöl und Orangenöl verwendet.

Das Sägeblatt war leicht mit Schleifpapier gereinigt.

Am Drehbank habe ich zwei neue Muttern aus Messing gemacht.

Die Zahnung ist 10 TPI (ist das ZPZ = Zähne pro Zoll in Deutsch?).


Disassembled tenon saw.

Handle before sanding.

Sawblade, back, rivets (drilled out), handle.

Etching on the sawblade
 
Sandvik No 761 Tenon saw
 
Sandvik No 761 Tenon saw


Thursday, January 1, 2015

Tools for Christmas / Werkzeuge für Weihnachten

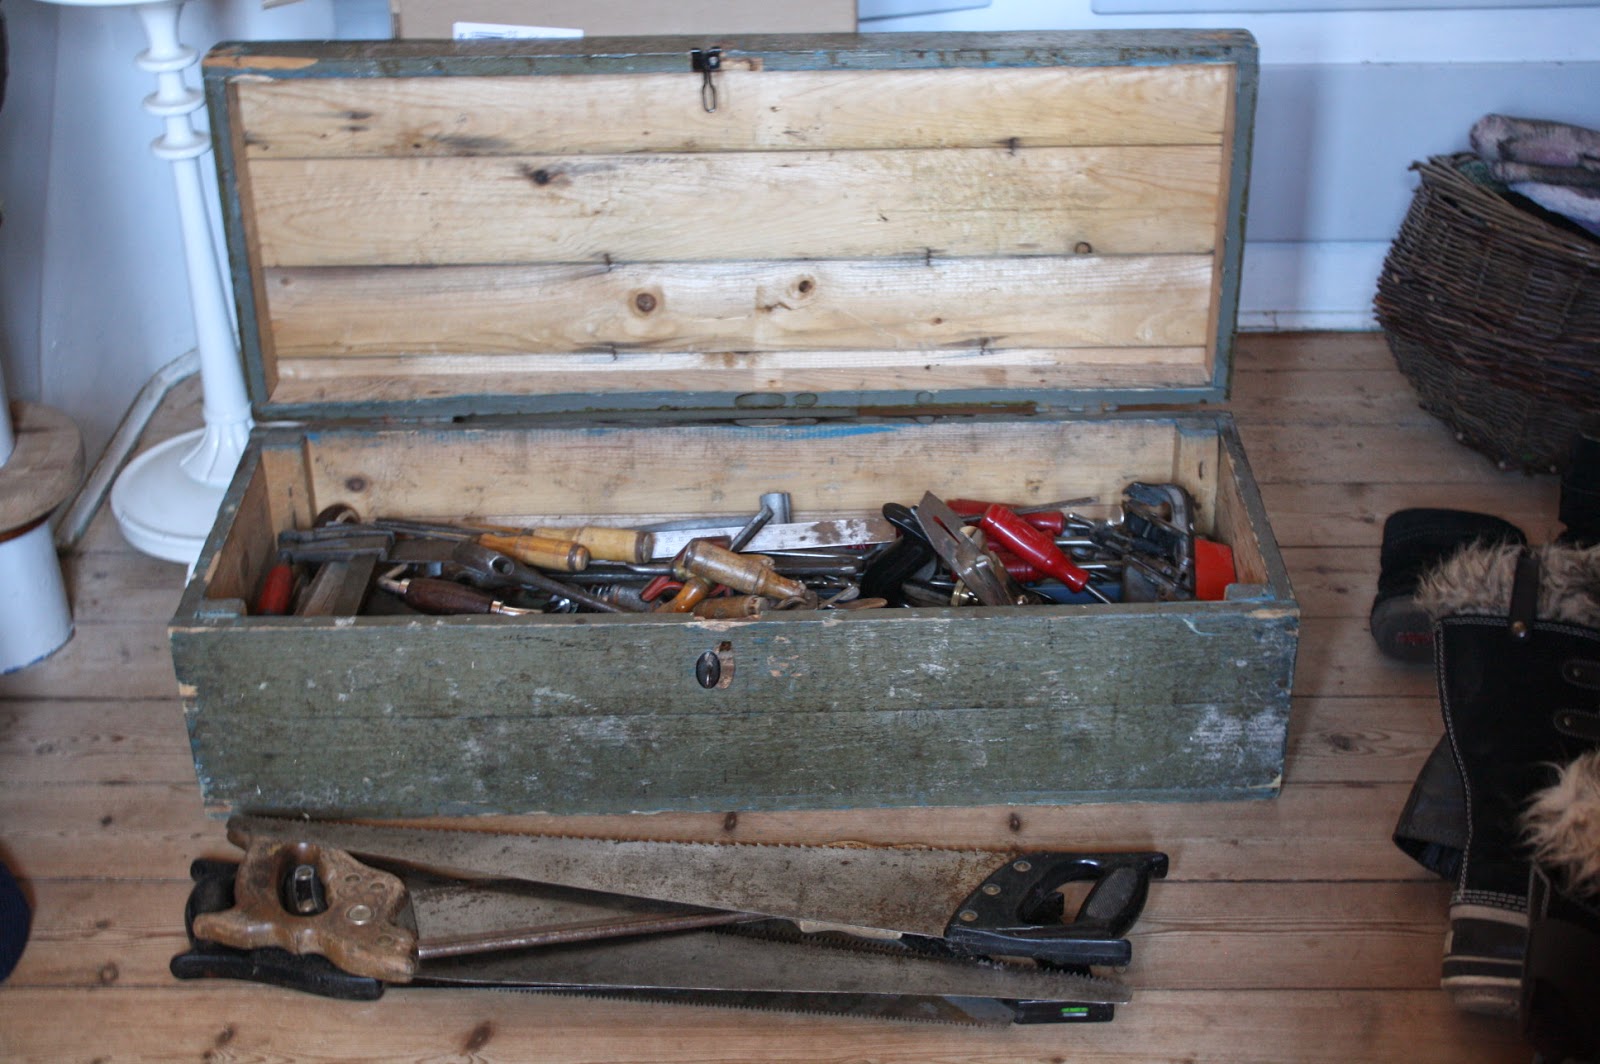
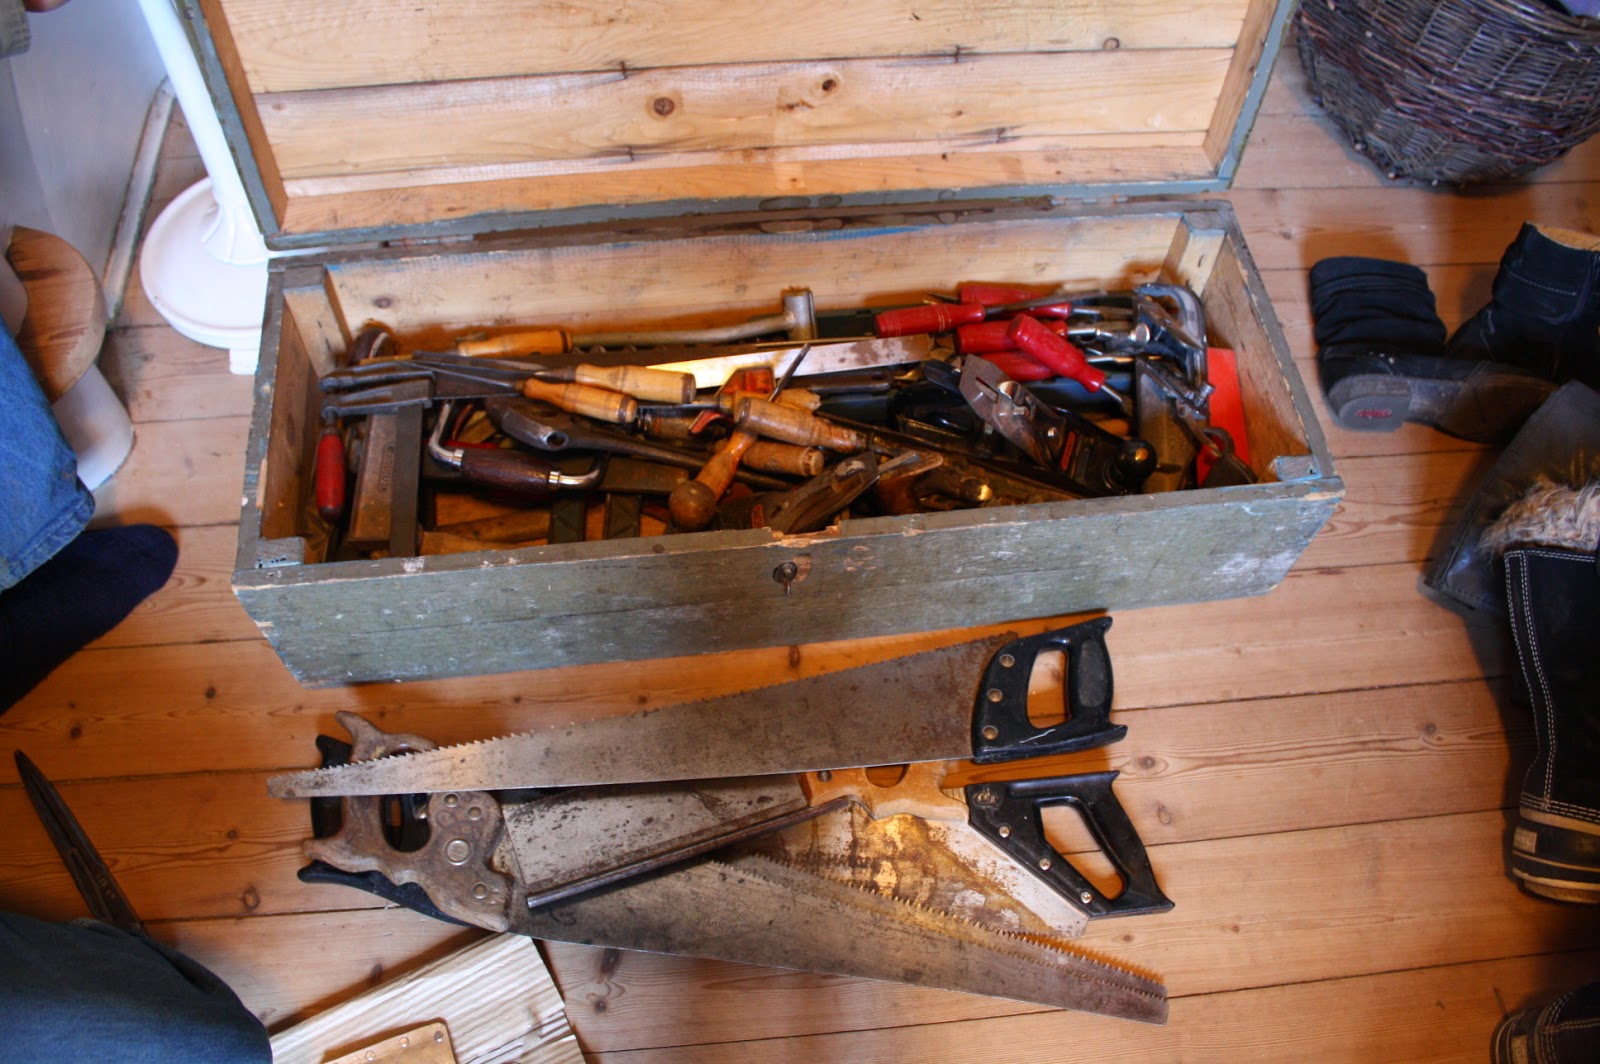
I got an old tool chest filled with tools from my parents for Christmas. My dad had bought it at an auction in Karlstad in Sweden not far from where they have a summer house.
The chest itself is nailed together, and it is fairly long and sleek. It looks like it has seen some work, it is worn but still in OK shape.

In addition to the chest, my dad gave me an old Danish produced slick that he had in his workshop. He made a small leather sheath to protect the edge.

I have spent a couple of hours sharpening some of the chisels and the slick, and generally just looking at all the old tools.

Here is a list of the content:

21 different drills/augers
9 metal chisels and drift pins
1 hinge bender
14 chisels ranging from 1/4" to 1½"
2 No 4 planes
1 No 5 plane
1 auger (practically new)
1 old Swedish rabbet plane
4 panel saws (rip + crosscutting teeth).
1 dovetail saw (Sandvik)
2 gouges.
3 adjustable wrenches 15" in length.
4 smaller adjustable wrenches.
2 long auger drills.
4 clamps.
2 squares (1 is adjustable)
3 hammers
2 saw set pliers.
1 marking gauge.
1 compass with quick release mechanism.
1 angle grinder. (which I traded with my dad for a No 7 Kunz jointer).
+ various bits and pieces.

HAPPY NEWYEAR

Meine Eltern haben mir als ein Weihnachtsgeschenk ein alte Werkzeugkiste voll von Werkzeug gekauft. Mein Vater hat es auf ein Auktion in Karlstad in Schweden gekauft. Das ist in die nähe von ihre Sommerhaus. 
Die Kiste ist ziemlich schmal und recht lang. Die ist mit Nageln gemacht und sieht aus wie ein alltags Kiste.

Mein Vater hat mir auch ein alte Dänisches Stoßaxt gegeben.

Ich habe ein paar Stunden in der Werkstatt gebraucht und bis jetzt habe ich an die alten Stemmeisen gearbeitet.

Hier ist eine Liste über das Einhalt in die Kiste:

21 verschiedene Bohrer
9 Metall Meißeln und Dornen.
1 Scharnier Gebogenwerkzeug.
14 Stemmeisen zwischen 6 mm und 38 mm.
2 No 4 Hobeln.
1 No 5 Hobel.
1 Bohrwinde.
1 alte Schwedische Falshobel.
4 Fuchsschwänzen.
1 Zinksäge (Sandvik)
2 Hohl Eisen.
3 Schraubenschlüssel 15" lang.
4 kleinere Schraubenschlüssel.
2 lange Bohrer rund 50 cm in länge.
4 Schraubenzwingen.
2 Winkel ( ist justierbar)
3 Hammer
2 Schränkzangen.
1 Streichmaß.
1 Spitzzirkel.
1 Winkelschleifer die ich mit ein Kunz No 7 Hobel tauschte.
+ Verschiedenes Kleinigkeiten.

PROST NEUJAHR

Toolchest with contents 

Slick / Stoßaxt

Tools :-)

Hinge bender.

HInge bender.

Tuesday, December 9, 2014

Maritime woodworking tools.

The title may be a bit misleading, because it is not about tools used to build maritime stuff, rather than tools I have used the past year for hobby woodworking on a ship.

As some of you may remember, I made a tool chest for the sea last year. During the last year I have built a couple of projects using the tool kit, so I feel that I can give an honest review of it.

The projects I have built have all been limited in size to something that could be transported as luggage on an air plane. The following is a list of the projects I have made on board. Some of them I finished at home, because I don't like to leave a project on board when I go home.

Seaborne chest
Cabinet with many drawers
A carved name sign
Fairy tale princess bed
Tumblehome sea chest.
The recent carved sign for Aslan Fenix
A Gerstner inspired tool chest.

We are only signed on for 4 weeks at the time, and things really have to go smooth for me to be able to finish a project in that time. sometimes we are prevented by the weather or fatigue, so woodworking out here for me is something I do to relax and get my mind to slow down. The process out here really is more important than the result.

The tool set I bring with me is stored in a home made tool chest. Due to the fact that it needs to go in my suitcase on the air plane, this chest had to be light and not too big.
I made it out of 5/16" thick larch that was dovetailed together. The top and bottom are made from 6mm birch plywood.
The chest has been damaged by luggage handlers throwing my bag around, but it still holds up. I have re glued it a couple of places earlier, and I can see that it is time for me to do it again.
I guess that I should have glued in some triangular reinforcements in all corners.

These are the tools of the ship that I use for my woodworking:

Hammer.
Multi purpose wood saw (Fuchsschwanz), doubles as a straight edge for marking lines.
Try square.
Clamp.
Hack saw which I normally use as a dovetail saw.
Measuring tape or folding rule.

Once in a while I use a drilling machine, but that is not very often, but those are on board as well.

My own tool set can be seen on one of the pictures below, and consists of:

3 chisels, 1/4", 1/2" & 1"
A small dozuki saw
Mallet.
2 brushes for glue
A jar of white glue
Plane
Smoothing iron for the plane
Scrub iron for the plane
Grooving plane
Marking gauge
Sanding block
Home made router plane with an extra narrow iron.
Oil stone for polishing
Pencil
Linoleum carving chisels (the newest addition to the chest)
Sandpaper grade 80 and 150 (as far as I remember)
Shooting board which is incorporated in the lid of the tool chest

I also bring a bit of hardware, all of it is in the small size:
Brass screws
Brass nails
Finishing nails.
Brass hinges (3 pairs)
An inset lock
Galvanized hinges (1 pair)
Turned drawer pulls (the dark stuff in a bag, they are very small)
A piece of a bone.
Some small pieces of cardboard to use for dovetail gauges.
A bit of emery cloth.

The only thing I have sometimes felt that I was missing is a jointer plane. But that has mostly been an issue if I had to glue up some sort of panels. Jointing two edges is not what a smoothing plane is designed to do.
Apart from that it is a pretty powerful tool kit when combined with the few items I need from the ship.
You can theoretically get by with only one clamp for work holding, but having more is advantageous in case you need to glue up something.

The tool I use the least is the 1" chisel, but I still like to use it for paring and if I make large dovetails.

The tool that makes the biggest difference is the scrub plane, or in my case the scrub iron for the smoothing plane. Being able to quickly process stock makes a huge difference.

Second on the list of tools that make a difference is the grooving plane. Because this enables you to make a wide variety of things: Tongue and groove boards, Grooves and dados, I even used it when I made a raised panel. The great thing with the grooving plane compared to a real plough plane is that at least the Stanley No 248 is so small that it will easily fit in a small tool set like this. I only have 1 iron for it (5/32"), but if I make multiple passes that doesn't pose a problem.

My conclusion is that the set is working pretty good for the type of projects that I do while on the water. But the tool chest itself should probably have been a bit sturdier made in the first place.


Damaged lid.

Lower chest cracked along the groove for the bottom.

Tools of the ship.

The line up of my own tools.

The shooting board.

Hardware assortment.

The tools neatly tucked in the chest.


Monday, December 8, 2014

Gerstner inspired tool chest, fall front hinge mechanism

This post was actually going to be about finishing the bottom drawer, and making some more drawers. But since my drawer stock has gone inter galactic WARP 1+ 2, I had to think of something else instead - The fall front.

As far as I have been able to see on pictures of Gerstner chests, and on their home page, they use some sort of bracket for the fall front mechanism.
Hardware is fine for me, but I didn't feel like making any for this project. Besides there had to be another solution.

Drilling a hole in each side and putting a dowel there was my first idea. The problem with this route is the fact that the dowel needs to be placed very low on the front, so the drill would likely wander off through the side. There was also the problem of how to get the front in place, and then plug in the dowels. There was no way I could tilt the front and still make contact with the dados for the hinge dowels.

Yesterday I had a revelation (OK maybe just a bright moment..), and today I tried it out in real life:
I made a groove in the bottom of the front.
Next I planed a small stick that fitted tight into the groove. I drilled some small pilot holes for the screw itself, and some bigger holes for the heads of the screws, so they could be sunk below the surface. That way I could finish the stick by planing it while it was in the correct position. That ensured a level surface with the front.

I then trimmed the ends of the stick to the correct length i.e. a little shorter than the depth of the dado where it would end up running.

The final step was to round the two protruding ends so they would fit in the dado. I used a chisel for the initial rounding and a piece of sandpaper for the final touch.

I unscrewed the dowel stick, and inserted it in the case of the tool chest. Then I brought up the lid to the stick and screwed it back into the front again.
The great thing about this approach is that:
1) It works.
2) It is cheap.
3) It is repairable

A thing that seems to be unrepairable though is the stock for my drawers. I have reached a conclusion, that I'll take the project with me home, and then I will make some drawers of some stock that is more stable. I could also go the spruce way for drawers, but I don't feel like doing that So I'll probably make the drawers out of some elm at home one day.


The fall front hinge.

The warp of the bottom drawer.

More warp on the next drawer front.

Saturday, December 6, 2014

Gerstner inspired tool chest, drawer with half blind dovetails.

Mario Rodriguez once wrote an excellent article for Popular Woodworking on how to make drawers.
He advocated re sawing the stock for the drawers, and then wait a couple of days before working on them, to make sure that all the stress was gone.
I pretty much tried to follow that advice on these drawers, but these boards were actually more twisted now than when I had just planed them. I guess Mr. Rodriguez has got access to better stock than dumpster wood.  Anyway, I can greatly recommend that article if you want some tricks from a pro on making really nice drawers.

I decided to soldier on despite the less than perfect stock. Otherwise the project would have sort of come to a halt.

Some wise man once said that grooving comes before dovetailing. I am not sure if it was Abraham Lincoln, or Niels Bohr, but regardless of who said it, it is still one of those advices that still hold true.

After cutting the stock to the desired lengths, I found my grooving plane and adjusted it, so I could start making the grooves for the drawer runners.
The wide grooves were made by readjusting the fence until I had reached the planned width of the grooves.
Next I adjusted the depth stop and the fence, and made a groove for the bottom. This groove was ploughed in both the front piece and the two sides.

I used my marking gauge to scratch a line on the ends of the boards so I had something to mark my dovetails from.

This is the first time I have made a drawer with a groove for a runner. I decided to put a pin where this wide groove is. Since it is in the middle, it looked OK to me. I guess the drawer will newer be used for a really heavy load, so two tails were deemed to be enough.

First I cut out the tails, which went smooth, since the only material that needed to be removed by chiselling was the middle part where the bulk was already missing due to the wide groove.

Next I drew the outline of the tails on the front board and sawed to my lines. A little bit of work with a chisel and I could make a test assembly of the first corner.

The dovetails came together at first try, but they are a little gappy. I guess the reason was that I never bothered to true up the corners before making them. They're all right for a project like this, and they'll hold. That is the most important thing.

The assembled corner.

Testing the drawer in the cabinet.


Friday, December 5, 2014

Carving a name sign with a utility knife, part 2

A couple of hours of work was all that required to complete the letters. There are a few tool marks left behind, but after all it is also a hand made sign, so it shouldn't necessarily look like it was moulded in plastic.

The profiles of horses at the ends of the board are my first attempt on carving something that elaborate. One of the challenges compared to letters is the fact that there aren't that many straight lines on a horse.

My first idea was to carve the horse in the same way as the letters, so the shape would be a depression. After looking at the horse I ruled that idea out. The ears and legs are pretty thin, so I think it would have looked strange to carve it that way.

Instead I decided to carve around the horse, so the horse itself will stand proud of the surrounding area.

For this part of the carving I had to stray away from the notion of using inly a utility knife.
This spring at the annual flea market held by the local shop in the village, I was given a small set of carving chisels that looks like they were intended to be used for carving linoleum .
They were far from sharp, and looked pretty cheaply made.
I guess they are from the 70'ies or the 80'ies, based on that they are made in Japan. Newer chisels of that sort would most likely be made in China or India.

I sharpened a pointed scalpel shaped chisel and a small gouge.

I traced the outline of the horse with the scalpel shaped chisel, and removed the material around the horse using the small gouge. This was actually easier that I had imagined, and I think the end result looks OK.

If I was going to paint the sign, I would paint the background red, the depressions should be white. That would give white letters and two red horses on a white background. I think that would look good. But it will be up to my friend if she wants to paint it or not.


The completed name sign.

My Linoleum carving chisels used for carving the horse profiles.

Wednesday, December 3, 2014

Carving a name sign with a hobby knife.

One of my good friends had to have her old horse put down due to old age. I had carved a name sign for that horse, and she asked me if I would make her another one in case she got herself a new horse.
I told her that I would be happy to make her a new sign for her future horse. About half a year ago, she told me that she had bought herself a new horse.

I was excited, and also a bit scared, because some horses have incredible long names, and I would hate having to carve a name like  "Vognmandsgårdens Marli" (An actual name of a pony that we once looked at).
Luckily my friend's new horse didn't have quite such a fancy name. Even though it isn't exactly short either.
Some breeds of horses have their own "symbol", and I have previously carved the symbol of Danish warm-blood horses, which is fairly straight forward: A crown and a wavy line below it.

Since her new horse is a mix of two different breeds, I opted for the logo of one of them: the logo of the PRE (Pura Raza Española) It is a horse seen in profile, and I think I'll be able to make it look OK.

I write the name I am going to carve in a Word document, and for my name previous carving projects I have used the font: Clarendon bold. But since it is not available on this computer, I have found another font that is OK for carving too: Mongolian Baiti size 160.

After printing out a document with the name, I tape it to the board I am going to carve. In this instance the board is made out of the longest step from the salvaged pilot ladder. This wood is rather soft, so it should be fine for my type of carving.
I measure the distance from the top and bottom of the letters to the edges of the board to make sure they are in the middle.

The next step is to take a hobby knife with a new blade. If it is of the break of type, I break of one piece of the blade to have a fresh edge.

Using a light cut, the letters are carved out of the paper. The trick is to use just enough pressure to leave a very fine line in the surface of the wood. Sometimes the letters are very close to each others, on this sign the lower part of the I and the X are almost touching. In that case I just move the line a bit so there will be a small space between the individual letters.
Once that is done, I remove the remains of the paper.

I start by cutting in the middle of the fat line on one of the letters. I try to hold the knife at an angle of approximately 60 degrees sideways.
Once I have obtained a small V shaped ditch, I gradually make it wider and deeper, taking care to maintain the centre of the V shaped ditch in the middle.

To get into the rhythm of carving again, I normally start on some of the easier letters. I.e. all the ones that are not round or curved. In this name the only difficult letter is the S.

I have decided to leave the horse profiles on for a little bit longer while I try to muster the courage to try carving them.

A good source of light will greatly aid the work.


The sign with taped on templates.

Carving out the letters of the templates.

Hard to see, but there are faint lines of the letters.

The approximate side angle  while carving.

The first steps of carving.